Thread breakage. Tension loops. Fabric puckering. Skipped stitches. Design drift. These problems show up repeatedly across every machine brand and skill level, and nearly all of them are fixable once you know what to look for.
This guide walks through the most common machine embroidery problems, their root causes, and how to fix them step by step — plus when to stop troubleshooting and call in a professional.
Key Takeaways
- Most embroidery failures trace back to six categories: thread breakage, puckering, tension issues, needle failures, bobbin problems, and design misalignment
- The majority of issues are fixable with a needle change, re-thread, tension adjustment, or stabilizer upgrade
- Small problems compound fast: a dull needle triggers thread breaks, thread breaks cause bird nesting, and bird nesting can damage your rotary hook
- Proactive maintenance (cleaning, oiling, needle replacement) prevents most repeat failures
- When basic fixes don't hold, professional repair is the faster, safer path
Common Machine Embroidery Problems
Most embroidery failures follow recognizable patterns. Knowing which problem you're dealing with makes the fix straightforward.
The five issues below cover the most common breakdowns: thread breakage, fabric puckering, tension problems, needle failures, and design misalignment.
Thread Breakage
Symptoms: Thread snapping mid-design, fraying near the needle eye, frequent stops
Likely causes:
- Old, low-quality, or improperly stored thread
- Incorrect threading path (especially with presser foot down)
- Needle too dull or wrong size for the fabric
- Top tension set too tight
- Burrs on the rotary hook catching the thread
Fabric Puckering
Symptoms: Fabric bunching or wrinkling around the design, visible gathering after removal from the hoop
Likely causes:
- Fabric stretched or distorted during hooping
- Wrong stabilizer type or weight for the material
- Design stitch density too high for the fabric
Thread Tension Problems
Symptoms: Loops on top of the design, bobbin thread visible on the front of the fabric, uneven or skipped stitches
Likely causes:
- Incorrect threading sequence — thread not properly seated in the tension disc
- Mismatched bobbin thread weight
- Lint buildup in the bobbin area disrupting tension consistency
Needle Failures and Skipped Stitches
Symptoms: Skipped stitches, holes in fabric, needle bending or breaking mid-run, thread shredding near the needle eye
Likely causes:
- Wrong needle type for the fabric (ball point vs. sharp point)
- Needle not fully seated or installed incorrectly
- Needle worn past its useful life — Tajima recommends replacing needles when they show signs of damage, dirt, or fabric incompatibility
Design Misalignment
Symptoms: Fill stitches and outlines not lining up, design elements drifting across multiple color stops
Likely causes:
- Fabric or stabilizer shifting under stitch load (under-stabilized)
- Fabric not hooped taut and flat
- Hoop shifting from vibration or loose mounting
Why These Problems Happen: Root Causes
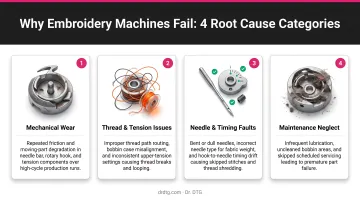
Symptoms vary, but most machine embroidery failures trace back to four root cause categories:
| Root Cause | Examples |
|---|---|
| Operational habits | Threading errors, wrong tension settings, poor hooping technique |
| Material mismatches | Wrong needle type, incorrect stabilizer, low-quality thread |
| Mechanical wear | Dull needles, burrs on the rotary hook, lint-clogged bobbin area |
| Inadequate maintenance | Skipped cleaning, missed lubrication, no proactive part inspection |
The compounding risk is what catches most embroiderers off guard. A slightly dull needle causes thread breaks. Thread breaks cause bird nesting. Bird nesting caught too late can knock the trimmer knife out of adjustment, bend trimmer components, or obstruct the movable knife entirely.
Melco's trimmer adjustment procedures specifically identify lint and thread buildup as a documented path from minor neglect to real mechanical damage.
A $0 fix, like changing a needle or cleaning the bobbin area, becomes a costly repair if ignored long enough.
Operating conditions compound these risks further. Running dense designs at high speed without adequate stabilization stresses components faster. Mechanical settings like presser foot height and wiper position also degrade gradually — easy to overlook until a pattern of failures makes the problem obvious.
How to Fix Common Machine Embroidery Problems Step by Step
Jumping straight to adjustments without identifying the specific problem leads to chasing symptoms. This process is designed to isolate the cause, apply the right fix, and confirm it holds.
Step 1: Identify the Exact Symptom
Before touching any setting, observe carefully:
- Is the thread breaking at the needle, at the hook, or during trimming?
- Is puckering happening inside the hoop or only after removal?
- Are skipped stitches random or concentrated in one part of the design?
- Does the problem appear at startup, during dense fill sections, or only at color changes?
Document the conditions: thread type, needle size, fabric, and stabilizer. Pattern recognition here cuts diagnostic time considerably.
Step 2: Isolate the Root Cause Category
Determine whether the issue is:
- Thread/material-related — wrong supplies for the job
- Mechanical — worn or misaligned parts (rotary hook, picker, wiper, trimmers)
- Technique-related — hooping errors, threading sequence, incorrect settings
- Maintenance-related — lint buildup, missed lubrication
Rule out simple causes first. Re-thread from scratch, change the needle, and clean the bobbin area before assuming anything mechanical has failed.
Step 3: Apply the Correct Fix
For thread breakage:
- Re-thread completely
- Replace the needle with the correct type and size for your fabric
- Check the rotary hook for burrs — drag a cotton ball across it; snags indicate a burr
- Reduce top tension slightly if thread snaps under load
- Switch to a quality polyester thread if bargain stock is causing breaks — Isacord (available through Dr. DTG) is a trilobal continuous-filament polyester designed to run smoothly at high speed through dense stitch counts
For puckering:
- Check hooping first — never stretch fabric into the hoop
- Match your stabilizer to the fabric: OESD's stabilizer guide identifies cut-away as the correct choice for knits and stretch fabrics; tear-away works for stable wovens like cotton and denim
- Add a second stabilizer layer or increase weight for high-density designs
- Use a light mist of temporary adhesive spray to anchor fabric to stabilizer before hooping
For tension issues:
- Verify the thread is fully seated in the tension disc before starting — Brother's PR670E documentation specifically requires the thread to be securely caught in the disc after threading
- If upper tension is too high, the thread can't travel properly; decrease it and confirm the tension disc rotates when you pull the thread by hand
- Check that the bobbin is wound evenly and inserted correctly per your machine manual
- Clean lint from the bobbin area before making any dial adjustments
- Verify thread weights match your machine's requirements: 40-50 weight upper thread and 90 weight bobbin thread is standard for embroidery-only machines
For needle-related issues:
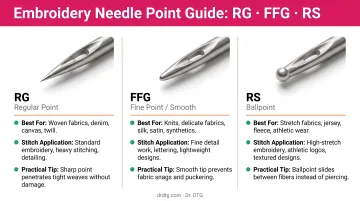
- Replace immediately with the correct needle type:
- RG point — standard for single and multi-head embroidery on knits, wovens, and microfiber
- FFG/FG point — best for fine-to-medium knits, jersey, and elastane blends
- RS point — for fine, densely woven fabrics requiring precise piercing
- Ensure the needle is fully seated with the flat side facing the correct direction per your machine manual
- Dr. DTG stocks Groz-Beckert needles for commercial multi-needle machines, including the 75/11 RG for universal embroidery applications
For design misalignment:
- If drift happens mid-design, the stabilizer is likely failing under stitch load — upgrade to a heavier or more rigid backing
- Ensure fabric is hooped flat and taut without distortion
- For items that can't be hooped directly, use the floating technique with adhesive spray, being careful not to stretch the fabric during placement
Step 4: Test and Validate the Fix
Run a test on scrap fabric matching your production material and design density. Watch the first 30–60 seconds closely for thread breaks, tension irregularities, or drift. Confirm the fix holds through a complete design run — including color stops and trim cycles — before returning to production.
When to Fix It Yourself vs. Call a Professional
Most embroidery machine issues are DIY-fixable. The decision point is whether the root cause is a setting or supply issue — or an internal mechanical failure.
Fix it yourself when:
- The problem resolves after re-threading, changing the needle, or adjusting tension
- Switching stabilizers or cleaning the bobbin area eliminates the issue
- The fix holds through a full test run
Call a professional when:
- Thread keeps breaking after all basic fixes have been applied
- The rotary hook shows timing issues or visible damage
- Error codes persist after a reset
- The machine makes unusual mechanical sounds
- Trimmer or wiper mechanisms appear bent or are not actuating correctly

If your machine falls into that second category, professional repair is the faster path to getting back in production. Dr. DTG offers commercial embroidery machine repair across the USA — on-site for Southern California customers and return-to-depot for other states. The in-house technician team handles mechanical failures including hook and trimmer issues, with OEM parts stocked in California for faster turnaround. Call 714-770-0969 or submit a repair ticket at drdtg.com/submit-ticket.
Preventive Maintenance Tips
Consistent maintenance is what separates embroiderers who are always troubleshooting from those who run smooth, reliable production. A few minutes of prevention routinely beats hours of reactive repair.
Establish a routine:
- Clean lint from the bobbin area and hook race after every project or every few hours of run time — Melco's maintenance documentation recommends cleaning the rotary hook and trimmer assembly at least once daily
- Oil according to your machine's schedule (Melco specifies 1 drop every 200,000 stitches for uncoated hooks, 1 drop every 600,000 stitches for coated hooks)
- Replace needles proactively — don't wait for breakage; by the time a needle snaps, it has already been causing subtle stitch quality degradation
- Store thread in a cool, dry location away from direct sunlight, heat, and humidity — Madeira advises these same controls to maintain thread integrity over time
Before starting any project, take two minutes to audit your supplies — catching a mismatch here prevents far bigger headaches mid-run:
- Confirm thread weight, needle type, and stabilizer are matched to the fabric
- Verify the bobbin is wound evenly and the thread weight is correct for your machine
- Check needle condition visually — if it looks worn or dull, replace it
Frequently Asked Questions
Why isn't my embroidery machine working?
Most startup failures come down to one of four things: incorrect threading, a dull or wrong-type needle, tension settings out of calibration, or lint buildup in the bobbin area. Re-threading from scratch, swapping the needle, and cleaning the bobbin area resolves the majority of issues before any deeper diagnosis is needed.
Why does my embroidery thread keep breaking?
The most common causes are an incorrectly routed thread path, a dull or wrong-type needle, top tension set too high, or burrs on the rotary hook. A complete re-thread and fresh needle resolves most cases. If breaks persist, switching to a quality polyester thread like Isacord reduces the problem significantly.
How do I fix tension problems on an embroidery machine?
Tension issues almost always start with threading. Re-thread completely, making sure the thread is fully seated in the tension disc, then clean the bobbin area before adjusting any dial. Bobbin thread visible on top signals a top-thread problem; loops on top signal a bobbin issue.
Why is my embroidery puckering after I remove it from the hoop?
Post-removal puckering typically means the fabric was stretched or distorted during hooping. Puckering that's visible while still in the hoop points to an under-stabilized setup. Fix the hooping technique — never stretch fabric into the frame — and upgrade to a heavier or more appropriate stabilizer for the fabric type.
How often should I replace the needle on my embroidery machine?
Replace the needle when it shows visible wear, such as being dirty, bent, or dull, and don't wait for it to break. SCHMETZ recommends changing after roughly 8 hours of sewing use as a practical baseline. Skipped stitches and thread fraying are signs the needle is already overdue.
When should I call a professional to repair my embroidery machine?
Call a professional when thread keeps breaking after all basic fixes have been exhausted, error codes persist after a full reset, the machine makes unusual sounds, or internal components like the rotary hook, trimmer, or wiper show visible damage or timing problems. Attempting DIY repair on these issues risks worsening the damage and increasing repair cost.