The good news: most embroidery machine jams trace back to a handful of fixable causes. Threading errors, tension imbalances, lint buildup, winding problems, and thread quality issues account for the vast majority of cases—and each has a clear solution.
This guide covers how to identify which problem you're dealing with, how to fix it correctly, when to replace components rather than adjust them, and how to prevent jams from coming back.
Key Takeaways
- Most bobbin jams fall into five categories: threading errors, tension imbalances, lint buildup, winding problems, or thread quality issues
- Diagnosing the root cause before attempting a fix prevents repeat jams
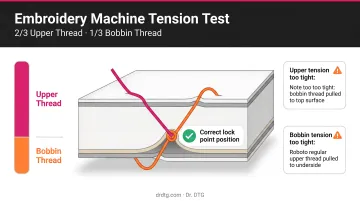
- Barudan's verified tension benchmark: two-thirds upper thread, one-third bobbin thread visible on the back of a test stitch
- Clean the bobbin case at every bobbin change to prevent lint-driven tension problems
- Replace needles every 8 hours of run time to avoid deflection jams
- Persistent jams after full troubleshooting indicate mechanical wear requiring professional service
What Is a Bobbin in an Embroidery Machine?
The bobbin supplies the lower thread that interlocks with the upper needle thread to form each stitch. According to Barudan's sewing head manual, the needle rises 2–3 mm from bottom dead center, forming a loop behind the needle, and the hook point captures that loop to create the lockstitch. Without precise timing between the hook and the bobbin, stitch formation breaks down.
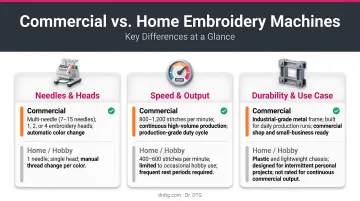
Commercial embroidery machines differ from home sewing machines in ways that make bobbin setup more demanding:
- High operating speeds — commercial machines like the Happy Japan HCD3E-X1501 run sustained production cycles that home machines simply aren't built for
- Format-specific bobbins — commercial machines require Style L or Style M bobbins, not the generic sizes sold for home sewing
- Sustained production runs — continuous output puts greater stress on the bobbin system, making lint buildup, winding quality, and tension calibration far more critical
Getting these details right from the start prevents most of the jamming issues covered in this guide. Always use machine-compatible bobbins and embroidery-specific bobbin thread — the wrong format introduces tension problems that no amount of adjustment will fix.
Common Bobbin Jamming Problems in Embroidery Machines
Most jams follow predictable patterns. Identifying which pattern applies is the fastest path to a fix.
Problem 1: Thread Bunching ("Bird's Nest") Under the Fabric
You'll usually notice this when the design stops or you flip the fabric over — a tangle of looped thread has collected underneath.
According to Barudan and ColDesi, bird's nesting results from unbalanced tension, hooping problems (flagging), or a hook assembly issue. When the upper thread bypasses part of the tension path, excess thread collects below the fabric instead of interlocking properly with the bobbin thread.
Problem 2: Bobbin Thread Visible on Top
Bobbin thread pulled up to the top surface creates visible loops or color bleed from the underside — easy to spot, straightforward to diagnose.
The cause is almost always upper thread tension set too tight relative to bobbin tension, or the upper thread skipping a tension guide. As a rule, correct upper tension should make the upper thread slightly visible on the wrong side of the fabric. If bobbin thread is showing on the right side, the upper thread is too tight.
Problem 3: Bobbin Runs Out or Tangles Mid-Design
Signs this is happening:
- Stitching stops suddenly with no needle break
- Thread breaks beneath the hoop
- An error alert fires mid-run
The likely culprit is an unevenly wound bobbin or low-quality thread that sheds lint and weakens under sustained tension. Brother's winding instructions specifically warn that thread not cut with the bobbin-winder cutter can tangle and cause needle breakage when the bobbin thread runs low.
Problem 4: Jams Right at the Start of a Design
A thread nest forming within the first few stitches — every single time — points to one specific cause: unsecured thread tails.
When upper or bobbin thread tails aren't held down at the start, the needle pulls them into the bobbin area on the first pass. Digitized lock stitches (three to four consecutive stitches at column starts) anchor the thread before the design runs and eliminate this problem reliably.
Problem 5: Jams With Unusual Noise or Needle Deflection
Symptoms here are harder to miss:
- Grinding or clicking sounds during embroidery
- Visible needle deflection on descent
- Sudden, severe jams
Lint or debris in the bobbin race is the most common cause, but also check for a burr on the bobbin case or incorrect case seating. Barudan's ZQ head manual states that burrs, nicks, and rough spots should be polished with very fine emery cloth. Thread buildup behind the hook can push it out of alignment, causing birdnesting or needle breaks.
How to Fix a Jamming Embroidery Machine Bobbin
Work through these four steps in order to clear the jam and prevent it from coming back. Skipping ahead before confirming the root cause is the most common reason the same jam returns.
Step 1: Power Off and Clear the Jam Safely
- Turn off the machine completely before touching anything
- Raise the needle to its highest point using the handwheel, then raise the presser foot
- Open the bobbin cover and snip tangled thread carefully. Pulling forcefully can damage the hook or bobbin case, so cut first.
- Brush lint from the bobbin area with a small lint brush; avoid compressed air, which pushes debris deeper into the mechanism
Step 2: Identify the Root Cause
Before applying any fix, inspect:
- The bobbin: look for uneven winding, overfilling, or visible thread damage
- The upper thread path: confirm the thread passes through every guide, through the take-up lever, and through the tension discs; rethread with the presser foot raised
- The needle: check for bends, dull tip, or incorrect installation (flat side facing the correct direction per your machine's manual)
- The bobbin case: run a fingernail along the interior edges to feel for scratches or burrs; check that it seats securely
Step 3: Apply the Correct Fix
If the issue is threading: Rethread from scratch following your machine manual's exact path. Hold both thread tails (upper and bobbin) before starting the design to prevent them from being pulled down on the first stitch. Use digitized lock stitches at design starts for more reliable anchoring.
If the issue is tension: Reset the upper tension to the machine's default and test on scrap fabric using two contrasting thread colors. Barudan's manufacturer benchmark: two-thirds upper thread and one-third bobbin thread visible on the back of a test stitch. Impressions Magazine confirms that if bobbin thread appears on the top surface, upper tension is too tight; excess upper thread on the underside means it's too loose.
For bobbin tension, make micro-adjustments to the bobbin case screw, less than a quarter turn at a time. For specialty threads, Madeira recommends slightly tighter upper tension for metallics, while rayon's smooth construction generally requires fewer adjustments.
Thread consistency also plays a role. Shops running Isacord 40-weight polyester, available from Dr. DTG as the USA Master Distributor, see fewer thread breaks because its modified cross-section fiber holds consistent tension at high speeds.
If the issue is the bobbin: Rewind using the machine's bobbin winder and cut the thread with the bobbin-winder cutter as Brother specifies, which prevents tangling when thread runs low. Insert the bobbin so thread unwinds in the correct direction per your manual (typically counterclockwise). Ensure the bobbin is fully seated before closing the cover. For high-volume shops, pre-wound bobbins eliminate winding inconsistency entirely.
If the issue is lint or debris: Remove the bobbin case and needle plate for a thorough cleaning. Inspect the hook race for buildup. Smooth any minor burrs with fine emery cloth. Oil the hook raceway as specified: Barudan recommends one small drop every 4–8 operating hours, while ZSK's maintenance manual calls for 1–2 drops daily.
Step 4: Test and Validate
Rethread completely, insert a fresh needle if there's any doubt about its condition, and run a short test design on scrap fabric before returning to the project. Watch both sides of the fabric. Monitor the first 50–100 stitches carefully. If the jam recurs, loop back to Step 2, because the root cause hasn't been fully resolved.
When to Fix vs. Replace Your Bobbin Case
The bobbin case is a precision component. Repeated jams, especially with thread snagging or unusual noise, may indicate it's beyond adjustment.
| Situation | Action |
|---|---|
| Tension can be recalibrated with the tension screw | Fix |
| Case seats securely and aligns correctly with the hook | Fix |
| Minor roughness on thread path interior | Polish with fine emery cloth |
| Visible scratches or burrs that cannot be smoothed | Replace |
| Tension spring is bent or broken | Replace |
| Case no longer seats securely | Replace |
| Jams persist after correct threading, tension adjustment, and cleaning | Replace |
Madeira lists worn bobbin cases as a production slowdown risk—if the case repeatedly misaligns or keeps causing snagging after cleaning and tension reset, replacement is the right call.
Dr. DTG stocks OEM bobbin cases for both the Xtreme Tech XTPro (1401Ci, 1501 IPX, 1502 IPX, 1504 IPX) and Happy Japan (HCH Plus, HCD3E-X1501) lines from their Brea, California facility. For machines outside Southern California, return-to-depot repair is available—call 714-770-0969 or submit a ticket at drdtg.com/submit-ticket with your machine model and issue description.
For machines that continue jamming despite bobbin case replacement and full troubleshooting, the problem may lie in hook timing or internal mechanical wear. That requires professional diagnosis.
When repair costs start stacking up on older equipment, replacement often costs less over time than continued servicing. Production shops in that position frequently find the Happy Japan HCD3E-X1501 or Xtreme Tech Pro 1501 IPX a more reliable path forward than chasing down recurring mechanical failures.
How to Prevent Bobbin Jams From Recurring
Common Mistakes to Avoid
- Using sewing thread (or mismatched bobbin thread weight) in an embroidery machine introduces inconsistent tension and excessive lint. Use thread designed specifically for embroidery
- Neglecting needle replacement: Madeira's needle guide puts average needle life at 8 hours, and commercial embroiderers typically swap needles every 8 hours or after three consecutive thread breaks. A dull needle drags fabric and strains the bobbin system
- Skipping the lint brush: thread wax and dust collect around the bobbin-case tension spring hole and cause incorrect tension (Brother's documentation confirms this specifically)
Preventive Maintenance Schedule
| Task | Frequency |
|---|---|
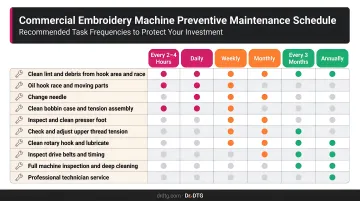
| Brush lint from bobbin area, tension path, and under needle plate | After every project |
| Check needle for bends or dullness | After every project |
| Clean bobbin case | Every bobbin change |
| Clean rotary hook and surrounding area | Daily |
| Oil hook raceway | Daily (1–2 drops) or every 4–8 operating hours |
| Replace needle | ~8 running hours or after 3 consecutive thread breaks |
| Professional inspection (hook timing, belts, internal alignment) | Annually or at first sign of mechanical change |
Dr. DTG stocks Groz-Beckert needles, bobbins, bobbin cases, and the full 390-color Isacord thread catalog, so you can replenish maintenance supplies and thread in one order.
Conclusion
The vast majority of embroidery machine bobbin jams are preventable and fixable. Threading errors, tension imbalances, lint buildup, winding problems, and thread quality issues cover most cases—and each has a clear, actionable solution.
Diagnosis is what separates a one-time fix from a recurring problem. Skip the root cause, and the jam comes back. Follow this sequence every time:
- Work through the inspection steps in order
- Apply the right fix for the identified cause
- Test on scrap fabric before returning to production
- Build the maintenance habits that prevent the next jam
Consistent process is what keeps your machine running—and your production on schedule.
Frequently Asked Questions
Why does my embroidery machine keep jamming underneath?
Thread bunching underneath (bird's nesting) is almost always caused by the upper thread not being correctly routed through the tension path, so excess thread collects below the fabric instead of interlocking with the bobbin thread. Rethreading from scratch and holding both thread tails before starting the design resolves most cases.
How do I know if my bobbin tension is too tight or too loose?
Use Barudan's benchmark: two-thirds upper thread and one-third bobbin thread should be visible on the back of a test stitch — run it with two contrasting thread colors to make the ratio easy to read. If bobbin thread appears on the top surface, upper tension is too tight; loops or bunching underneath mean it's too loose.
How often should I clean the bobbin area on my embroidery machine?
Brush the bobbin area after every project and clean the bobbin case at every bobbin change — thread wax and lint around the tension spring hole are a direct cause of tension problems. High-volume users should also do a deeper clean (removing the bobbin case and needle plate) daily.
Can using the wrong thread cause my embroidery machine to jam?
Yes. Old, frayed, or inconsistently wound thread sheds lint, breaks under sustained tension, and clogs the thread path. Thread engineered for embroidery machines—with consistent weight, smooth finish, and appropriate dtex range—reduces jam risk compared to generic sewing thread.
When should I replace my bobbin case instead of adjusting it?
Replace when there are visible scratches or burrs that cannot be smoothed, when the tension spring is bent or broken, or when jams persist despite correct threading, tension adjustment, and cleaning. Those signs indicate wear that recalibration cannot fix.
Why does my embroidery machine jam only at the start of a design?
Start-of-design jams are typically caused by loose thread tails being pulled into the bobbin area on the first stitch. The fix: hold both thread tails firmly as the machine takes its first few stitches, or use digitized lock stitches (three to four consecutive stitches) at the start of each design element if your software supports it.