Introduction: Why Embroidering Hats Isn't Like Embroidering Anything Else
According to PPAI's 2024 sales data, caps and hats grew from 7.2% to 9% of U.S. promotional products sales — overtaking bags and travel accessories for third place. Custom sports teams, branded merchandise, and small-batch personalized caps are all driving that demand.
The catch? Hat embroidery is genuinely harder than flat-garment work. A curved sewing surface, a usable design area of roughly 2.25" high x 4" wide, thick seams, and an interior sweatband all create challenges that flat-garment techniques simply don't prepare you for.
This guide covers what to look for in a hat embroidery machine, how machine type affects your results, hooping and stabilization, digitizing rules, and what it actually costs to build a hat embroidery business. Work through it and you'll move from frustrated first attempts to consistent, professional output.
TLDR: Quick Takeaways
- Cap frames are required for hat embroidery — flat hoops can't conform to curved surfaces
- Multi-needle commercial machines are the industry standard; single-needle setups require significant workarounds at low volume
- Always digitize bottom-up and center-outward to prevent buckling on curved surfaces
- Use tear-away stabilizer for structured caps and cut-away for unstructured or stretchy hats — stabilizer choice trips up most beginners
- Practical cap embroidery speed is around 600 SPM, not the maximum SPM listed on spec sheets
Key Features to Look for in a Hat Embroidery Machine
Not every embroidery machine is engineered for hats. The curved sewing surface, thick cap seams, and interior geometry require specific hardware features — the wrong machine will cause constant thread breaks, misaligned designs, and wasted hats.
Dedicated Cap Frame and Hoop System
The most critical hardware requirement is a 270° cap frame (also called a wide-angle cap frame) that wraps around the hat's cylindrical shape. Melco's specifications illustrate the difference clearly: a wide-angle cap frame measures 14.1" x 3.25", while a conventional cap frame covers only 5.9" x 2.75" — far less curved-surface coverage.
A complete cap frame system has three components that must work together:
- Driver rotates with the hat over the machine arm
- Cap frame holds the hat securely against the driver
- Jig locks in accurate, repeatable hooping alignment
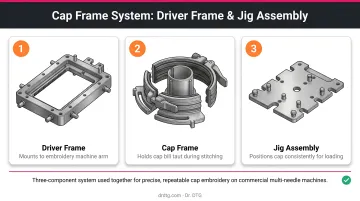
Machines with a cylindrical lower arm maintain a more consistent relationship with the hat's natural round contour throughout the stitch cycle, which improves stitch quality compared to flat-bed machine architectures.
Needle Count, Speed, and Stability
Multi-needle machines (10–16 needles) are strongly preferred for hat work. Pre-loaded thread colors eliminate constant manual re-threading between color changes, which matters whenever a logo runs four or five colors.
Speed settings are worth understanding carefully. Manufacturer specs often list 1,000–1,200 SPM as a capability ceiling for commercial machines, but practical guidance from Ricoma and ColDesi consistently recommends 600 SPM as the working rule of thumb for hat embroidery. Running faster through thick buckram and dense seams increases thread breakage and needle stress without improving output quality.
Design Import, Editing, and Software Compatibility
Hardware specs only get you so far. The software and connectivity layer determines how quickly you can load designs, preview placement, and catch problems before they reach a hat. Key features to look for:
- Common file format support (.DST, .PES, .EXP) for design compatibility
- USB or Wi-Fi transfer for fast file loading
- Onboard color touchscreen (at least 3.5") for previewing placement and stitch paths before committing to a hat
- Automatic thread-cut and thread-break detection to minimize supervision in production runs
- Adjustable presser feet for varying fabric thickness across cap types
Single-Needle vs. Multi-Needle: Which Machine Is Right for You
The core trade-off is entry cost versus production capability. Single-needle machines lower the barrier to starting; multi-needle commercial machines are built for consistent hat embroidery at any real volume.
Entry-Level Single-Needle Machines
Single-needle machines can technically embroider hats, but they come with real constraints that add up fast at any volume:
- One color at a time — each color change requires manual re-threading
- Slower throughput — approximately 650 SPM under typical conditions
- No rotating cap driver — affects stitch geometry on curved surfaces
- Lower durability for repetitive thick-fabric work
Every hat requires careful individual setup, and workarounds only go so far. For anyone testing demand on a tight budget, a single-needle machine is a starting point — not a long-term production solution.
Best for: Hobbyists, custom gifts, or validating demand before investing in commercial equipment.
Commercial Multi-Needle Machines
Commercial multi-needle machines (7–15 needles) handle thick seams reliably, manage multi-color logos without manual intervention, and sustain consistent quality across high volumes. Dr. DTG carries two commercial lines purpose-built for this work:
- Happy Japan series (HCH Plus 7-needle, HCD3E-X1501 15-needle, 4-head options) — includes rotating cap frame compatibility and cap-specific engineering as standard, not an add-on
- Xtreme Tech XTPro line (1401Ci 14-needle, 1501 IPX 15-needle, multi-head configurations) — strong throughput with a 7-year warranty option and on-site customer training
Both lines are available with financing, trade-in valuation, and personalized post-purchase support.
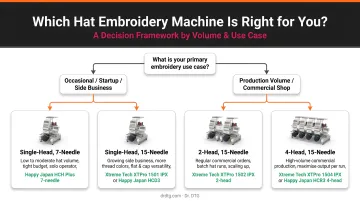
Simple decision framework:
| Volume / Use Case | Recommended Machine Type |
|---|---|
| 1–10 hats/week, simple designs | Single-needle with cap hoop attachment |
| 10+ hats/week, multi-color logos | Multi-needle commercial machine |
| Hat embroidery as primary revenue | Multi-needle commercial machine |
Hooping and Stabilization Techniques for Hat Embroidery
Even the best machine produces poor results on a badly hooped hat. Misalignment, puckering, and design drift almost always trace back to hooping errors or wrong stabilizer choice — not machine malfunction.
Structured vs. Unstructured Caps
Structured caps (snapbacks, sports caps with fused buckram backing):
- The buckram provides built-in stability
- A single layer of tear-away stabilizer is sufficient
- Always align the center seam to the center mark on the cap frame — this single step determines whether your design is centered or not
Unstructured caps (dad hats, collegiate styles without buckram):
- Require at least one layer of heavy cut-away stabilizer
- The fabric moves under the needle without buckram support, distorting the design
- Secure stabilizer to the cap frame with double-sided tape before hooping to prevent slipping
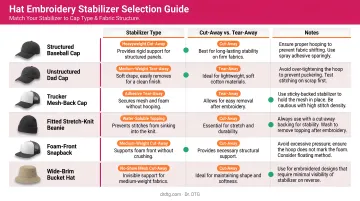
Stabilizer Selection and Application
| Cap Type | Stabilizer Choice |
|---|---|
| Structured with buckram (cotton/twill) | Tear-away stabilizer |
| Unstructured or stretchy fabric | Cut-away stabilizer |
| Mesh or textured surface | Water-soluble topping over primary stabilizer |
Once your stabilizer is secured, one more step prevents wasted hats: orient the bill away from the machine body, then use the machine's trace function to simulate the stitch path. Verify the design clears the sweatband before starting. Skip it, and designs consistently land too low.
Design, Digitizing, and Thread Tips for Hat Embroidery
The Digitizing Rule That Prevents Most Mistakes
According to Impressions Magazine, the fundamental rule for cap digitizing is center-out and bottom-up. Here's why it matters: a hat's curved surface has the most stability at the bottom (near the brim) and the least at the crown. When stitches start at the top and move downward, they push fabric that has nowhere stable to go, causing buckling and design drift. Starting from the center and stitching outward and upward locks the fabric progressively into place.
Design Size and Density Constraints
Keep front-panel designs within these boundaries:
- Standard caps: 2.25" tall x 4" wide maximum
- Larger cap profiles: up to 2.5" tall x 4.5" wide
- Low-profile or slanted caps: 2" tall x 3.5"–4.5" wide
Stitch density should be reduced compared to flat-garment work — cap fabric under tension near seams and the brim edge puckers more easily than a t-shirt. Adjust density conservatively and test on a scrap hat before production runs.
Thread and Needle Selection
Thick cap fabrics stress thread harder than flat garments, so thread choice matters. Polyester thread like Isacord (40wt, trilobal polyester, abrasion-resistant) handles this consistently and is the go-to for commercial hat work.
Dr. DTG is a Master Distributor of Isacord thread in the USA, stocking the full 390-color catalog in 1000m ($5.29/spool) and 5000m ($9.95/spool) sizes — useful for shops building out a reliable thread inventory.
Needle recommendations from Madeira and Impressions Magazine:
- 75/11 sharp or RG needle — standard choice for most hat fabrics
- 80/12 sharp or titanium needle — for thick structured caps with heavy buckram
- Change needles when stitch quality declines — Madeira cites approximately 8 hours of running time as average needle life; caps dull sharp points faster than flat fabric work
Dr. DTG stocks both Groz-Beckert 75/11 RG needles ($28.00 per box of 100) and 80/12 KK needles for 3D foam and heavy-fabric applications.
What It Takes to Start a Hat Embroidery Business
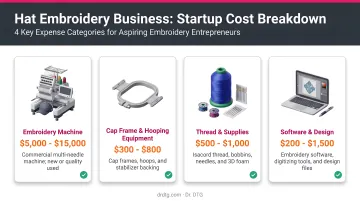
Realistic Startup Costs
Startup costs vary significantly by machine class. Here's what current public pricing looks like for key components:
| Item | Approximate Cost |
|---|---|
| Cap frame driver kit (e.g., Melco wide-angle kit) | ~$1,585 |
| Digitizing software (Hatch, entry to professional) | $199–$1,199 |
| Blank structured caps (wholesale) | $3.50–$11+ per unit |
| Digitizing setup fee (one-time per design) | $25–$35 (industry examples) |
Commercial multi-needle machines are priced on request — contact Dr. DTG at 714-770-0969 for current pricing on the Happy Japan series and Xtreme Tech Pro 1501, along with financing options.
Pricing Your Hat Embroidery Services
Custom hat embroidery services typically charge in the range of $15–$20 per hat at production quantities — Custom Ink's published pricing for embroidered hats runs approximately $15.90–$19.64 each for orders of 30. A one-time digitizing setup fee ($25–$35) usually applies to new designs.
How you structure the business determines how that pricing translates into profit. Two models dominate:
- Service orders — customers supply their own blanks (or you source them per order); lower upfront capital, but revenue depends on consistent order flow
- Product line — you stock branded inventory and sell direct; higher capital commitment, but stronger margin per unit and repeat purchase potential
Why Your Equipment Vendor Matters
Equipment downtime kills revenue in a hat embroidery business. A machine sitting idle for two weeks waiting on a repair is two weeks of orders you can't fill.
Dr. DTG backs the Happy Japan series and Xtreme Tech Pro with direct, responsive support — not a call-center queue. For first-time business owners, that relationship matters as much as machine specs:
- On-site service for Southern California customers
- Return-to-depot repair for all other US states
- In-house technicians using OEM parts (no third-party guesswork)
- Over 20 years of service history on the equipment they sell
Frequently Asked Questions
Can a single-needle embroidery machine embroider hats?
Yes — with a cap hoop attachment, a fixed-hoop approach, and careful setup. Single-needle machines are limited to one color at a time, run slower, and require more manual intervention per hat. They work for low-volume personal projects but aren't practical for consistent business volume.
What type of hoop do I need to embroider a hat?
Hat embroidery requires a dedicated cap frame system with three components: a driver, a cap frame, and a jig. Standard flat hoops don't work on curved surfaces. Most commercial machines include a cap frame or offer one as an add-on; entry-level single-needle machines typically require a separate purchase.
What stabilizer should I use for hat embroidery?
Use tear-away stabilizer for structured caps with buckram backing. For unstructured or stretchy hats, cut-away stabilizer holds better since the fabric can shift under the needle — doubling the layer adds extra support on highly flexible styles.
What needle size is best for embroidering hats?
A 75/11 sharp or RG needle works for most hat fabrics. Use an 80/12 sharp or titanium needle for thick, heavily structured caps. Replace needles when stitch appearance deteriorates, as caps dull needle points faster than flat fabric work.
What is the best hat type to start embroidering on?
Structured caps with fused buckram backing — sports caps, trucker hats — are the easiest starting point. The buckram acts as a natural stabilizer, making hooping and alignment more forgiving before you develop a feel for unstructured cap behavior.
How much does it cost to embroider a hat?
Custom embroidery services typically charge $15–$20 per hat plus a one-time digitizing fee of $25–$35 for new designs. Shop owners running their own machines bring ongoing costs down to thread, stabilizer, and blank caps.