The good news: most tension problems follow recognizable patterns, and once you know what you're looking at, the fix is usually straightforward. This guide walks through diagnosing upper thread vs. bobbin issues, correcting each one step-by-step, and preventing the problem from coming back.
Key Takeaways
- Tension problems split into two categories: upper thread and bobbin — identify which before touching any dial
- Loops on the underside = upper thread too loose; bobbin thread visible on top = upper thread too tight
- Fix sequence: re-thread first, adjust tension, then test with a satin stitch and verify the 1/3 rule on the back
- Replace the needle before assuming a machine fault when thread keeps breaking
- Consistent-diameter thread (like Isacord 40wt polyester) reduces how often you need to recalibrate
Understanding Thread Tension: Upper vs. Bobbin
Every embroidery stitch is formed by two threads meeting inside the fabric. The upper thread feeds down through the needle; the bobbin thread comes up from below. For a stitch to lock correctly, both threads must pull against each other with equal force — if either side is off, the lockpoint shifts to the surface or the underside.
Upper thread tension is controlled by the tension discs and a dial or spring bar on the machine head. Bobbin tension is set by a small screw on the bobbin case. These two systems work independently, which means either one can be the culprit when stitches go wrong.
The 1/3 Rule
The standard diagnostic for satin or column stitches: flip your embroidery over and look at the back.
- Correct tension: approximately 1/3 bobbin thread down the center, 1/3 top thread on each side
- Too much upper tension: bobbin thread gets pulled to the top; underside looks mostly top thread
- Too little upper tension: top thread loops loosely on the underside
According to Madeira USA, this 1/3 bobbin / 2/3 top thread distribution is the target for proper satin stitch tension — and it's the fastest visual confirmation that your calibration is correct.
This rule applies specifically to satin and column stitches. Fill stitches and running stitches have different geometry and won't show the same ratio.
Common Thread Tension Problems and Their Causes
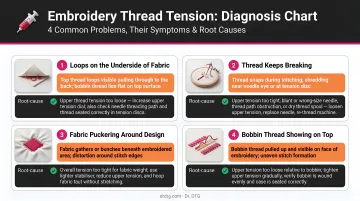
Most tension failures look like one of four things. Matching the symptom to the cause narrows down your fix before you touch anything.
| Symptom | What You See | Root Cause |
|---|---|---|
| Thread looping (underside) | Loops of top thread hanging underneath | Upper tension too loose; thread not seated in tension discs |
| Bobbin thread on top | Thin line or dots of bobbin thread visible on front | Upper tension too tight; or bobbin tension too loose |
| Frequent thread breakage | Thread snapping at or near needle during run | Upper tension too tight; burr on needle; threading path obstruction |
| Bird-nesting | Tangled mass of thread under hoop at start | Upper thread not threaded through tension discs; upper tension too loose |
A Quick Diagnostic Shortcut
Before adjusting anything, ask: is this problem happening on one needle or all needles?
- One needle affected → almost always an upper thread or threading issue on that specific needle
- All needles showing the same problem → suspect bobbin tension or a global machine threading issue
This single question saves a lot of unnecessary dial-turning.
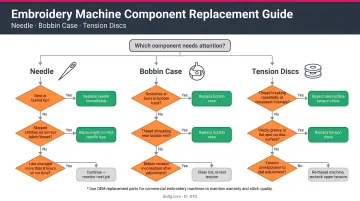
How to Fix Embroidery Machine Thread Tension: Step-by-Step
Don't adjust dials blindly. Work through this sequence to isolate the actual cause.
Step 1: Re-Thread the Problem Needle Completely
Re-threading catches the issue in roughly half of cases. Thread can slip out of guide pins or ride over tension discs instead of sitting inside them, and either one produces symptoms that look like a calibration problem.
Start from the spool and work forward:
- Remove the thread entirely from that needle position
- Re-thread from scratch, confirming the thread passes under the tension disc (not over it) and through every guide pin in order
- Thread the needle eye last
- Check that the thread tail is held when starting — loose tails are the primary cause of bird-nesting at the start of a design
Step 2: Adjust Upper Thread Tension
Once you've confirmed correct threading, adjust the tension dial or spring bar if the issue persists.
- Spring bar systems (Ricoma and similar): lower the bar to increase tension, raise it to reduce tension; keep it at a 90-degree angle as your reference point
- Dial systems (Brother and similar): clockwise increases tension, counterclockwise reduces it — confirm direction in your machine manual
- Digital systems: use the on-screen +/- adjustments
Starting benchmarks by thread type (from Madeira USA):
| Thread Type | Upper Tension Range |
|---|---|
| Rayon | 100–120 grams |
| Polyester | 120–150 grams |
| Metallic | Varies by construction — not a single rule |
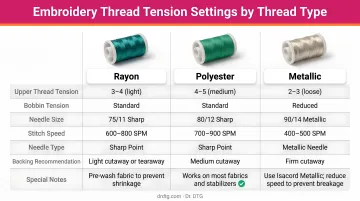
For metallic threads specifically: Madeira's Supertwist #30 starts at 170 gf, while Sulky metallics typically need reduced tension by 1–3 dial numbers. The direction depends on the thread's construction, so check the manufacturer's guidance for the specific product you're running.
Thread quality compounds this. Isacord 40wt polyester, available through Dr. DTG as USA Master Distributor, is engineered with consistent sliding-friction values across all 390 colors. That consistency means you typically don't need to recalibrate tension when switching colors — useful on long production runs.
Step 3: Adjust Bobbin Tension
Start by cleaning the bobbin case. Lint buildup under the tension flap is a commonly overlooked cause of erratic bobbin tension. Remove the bobbin case, blow it out with compressed air, and clear any debris from under the tension flap with a folded piece of paper. Madeira recommends doing this every time you change a bobbin.
Once the case is clean, measure before adjusting. Use a Towa bobbin tension gauge (the TM-1 Style L is the industry standard) to get a baseline reading. Target ranges:
- Standard flat embroidery: 18–22 grams (Madeira) / 22–25 grams (Impressions Magazine starting range)
- Cap/hat embroidery: up to 25 grams — caps require slightly higher bobbin tension due to the curved stitching surface
Adjusting the bobbin screw:
- Clockwise = tighter
- Counterclockwise = looser
- Move in quarter-turn increments maximum, then re-measure
- Don't chase a reading by over-tightening — a worn bobbin case spring cannot hold consistent tension regardless of screw position
Step 4: Run a Tension Test
Stitch a simple satin column on a scrap of the same fabric you'll use for the actual job. Examine both sides:
- Front: smooth, flat surface, no bobbin thread visible
- Back: 1/3 bobbin thread centered, 1/3 top thread on each side
Repeat the adjust-and-test cycle until both sides pass. Only then move to production.
When to Adjust Settings vs. Replace Components
Calibration fixes have limits. When a worn or damaged part is the issue, no amount of dial adjustment will produce a permanent result.
Replace the Needle First
Madeira's Needle Guide puts average embroidery needle life at 8 hours of running time. A needle that's developed a microscopic burr will cut the thread on every pass — and that looks exactly like a tension problem.
If thread keeps breaking after re-threading and tension adjustment:
- Replace the needle before doing anything else
- Confirm the new needle is the correct size for your thread weight
- Verify the flat side is facing the back (standard on most commercial machines)
- Check that all needles on a multi-needle machine are the same size
Dr. DTG stocks Groz-Beckert needles (75/11 RG and 80/12 KK) in boxes of 100 — keeping a fresh supply on hand makes needle replacement a routine step rather than an afterthought.
Replace the Bobbin Case When Tension Stays Erratic
A worn tension spring in the bobbin case cannot hold consistent pressure. If bobbin tension fluctuates after cleaning and adjustment, the spring is likely worn out. Replace the case rather than continuing to adjust around a damaged component. Dr. DTG carries bobbin cases compatible with our machine lines.
Inspect Upper Tension Discs for Wear
Upper disc problems follow a similar pattern. If upper thread tension won't stabilize after correct threading and normal adjustments, inspect the tension discs for wear or debris caught in the disc slot.
- Clean the disc slot first — trapped lint or thread fragments are a common culprit
- If cleaning resolves the inconsistency, no further action is needed
- If the disc is visibly damaged or grooved, the head requires professional service
If you've exhausted these steps and the problem persists, Dr. DTG's repair team handles embroidery machine servicing across the US — on-site in Southern California, return-to-depot for other states. Reach them at 714-770-0969 or info@drdtg.com.
Preventive Maintenance to Avoid Future Tension Issues
Three habits eliminate most tension problems before they start:
1. Clean on a schedule
- Blow out the bobbin area and race with compressed air every bobbin change
- Clean the thread guides and tension disc area after each project
- Lint accumulation in the bobbin case is the leading cause of gradual tension drift that's hard to pinpoint
2. Use consistent thread Thread with uneven diameter causes tension to fluctuate stitch-to-stitch even when the machine is perfectly set. AMANN's technical documentation notes that Isacord maintains consistent friction coefficients across all 390 colors, so you can dial in tension once and hold it across an entire multi-color run without recalibrating. For shops standardizing on a single thread brand, that consistency pays off fast.
3. Record your working settings When you dial in correct tension for a specific thread type, fabric weight, and stitch type, write it down. A simple log eliminates guesswork on repeat jobs and cuts setup time on every repeat job. Bobbin tension gauges give you a repeatable numeric reference point — much more reliable than "turned the screw about halfway."
Frequently Asked Questions
What should my tension be on my embroidery machine?
There's no universal setting. As a starting point, bobbin tension should be in the 18–22 gram range for standard flat embroidery, with up to 25 grams for caps. Upper thread tension varies by thread type — 120–150 grams for polyester is a common benchmark. Run a satin stitch test and check the 1/3 rule on the back to confirm.
How do I tell if tension is too high or too low?
Too-tight upper tension pulls bobbin thread to the front surface and causes frequent thread breaks. Too-loose upper tension creates loops on the underside. Too-tight bobbin tension causes puckering and breaks. Too-loose bobbin tension allows bobbin thread to show on the front: the same symptom as over-tight upper tension, but a different cause entirely.
Why does my embroidery thread keep breaking?
The three most common causes: upper tension set too tight, a dull or burred needle cutting the thread on each pass, and an incorrect or obstructed thread path. Check all three before assuming a machine malfunction. Replace the needle first — it's the quickest and cheapest test.
What's the difference between upper thread tension and bobbin tension?
Upper thread tension is controlled by the machine's tension discs and dial, governing how tightly the top thread is pulled as it feeds through the needle. Bobbin tension is set by a screw on the bobbin case, controlling how freely the bottom thread releases. When either is off, it shows up as visible defects in the finished stitch.
How do I fix bird-nesting on my embroidery machine?
Bird-nesting is almost always caused by the upper thread not being correctly seated in the tension discs. Completely re-thread the upper path, confirming the thread passes through every guide and under the tension disc. Also hold the thread tail when starting a new design — a loose tail at the start is the other common trigger.
Can the type of thread I use affect my machine's tension settings?
Thread type directly affects tension settings. Polyester, rayon, and metallic threads all have different diameters and tensile properties, and even switching brands of the same type can require minor recalibration. Thread with consistent diameter, like Isacord, reduces how often you need to adjust since tension stays stable across the spool and between color changes.