The problem is that most people recognize the look but have no idea what produces it. That gap leads to bad design choices, wrong materials, and finished products that look nothing like the reference images that inspired them.
This guide covers exactly what 3D puff embroidery is, how the process works from foam placement to final stitch, what designs actually hold up, and what materials you need to do it right.
Key Takeaways
- 3D puff embroidery uses a foam insert beneath satin stitches to physically raise the design above the fabric
- The foam is cut to match the design shape, stitched over completely, then excess is trimmed away after embroidery
- Only bold, simple designs with thick lines work — minimum 3mm satin width; thin scripts and fine details collapse under the foam
- Structured garments like caps are the ideal substrate; soft, stretchy fabrics distort the raised profile
- The design must be digitized specifically for puff; flat embroidery files will not produce acceptable results
What Is 3D Puff Embroidery?
3D puff embroidery is a machine embroidery technique where a foam insert is placed beneath satin stitches to physically raise the design above the fabric surface. The result is a sculpted, three-dimensional appearance you see on MLB caps, snapback brands, and premium team gear.
Traditional flat embroidery lies flush against the fabric. It's precise and handles fine detail well, but it lacks the visual weight and tactile presence that bold logos and headwear decoration demand. 3D puff solves that with actual physical height.
What 3D Puff Is Not
A few common misconceptions worth clearing up:
- Not a printing method — the raised effect is created by thread and foam, not ink
- Not achieved by layering thread alone — no amount of stitch buildup replaces foam
- Not the same as appliqué or chenille — those are entirely different construction methods
- Not achievable with a standard flat embroidery file — the digitizing must be purpose-built for puff
The foam insert is what defines the technique — remove it, and you're back to flat embroidery regardless of stitch count.
Two Common Variations
Most 3D puff work falls into one of these approaches:
- Full 3D puff raises the entire design element — common for single letters, logos, and monograms
- Hybrid designs combine raised puff elements with flat embroidery in the same piece, useful when a logo has a bold mark alongside fine supporting text
How Does 3D Puff Embroidery Work?
3D puff follows a defined sequence. Skipping or rushing any stage produces visible flaws : foam showing through at the edges, uneven height across the design, or stitch gaps that expose the foam below.
Setting the Foundation
The process starts with secure hooping. The garment must be hooped tight and wrinkle-free because any slack translates directly into an uneven finished surface.
Madeira's E-Zee 3D Foam instructions document the standard sequence: flat embroidery or support stitching is completed first, the machine stops before the raised portion begins, the operator lays the foam inside the hoop, then the machine continues with the satin layer over the foam.
Cut the foam — by hand or laser — to match the design shape, then place it directly on the base layer. If the foam sits outside the design boundary, you'll see exposed foam at the edges after stitching.
Foam thickness selection:
| Thickness | Application |
|---|---|
| 2–3 mm | Beanies, subtle lift, small letters |
| 3–4 mm | Standard cap work (most common range) |
| 5–6 mm | Dramatic sculptural results (use with caution — can affect tear-off quality) |
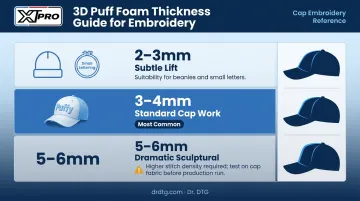
Per Wilcom's 3D puff webinar Q&A, most experienced digitizers work primarily in the 3–4mm range and generally avoid foam thicker than 4mm, as very dense foam can actually produce a less clean result than well-chosen medium foam.
Core Stitching Over the Foam
With the foam placed, the machine is ready for the stitching pass that creates the raised profile. Satin stitches run perpendicular to the foam's surface; as the needle passes through and around it, the thread caps and compresses the foam, locking it in place.
Key machine parameters at this stage:
- Speed: Run at 650–750 stitches per minute (Wilcom); faster speeds increase friction and cause thread breaks
- Stitch density: Target 0.18mm for puff work — roughly twice normal rate to perforate the foam cleanly
- Needles: Schmetz 75/11 is the standard; note that Wilcom specifically recommends the sharp variant for cap puff work, while general puff work often uses the medium ball point
Note on underlay: there's no universal standard here. Impressions recommends a tight edge-run underlay at around 1.0mm to perforate the foam perimeter. Wilcom advises against underlay through the foam at all, recommending only minimal travel stitches. This is a digitizer-dependent decision, not a fixed rule.
Finishing and Foam Removal
Once stitching is complete, the excess foam extending beyond the design borders needs to come off. ColDesi's puffy foam guide recommends using tweezers to remove larger pieces carefully since tearing rather than pulling can distort finished stitches.
For smaller remnants, a heat gun applied a few inches from the garment causes remaining foam traces to shrink and retract. ColDesi also notes a pressing cloth and iron can achieve the same effect for stubborn bits.
A clean finished piece shows:
- Crisp stitch edges with no exposed foam
- Consistent height across all raised elements
- No loose thread ends at the design borders
What Makes a Good 3D Puff Design?
Design compatibility decides whether a 3D puff project succeeds — often before the machine runs a single stitch.
Line Width Is Everything
Wilcom's guidance establishes a satin stitch width range of 3mm minimum to 12mm maximum for puff work. At 2mm, the foam tends to compress too much; at the wider end (10–12mm), you're pushing the limits of what a satin stitch can span cleanly.
Anything with elements narrower than 3mm simply can't hold the foam underneath without collapsing or showing gaps. This single constraint rules out a large category of designs.
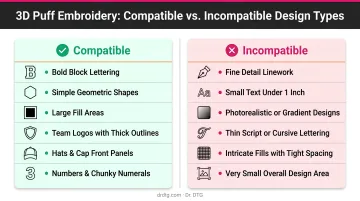
Designs that work well:
- Block lettering and collegiate initials
- Single-letter monograms
- Simple geometric shapes
- Chunky sports logos and team marks
- Bold wordmarks with thick stroke weights
Designs that don't work:
- Thin script fonts
- Fine detail lines or intricate internal shapes
- Small text (especially any word under 1 inch tall)
- Logos with tight internal spacing between elements
Digitizing Is Not Optional
Once a design clears the width test, the file itself becomes the next constraint. Madeira, ColDesi, and Wilcom all confirm that 3D puff requires a purpose-built digitized file — not a repurposed flat embroidery file.
A puff-specific file needs:
- Satin stitches set for foam coverage (not standard flat density)
- End caps extending ~0.5mm from the stitch end (per Wilcom)
- Side push compensation of 0.3–0.4mm
Reusing a flat file produces collapsed foam, inconsistent height, and coverage gaps. The digitizing has to be built for puff from the ground up.
Materials for 3D Puff Embroidery
Foam
Commercial embroidery foam is the right choice over craft foam. Wilcom's Q&A notes that craft foam is typically not dense enough for machine embroidery, while overly dense foam causes poor tear-off and can create machine issues.
Well-known commercial options include:
- Madeira E-Zee 3D Foam — 3mm
- Gunold Puffy Foam — 3mm and 4mm
- AllStitch PuffyStitch — 2mm, 3mm, and 6mm
Dr. DTG also stocks 3D puffy foam in multiple thicknesses and colors. Contact us at 714-770-0969 or info@drdtg.com for current availability.
One practical tip: match foam color to thread color. Minor stitch gaps are less visible when the foam underneath is the same shade as the thread covering it.
Thread and Needles
Polyester thread handles 3D puff well. AMANN describes Isacord as a trilobal continuous filament polyester thread with strong abrasion resistance, which matters when thread is driving through foam at machine speed. Dr. DTG is the US Master Distributor for Isacord, offering the full 390-color catalog in 1000m ($5.29) and 5000m ($9.95) spools.
For needles, Dr. DTG stocks two Groz-Beckert options suited for puff work:
- 75/11 RG — general-purpose, appropriate for most puff embroidery applications
- 80/12 KK — specifically noted for 3D puffy foam use on commercial machines
Where 3D Puff Embroidery Is Commonly Used
Structured garments are the natural home for this technique. Baseball caps, snapbacks, trucker hats, and structured beanies provide the firm foundation the foam and stitch density require. The fabric doesn't flex under the design, so the raised profile stays intact.
Soft, stretchy fabrics — lightweight t-shirts, most polo shirts, thin fleece — can't support the technique. The fabric compresses and flexes with wear, distorting the raised profile over time.
Secondary applications where fabric construction permits:
- Heavy jackets and thick hoodies
- Canvas tote bags
- Denim garments
- Embroidered patches (which can then be applied to softer items, sidestepping the fabric limitation entirely)
That range of compatible substrates also translates directly into pricing power. As Impressions Magazine notes, decorators who master the technique can charge more because it's more complex to produce. For custom apparel brands and sports team suppliers, it creates a product with visible texture and depth that flat embroidery can't match.
Frequently Asked Questions
What is 3D puff embroidery and how does it differ from regular embroidery?
3D puff embroidery uses a foam insert placed beneath satin stitches to physically raise the design above the fabric. Regular flat embroidery stitches lie flush against the surface with no foam. The key difference is dimensional height and the additional materials — foam, adjusted density, and purpose-built digitizing — required to achieve it.
What does 3D puff embroidery look like?
Designs appear sculpted and raised from the fabric, with a bold, tactile quality similar to a soft relief carving. Stitching wraps visibly over the foam, giving logos and lettering a thick, "puffed up" presence that catches light and stands out from multiple angles.
What types of designs work best for 3D puff embroidery?
Bold, simple shapes with thick elements — block letters, single initials, chunky logos, and geometric shapes with satin widths between 3mm and 12mm. Thin script fonts, fine detail lines, and small text cannot hold foam cleanly and should be avoided or handled as flat embroidery instead.
Does 3D puff embroidery require special digitizing?
Yes. The file must be purpose-built for puff using satin stitches, adjusted density, end cap extensions, and push compensation settings. A standard flat embroidery file cannot be reused for puff work; it will produce poor coverage and inconsistent height.
What foam is used in 3D puff embroidery?
Commercial embroidery foam in thicknesses from 2mm to 6mm, selected based on desired height. The 3–4mm range covers most cap applications. Craft foam is not recommended. It lacks the density consistency needed for clean machine piercing and tear-off.
Can 3D puff embroidery be done on any fabric?
No. Structured fabrics — caps, heavy jackets, canvas bags — work best because they support the foam without flexing. Soft, stretchy fabrics like lightweight tees will distort or flatten the raised design over time with regular wear.