Understanding why they happen starts with the lock stitch: your machine forms every stitch by interlocking the top thread with the bobbin thread beneath the fabric. When that system falls out of balance — through tension drift, improper threading, worn needles, or a dirty bobbin area — loose stitches, loops, and thread breaks follow.
This guide covers the four most common loose thread problems, their root causes, a structured five-step fix process, and when a professional repair call is the smarter move.
Key Takeaways
- Root causes almost always fall into four categories: tension imbalance, improper threading, a dirty bobbin case, or a worn needle
- Most issues are DIY-fixable — but only after correctly identifying the root cause first
- The H-test is your fastest diagnostic: it reveals tension imbalance direction before you touch any settings
- If problems persist after basic fixes, it's time to call a technician for a mechanical inspection
Common Loose Thread Problems on Embroidery Machines
Loose thread issues follow predictable patterns. Each has distinct visual symptoms — and the fix depends entirely on identifying which pattern you're looking at.
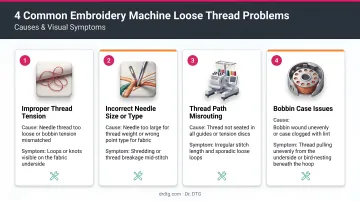
Loops or Loose Stitches on Top of the Design
What it looks like: Visible thread loops sitting on the fabric surface, especially at the edges of filled areas or lettering. The design looks uneven or puckered.
Why it happens: According to Barudan, loopy or very loose stitching on top means top tension needs to be tightened. Madeira adds that looping stitches can also result from improper threading or a damaged needle — so top loops aren't a single-cause symptom. Check threading first, then tension.
Bobbin Thread Showing on Top
What it looks like: Dark bobbin thread visibly edging light-colored designs, or small loops peeking through filled areas — especially on narrow satin stitches.
Root causes: Three primary culprits:
- Bobbin seated incorrectly or running the wrong direction through the tension spring
- Bobbin tension too loose relative to top tension
- Lint or debris holding the tension flap partially open
The H-test (explained in Step 2 below) identifies which one.
Frequent Thread Breaks During Stitching
What it looks like: Thread snapping repeatedly during a run, often at the needle eye, forcing re-threading and leaving unanchored thread ends in the design.
Why it happens: Madeira's thread-break troubleshooting guide lists the main culprits:
- Dull, bent, or wrong-size needle for the fabric and thread
- Top tension set too tight
- Excessive machine speed for design complexity
- Low-quality thread that's brittle or inconsistently wound
- Burrs or nicks in the rotary hook, throat plate, or needle eye
Loose Thread Tails at Color Changes or Jump Points
What it looks like: Unsecured thread tails or long jumps lying across the design surface after color changes or at the start/end of stitch sequences.
The visual sign: Insufficient tie-in and tie-off stitches programmed into the design file are the primary cause. In commercial digitizing, tie-in and tie-off stitches are standard anchoring elements — if they're missing or too short, threads won't hold properly. A malfunctioning automatic trimmer can make this worse at the mechanical level.
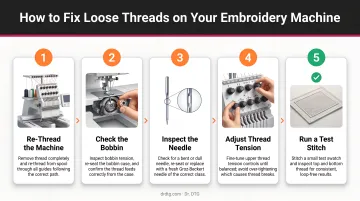
How to Fix Loose Threads: Step-by-Step
Jumping straight to tension adjustments without diagnosing the specific problem wastes time and risks making things worse. Follow this sequence.
Step 1: Re-Thread the Machine Completely
Improper threading is the single most overlooked cause of tension problems, even among experienced operators.
Power the machine off. Remove all thread from both the top thread path and the bobbin. Re-thread both from scratch using the machine manual.
For the bobbin specifically:
- Tajima specifies inserting the lower thread in a clockwise direction, routing it through the bobbin slit and under the tension spring, and pushing the case into the rotary hook until it clicks
- Ricoma confirms the bobbin should exit in a consistent orientation, with the case seated until it clicks into place
- Use embroidery underthread specified for your machine — not regular sewing thread
If the problem started after a thread break or bobbin change, re-threading alone is the fix more often than any other single step.
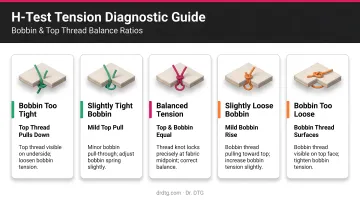
Step 2: Run the H-Test to Diagnose Tension
The H-test is the fastest way to confirm whether tension is balanced before touching any settings.
Stitch a file with capital H shapes and inspect the back of the fabric. Impressions Magazine describes the target as equal thirds: approximately one-third bobbin thread visible in the center, flanked by one-third top thread on each side. Barudan's commercial machine benchmark is roughly two-thirds top thread and one-third bobbin thread on the back.
Reading the result:
- Bobbin thread pulling to the top → top tension is too tight, or bobbin tension too loose
- Excessive loops on top → top tension too loose; tighten it
- Top thread visible entirely on the back → top tension too loose, pulling thread through
Critical caution: Adjust top tension first (accessible via the machine dial or software). Do not adjust bobbin tension screws without consulting the machine manual or a technician. Bobbin tension screws are extremely sensitive; a fraction of a turn produces a significant change.
Step 3: Inspect and Replace the Needle
A dull, bent, or incorrectly sized needle causes both thread breaks and loose stitches. According to Madeira's Needle Guide, the average commercial embroidery needle life is 8 hours of running time; high speeds accelerate wear on the needle eye.
Replace the needle and match it to the job:
- Sharp/standard point — woven fabrics
- Ballpoint — knits and stretch materials
- Needle size — match to thread weight; heavier thread needs a larger needle
Dr. DTG stocks Groz-Beckert 80/12 KK needles for commercial embroidery machines, a reliable choice for both knitted and woven fabrics on single and multi-head setups.
Step 4: Clean the Bobbin Case and Thread Path
Lint and thread fuzz accumulate in the bobbin case, tension discs, and thread path. As Impressions notes, lint and dust buildup in the bobbin case directly undermines tension maintenance. Debris holds the tension flap partially open, causing inconsistent thread release.
Cleaning procedure:
- Remove the bobbin case completely
- Use a soft brush to clear lint from the bobbin area, thread path, and tension discs
- Inspect the thread path for burrs, rough spots, or nicks that could fray thread
- Re-inspect the rotary hook area for debris
On lubrication: Barudan's maintenance documentation specifies one drop of machine oil in the hook raceway every 4–6 hours of operation for listed compact models. Follow your specific machine manufacturer's lubrication schedule; over-oiling causes its own problems.
Step 5: Reduce Machine Speed and Test on Scrap Fabric
Maximum speed gives thread less time to seat properly. On dense designs or with finer thread, this pulls the bobbin thread up or creates loose top stitches. Madeira lists excessive machine speed among the verified causes of thread breaking and fraying.
Reduce speed and run a test on scrap fabric of the same type before continuing on the actual project.
Stitches should lie flat against the fabric surface with no visible loops or bobbin thread on top. Run the same design section, inspect the back against your H-test benchmark, and only proceed to the full piece when the result matches the target ratio.
Fix It Yourself vs. Call a Professional
Most loose thread issues respond to the steps above. Some don't, and pushing further with DIY adjustments can turn a minor tension problem into a mechanical one.
Fix It Yourself When:
- The problem started immediately after a thread break or re-thread
- Tension drifted after a bobbin change and the H-test shows a clear imbalance
- The needle was past its 8-hour service interval
- The bobbin area had visible lint buildup
Call a Professional When:
- Tension problems persist after complete re-threading, bobbin replacement, needle change, and cleaning
- The machine makes unusual mechanical sounds (clicking, grinding) suggesting hook timing or mechanical misalignment
- The automatic trimmer cuts inconsistently or not at all
- Tension screws were manually adjusted and the problem worsened
Dr. DTG offers commercial embroidery machine repair across the USA — on-site for Southern California customers, return-to-depot for other states. The team stocks OEM parts for Xtreme Tech XTPro and Happy Japan machines, including bobbin cases, hooks, tension springs, and take-up levers.
To get started, call 714-770-0969 or submit a repair ticket at drdtg.com/submit-ticket with your machine make, model, serial number, and a description of the issue.
Preventive Measures to Avoid Loose Threads
Fixing a loose thread problem costs time. Preventing it costs almost nothing.
Use High-Quality Embroidery Thread
Thread quality directly affects tension stability and break frequency. Low-quality thread is inconsistently wound, more prone to fraying under tension, and creates lint buildup that compounds bobbin case problems.
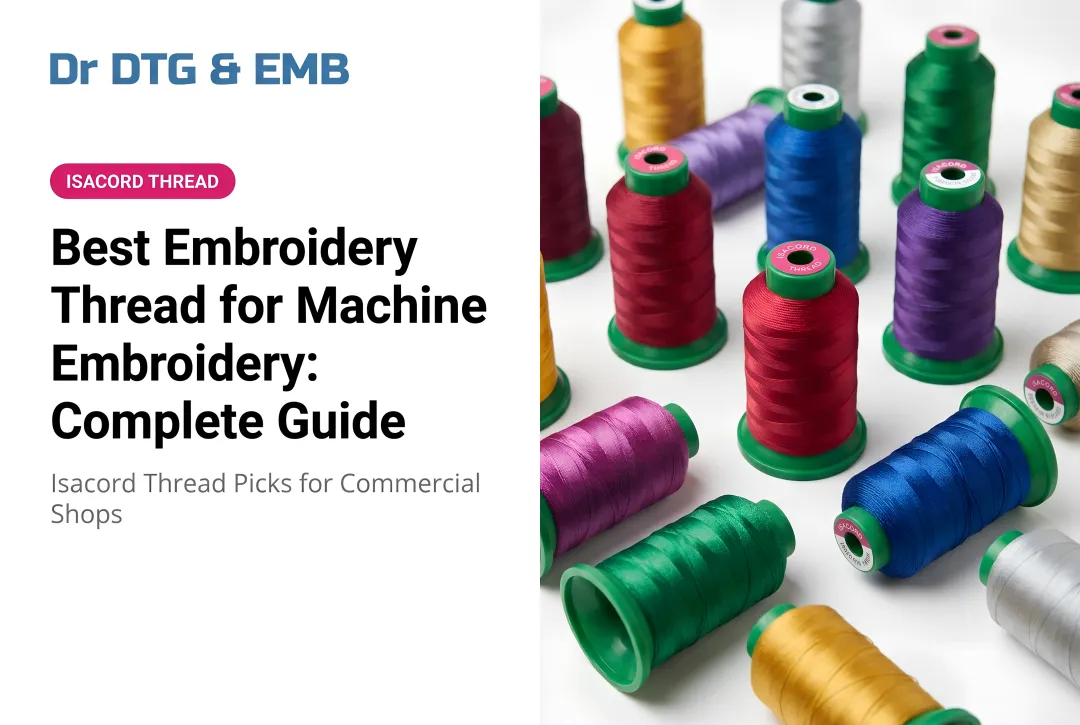
Dr. DTG is the USA Master Distributor of Isacord Thread, a polyester continuous-filament (smooth, non-spun) thread built for commercial machine embroidery. Its properties directly address the most common causes of loose threads:
- Holds nearly twice the tensile strength of rayon, reducing breaks under high-speed mechanical stress
- Controlled elasticity prevents looping and puckering without sacrificing stitching speed
- Low-friction surface runs cleanly through tension discs, guides, and needle eye
- Consistent spool winding delivers stable tension delivery stitch after stitch
The full 390-color catalog is available in 1,000m and 5,000m spools with volume pricing for commercial shops.
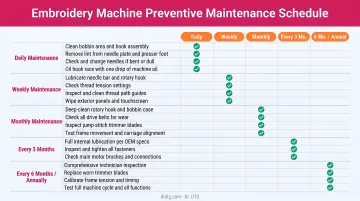
Establish a Regular Maintenance Schedule
| Maintenance Task | Interval |
|---|---|
| Clean bobbin area and thread path | Start of each session |
| Replace needle | Every 8 hours of run time |
| Oil hook raceway (machine-specific) | Per manufacturer spec (e.g., every 4–6 hours for listed Barudan compact models) |
| Check bobbin case tension | Each bobbin change |
| Inspect thread path for burrs | Weekly or after any thread break |
Match Stabilizer to Fabric
Uneven fabric tension in the hoop causes fabric to shift during stitching, distorting stitch formation and pulling thread loose at the surface. Impressions specifies:
- Cut-away stabilizer — required for knits, fleece, and unstable stretch fabrics
- Tear-away stabilizer — appropriate for stable heavyweight wovens like denim, twill, and canvas
Always hoop fabric evenly. As a rule, use the smallest hoop that fits the design. This limits fabric movement and supports stitch registration.
Program Lock Stitches and Check Design Density
Every color block in a digitized design should begin and end with tie-in and tie-off stitches. Without them, threads won't anchor and tails remain loose.
If loose thread problems cluster around specific design elements, check two settings before adjusting machine tension:
- Stitch density — reduce if fills or narrow columns are pulling fabric or breaking thread
- Underlay settings — adding or adjusting underlay stabilizes the base layer and reduces surface thread movement
These digitizing-level fixes often resolve recurring problems that no amount of machine-level tension adjustment can correct.
Conclusion
Loose threads on an embroidery machine are almost always fixable when approached methodically. Re-threading, the H-test, needle replacement, and bobbin case cleaning resolve the vast majority of cases — and in that order.
Quality thread like Isacord, a consistent maintenance schedule, proper stabilizer selection, and correct machine setup eliminate most problems before they start. If issues persist despite those steps, contact a professional repair service to prevent further damage and minimize downtime.
Frequently Asked Questions
Why is my thread loose on my embroidery machine?
Loose thread almost always signals an imbalance between top thread tension and bobbin thread tension, improper threading, a dirty bobbin case, or a dull needle. Start by re-threading the machine completely from scratch, then run an H-test to identify which tension is off before making any adjustments.
What should I do about loose stitching on an embroidered design on a shirt?
Thread a fine hand-sewing needle with the loose thread, pull it to the back of the fabric, and weave it under existing stitches two or three times to anchor it; trim and apply a small dab of fabric sealant if needed. Recurring loose stitching signals a tension or needle problem that needs fixing at the machine level, not just patched on finished pieces.
How do I know if my embroidery machine tension is correctly balanced?
Stitch a capital H design and inspect the back of the fabric. You should see approximately one-third bobbin thread in the center and one-third top thread visible on each side. If the threads meet entirely in the center or bobbin thread pulls to the top, adjust top tension first and retest.
Can using low-quality thread cause loose stitches on an embroidery machine?
Yes. Low-quality thread with inconsistent weight, poor winding, or brittleness causes frequent breaks, tension fluctuations, and loose stitches. Premium thread like Isacord — engineered specifically for commercial machine embroidery with consistent weight and controlled elasticity — reduces these problems measurably.
How often should I clean my embroidery machine to prevent thread problems?
Clean the bobbin case and thread path at the start of each session using a soft brush, and follow your machine manufacturer's lubrication schedule to keep the hook mechanism running smoothly. Lint buildup in the bobbin area is one of the most direct causes of tension inconsistency.
When should I call a professional to fix loose thread problems?
Seek professional help when problems persist after complete re-threading, needle replacement, and thorough cleaning — or when the machine makes unusual mechanical sounds, the automatic trimmer malfunctions, or tension screws were manually adjusted without resolving the issue. These point to mechanical or calibration problems that require hands-on diagnosis.