The display settings menu feels intimidating at first. The numbered parameter list looks mechanical, the options are terse, and the wrong tap puts you in a submenu that affects how the machine moves, not how it displays information. Most new operators skip the menu entirely and work around whatever the machine shows by default.
This guide walks through the exact navigation sequence, the settings that matter most, and how to verify each change — so you configure the display once, correctly, and move on to running jobs.
Key Takeaways
- Navigate to display settings via Main Menu → Option → Machine; never modify settings 1–12
- Change one setting at a time, verify it on the home screen, then proceed
- Setting #21 ("Display inch") switches dimensions between inches and millimeters — US operators should set this to YES
- Perform touchscreen calibration (MENU → OTHER → Calibrate) after any firmware update
- Before pressing Start, confirm the home screen shows correct design width, height, stitch count, and speed
When to Adjust Your Happy Machine's Display Settings
Factory defaults are configured for general use. They work, but they're not optimized for your workflow, your measurement preferences, or your production environment.
Adjust display settings when:
- Setting up a new machine for the first time
- A different operator takes over the machine
- Transitioning from flat garment work to cap embroidery (sewing field boundaries matter more)
- The displayed measurements don't match what your design software shows
- A firmware update has been installed
Never adjust display settings mid-job. The menu system may not register changes correctly while the machine is running. Only enter the Option > Machine menu when the machine is fully powered on, initialized, and idle.
Firmware updates in particular can silently reset display preferences to factory defaults. According to Texmac's firmware documentation for Happy touchscreen machines, there are distinct firmware families (B-type and C-type) across 7-inch and 10-inch touchscreen machines, and updates can silently reset display preferences to factory defaults. Make display setting verification a standard post-update task — not a one-time setup step.
What You Need Before Adjusting Display Settings
Before touching any display settings, confirm these three things. Skipping this step is the most common reason a settings change doesn't stick — or causes unexpected behavior.
1. Machine state The machine must be powered on, fully initialized, and in idle/standby mode. Check your installed firmware version — menu layout and available setting numbers vary by model and firmware generation. The HCS3 runs Program Ver. 3.00+; the HCR3 runs Program Ver. 2.11+. Settings confirmed in one manual may not appear identically in another.
2. Documentation Pull your model-specific operator manual before making any changes. HappyJapan's official download page lists operator manuals for HCH-701, HCH-701P, HCS3-1201, HCD3E, HCU2, HCR3, HCR3E, and HFR series. Dr. DTG also provides operator manual downloads for the Happy HCH Plus and Happy 1201 Voyager at drdtg.com/downloads.
Before changing any value, photograph the current screen — that photo is your reference point if you need to undo anything.
3. Operator readiness No certification required, but first-time operators should complete at least one full startup, threading, and test run before entering the Option > Machine menu. Familiarity with normal machine behavior makes it far easier to spot whether a display change caused something unexpected.
How to Adjust the Display on Your Happy Embroidery Machine
Adjusting display settings on a Happy embroidery machine takes only a few steps, but the order matters. Changing multiple settings at once makes it nearly impossible to identify which adjustment caused unexpected behavior — so work through these steps one at a time.
Step 1: Navigate to the Display Settings Menu
From the home/drive screen:
- Press Main Menu
- Tap the Option icon (gear or tool symbol)
- Tap the Machine icon (leftmost category)
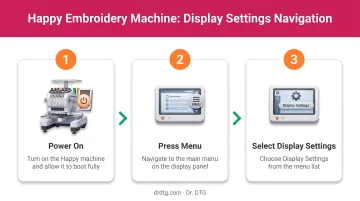
You should now see a numbered parameter list. Confirm you're looking at machine parameters — not a design editing screen or stitch-count screen. They look similar but lead to completely different outcomes.
The most common setup error: entering the wrong submenu and modifying a parameter that controls mechanical behavior rather than display output. If the list you're viewing doesn't show numbered settings in a clean parameter format, back out and navigate again.
⚠️ Settings 1–12 are factory-calibrated motor and sensor parameters. Do not modify them — regardless of any recommendation you encounter outside the official manual. These stay at factory default.
Step 2: Make the Adjustment
Tap the target setting number. Change the value using the on-screen input. Confirm the change. The entire process is touchscreen-driven — no physical tools required. Depending on the setting, changes take effect immediately or upon confirmation.
One variable at a time. Change one setting, exit to the home screen, verify the result, then return for the next adjustment. This creates a clear cause-and-effect chain and makes reverting simple if something looks wrong.
Step 3: Verify the Change
Navigate back to the home/drive screen and confirm that the relevant display element — unit label, notification behavior, sewing field boundary — now reflects the new value.
If you power the machine off mid-adjustment or navigate away without saving, the setting may revert on next startup. Stay in the menu until the home screen confirms the new value is active.
Key Display Settings Every Happy Machine Operator Should Know
Setting #21 — Display by Inch (YES/NO)
Per the HCS3 Program Ver. 3.00 manual, Setting #21 controls whether design dimensions appear in millimeters (NO) or inches (YES) on the home screen. The same setting appears in the HCR3 Program Ver. 2.11 manual, making this one of the most reliably cross-confirmed settings in the Happy lineup.
US operators should set this to YES. When your customer specifies "a 3-inch logo" and your machine displays in millimeters, unit conversion becomes a manual step every job — and manual steps create errors.
One important note: some internal values may still display in millimeters regardless of this setting. Always check the unit label next to each number on screen rather than assuming the unit has changed globally.
Setting #27 — Notification Sound (YES/NO)
The HCS3 and HCR3 manuals both list Setting #27 as controlling the beep that sounds when the machine stops. A related setting — #35 in the HCS3 manual — controls buzzer duration, ranging from a single beep up to 5 minutes of continuous sound.
The default continuous alert works in a quiet single-machine setup. In a busier shop, that default creates alert fatigue — when everything beeps the same way, operators tune it out, including alerts that signal real problems.
Recommended approach for most shops:
- Set Setting #27 to YES (sound enabled)
- Adjust Setting #35 to a single, brief beep rather than continuous sound
- Reserve extended alerts for stop conditions that genuinely require attention
Home Screen Display Elements
Before pressing Start on any job, read the home screen. The drive screen on Happy machines shows:
- Design width and height — in your chosen unit (inches or mm)
- Total stitch count — useful for estimating run time and thread consumption
- Maximum speed setting — confirm this is appropriate for your material
- Needle/color information — current needle bar selection and color sequence
- Design position visualization — frame position relative to the hoop boundary
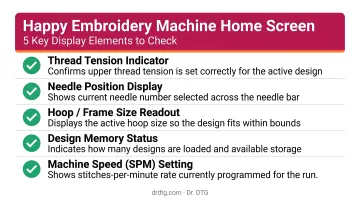
The HCR3 manual additionally shows remaining embroidery time. Verifying these elements before starting catches wrong-size designs, incorrect speed settings, and positioning errors before they become wasted garments.
Touchscreen Calibration
Both the HCS3 and HCR3 manuals place touchscreen calibration at MENU → OTHER → Calibrate. The calibration process prompts the operator to press the center of crosshair targets in numerical order using the built-in stylus.
Perform calibration after any firmware update as a standard step. If taps are landing off-target — selecting adjacent menu items, requiring multiple attempts — calibration is the first fix to try. Verify the exact navigation path in your model-specific manual, as menu layout varies between models and firmware versions.
Setting #34 — Embroidery Area Margin
Per the HCS3 Program Ver. 3.00 manual, Setting #34 controls the software boundary displayed as the sewing field limit on screen. The default range is 1–10mm, with 3mm as the standard value. This margin acts as a buffer inside the hoop edge.
Reducing it to 1mm expands the visible sewing area, letting designs sit closer to the frame edge. The tradeoff is real: that 3mm buffer absorbs minor hooping imprecision, and removing it leaves no tolerance for a slightly off-center hoop.
Only reduce this margin when using rigid, stable hoops that hold fabric flat and consistently. Note that this setting is confirmed in the HCS3 manual but was not present in the HCR3 Program Ver. 2.11 documentation reviewed — verify availability and behavior against your specific model's manual before adjusting.
Best Practices for Managing Display Settings
Create a written baseline configuration. If multiple operators share one machine, post a reference card showing agreed display settings — unit preference, notification behavior, area margin. Inconsistency across operators leads to misread dimensions and setup errors that only show up at the point of the needle.
Build a post-update verification checklist. After any firmware update, verify at minimum:
- Display unit setting (Setting #21)
- Notification sound preference (Setting #27)
- Touchscreen calibration accuracy (MENU → OTHER → Calibrate)
- Embroidery area margin (Setting #34, where applicable)
Treat this as a required step before returning the machine to production, not optional housekeeping.
Keep display settings in sync with machine maintenance. Accurate display configuration only delivers consistent results when the underlying machine is properly maintained. For Happy Japan owners dealing with technical issues beyond display settings, Dr. DTG offers hands-on repair support: on-site service for Southern California customers and return-to-depot repair for operators elsewhere in the US.
Frequently Asked Questions
Why won't my embroidery design show up on my machine?
The most common causes are an incompatible file format, an unrecognized USB drive, or viewing the wrong screen. Check that your file is in .TAP or .DST format first, then verify the USB connection, and confirm you're in the design load menu — not the machine settings menu.
What embroidery file format does Happy Japan use?
Happy Japan machines accept .TAP, .DST, DSB, and DSZ formats, as confirmed in the HCS3 and HCR3 operator manuals. Files in other formats must be converted before transfer — Wilcom EmbroideryStudio is a reliable option for exporting to .TAP.
How do I calibrate the touchscreen on my Happy embroidery machine?
Navigate to MENU → OTHER → Calibrate and follow the on-screen prompts to press the center of crosshair targets in order using the stylus. Perform this after any firmware update. Verify the exact path in your model-specific operator manual, as menu structure varies by model and firmware version.
How do I change the display from millimeters to inches?
Go to Main Menu → Option → Machine and locate Setting #21 ("Display inch"). Switch it to YES. Design dimensions on the home screen will then appear in inches, making it easier to match customer specifications without manual conversion.
What does the Happy machine home screen display?
The home screen displays design dimensions (in your selected unit), total stitch count, maximum speed, needle and color information, and a visual of the design's position within the hoop — review these before starting each job.
Can I adjust display settings without affecting mechanical performance?
Yes. Display-related settings — units, notification sound, area margin, touch calibration — do not affect motor timing or needle calibration. The critical restriction is settings 1–12 in the Option > Machine menu: those control factory-calibrated motor and sensor parameters and should never be modified.