The US commercial embroidery services industry is valued at $987.4 million in 2026, and the shops sustaining that volume share one thing: disciplined machine operation. This guide covers how to operate a 15-needle embroidery machine from setup through shutdown — threading, design loading, monitoring, maintenance, and everything in between.
Key Takeaways
- A 15-needle machine is built for multi-color, high-volume production — not occasional single-color jobs
- Correct operation follows a strict sequence: threading → hooping → design loading → trace → stitch → shutdown
- Thread tension, bobbin condition, and stitch quality are the three variables to monitor during every run
- Oil the rotary hook every 4–8 hours of active use; clean lint from the bobbin housing daily
- A test stitch on scrap fabric before every production run prevents most avoidable errors
When Should You Use a 15-Needle Embroidery Machine?
A 15-needle machine is built for specific conditions. Using one outside those conditions doesn't damage anything — it just means you're not getting what you paid for.
Use a 15-needle machine when you have:
- Designs with multiple thread colors requiring automatic color sequencing
- Medium-to-high production volume (multiple identical garments per day)
- Specialty applications like cap embroidery, jacket backs, or structured workwear
Where operators misuse the machine:
- Running single-color designs without using color-sequencing automation
- Loading first-time digitized designs directly into production without a test run
- Attempting complex multi-color work before understanding tension and stabilizer requirements
Understanding these misuse patterns points to a simple principle: 15-needle machines are designed to run warm, consistently, and with pre-loaded designs. They perform best in scheduled production blocks — not switched on for a single piece and shut off.
Impressions Magazine notes that single-needle machines are "not typically used for commercial embroidery businesses." If your work involves repeat orders, multiple colorways, or structured garments at scale, a 15-needle machine is the right tool — provided you're set up to use it regularly.
What You Need Before Operating a 15-Needle Embroidery Machine
Getting these five prerequisites right before you power on eliminates the majority of mid-run problems.
Design File
Your design must be in the machine's supported format — commonly DST, PES, or a brand-specific format depending on your machine. Improperly formatted files cause read errors, stitch skipping, and incorrect color sequencing. The design should also be optimized for the number of active needles you're using, not just exported generically from digitizing software.
Embroidery Thread
40-weight polyester is the standard for commercial multi-needle work. Polyester outperforms rayon in high-speed environments: stronger, colorfast, wash-resistant, and consistent under tension.
Consistency across all 15 spool positions matters just as much as thread quality itself — mismatched thread construction between spools causes uneven tension and more breaks. Isacord 40wt polyester is a go-to across commercial embroidery shops, available through Dr. DTG (USA Master Distributor) in a 390-color catalog across 1,000m and 5,000m spools.
Stabilizer
Match the stabilizer to the fabric — this is non-negotiable:
- Cut-away — knits, stretch fabrics, and dense stitch-count designs
- Tear-away — stable wovens, canvas, duck cloth, vinyl, leather
- Wash-away — freestanding lace, cutwork, topping on textured fabrics like towels or velvet
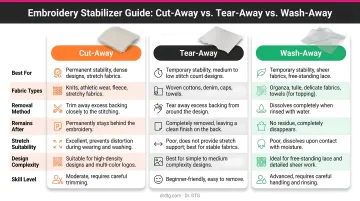
OESD's stabilizer guide identifies wrong stabilizer choice as a leading cause of puckering and design distortion — even when thread, tension, and digitizing are dialed in.
Bobbin and Bobbin Case
Bobbin tension is one of the most overlooked setup variables. Madeira's tension guidelines put the target at 18–22 grams for standard work, up to 25 grams for caps. A properly tensioned bobbin shows one-third bobbin thread and two-thirds top thread on the underside of finished satin stitches. Test before starting production — not after you've already run 20 pieces.
Control Panel Familiarity
Before you stitch anything, know how to navigate the design library, assign thread colors to needle positions, adjust machine speed, and run a design trace. These are baseline requirements, not advanced skills — skipping this step is where most preventable errors start.
How to Operate a 15-Needle Embroidery Machine (Step-by-Step)
Every phase below has a purpose. Operators who skip pre-run steps because "it looks fine" are the same operators calling for repairs three months in. The five phases covered here — setup, initiating use, operating, monitoring, and shutdown — build on each other. Work through them in order.
Setup and Preparation
Position the machine on a stable, level surface in a low-dust environment. If the machine is newly unboxed, remove any shipping locks before powering on. Allow the machine to complete its full startup calibration sequence before attaching a hoop or loading a design.
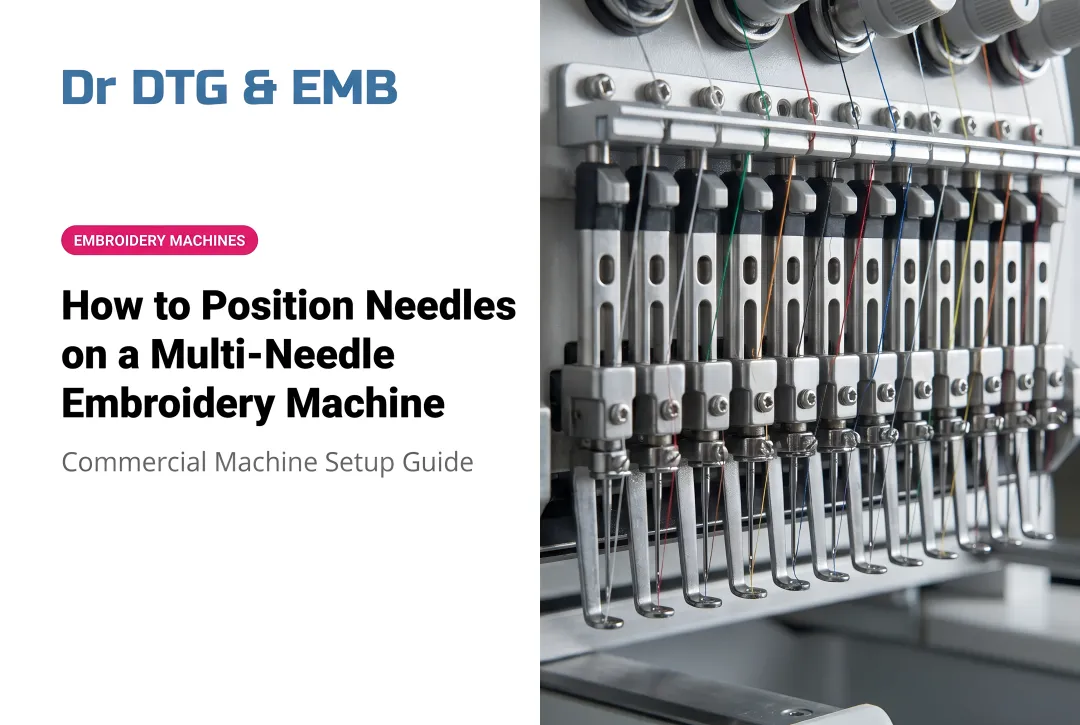
Threading all 15 needles is the most error-prone setup step. According to the Happy HCD3e instruction manual, the complete upper thread path runs through:
- Thread stand and guide
- Minor thread tension
- Main thread tension (one clockwise wrap around the rotary tension disc)
- Guide pin and lower rectifier
- Thread adjusting spring
- Take-up lever
- Lower thread guide plate
- Needle bar thread guide
- Needle eye (front to back)
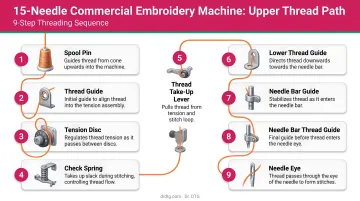
Barudan confirms the thread must also wrap around the rotary thread-break wheel — this is how the machine monitors thread movement. If that wheel doesn't spin, the machine reads a thread break and stops, even if the thread is still intact.
Needle numbering sequences vary by brand. Verify your machine's specific sequence in the operator manual before threading — don't assume a universal order.
Initiating Use
Load the design via USB or network transfer, then assign thread colors to specific needle positions through the control panel. Confirm the color sequence on screen matches the design's intended output before proceeding. This takes 60 seconds and prevents discovering a color mismatch 200 stitches in.
Before starting the run:
- Attach the appropriate hoop to the machine arm and insert the hooped, stabilized fabric
- Run the design trace or basting function to confirm placement and verify the hoop won't strike the machine head during stitching — don't skip this step
Operating the Machine
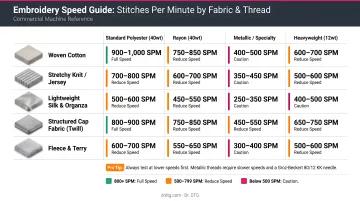
Start at reduced speed for the first several stitches. This confirms thread paths and tension are balanced before running at full production speed. Commercial 15-needle machines from Happy Japan and Tajima spec at a maximum of 1,200 stitches per minute (SPM) on flat goods, with cap embroidery typically capped at 1,000 SPM.
Adjust speed based on what you're stitching:
- Dense stitch counts → reduce SPM
- Leather or structured hat fronts → reduce SPM
- Metallic thread → 500–600 SPM (Impressions recommends this specifically to reduce friction and breakage)
- Standard polyester on stable wovens → full rated speed
Do not override automatic thread-break stops. Do not manually advance the design mid-stitch without resetting the position reference. Confirm the presser foot height is set correctly for fabric thickness before each new job type.
Monitoring During Use
Active monitoring during a run is what separates a recovered mistake from a ruined garment.
Watch for:
- Consistent thread pull from all active spools (slack or excess tension on any single spool points to a threading or tension disc issue)
- Puckering, looping, or skipped stitches appearing on the fabric surface
- Design drifting from its traced position (indicates the fabric is shifting in the hoop)
Pause the run when:
- The same needle breaks thread more than once — this requires a systematic troubleshooting check of the thread path, bobbin, and needle installation
- Visible tangling appears on the underside of the fabric, typically caused by incorrect bobbin tension or upper thread not seated in the tension disc
- You hear irregular mechanical sounds (a bent needle or hook timing issue will announce itself before it causes serious damage)
Shutting Down or Completing the Run
Allow the machine to complete its automatic thread trim sequence if equipped. Remove the hoop carefully — don't pull the fabric. Inspect the underside of the embroidery for consistent bobbin coverage before removing the garment from the hoop.
Never cut power mid-design. The machine loses its position reference, which creates misaligned restarts on the same garment. Always use the machine's stop function, and park the needle head in the home position before powering down. This prevents mechanical stress on drive components over repeated shutdown cycles.
Best Practices for Operating a 15-Needle Embroidery Machine
These aren't rules for beginners — experienced operators follow them precisely because they've seen what happens when they don't.
Test stitch before every production run. Stitch on scrap fabric or similarly-weighted material to confirm tension, stabilizer choice, and design integrity. One test run prevents the majority of production errors — a consistent pattern observed by commercial embroiderers across every skill level.
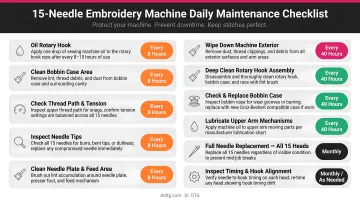
Establish a daily maintenance routine:
- Apply one small drop of clear sewing-machine oil to the rotary hook raceway every 4–8 hours of active use (Barudan's documented recommendation)
- Clean lint from the thread trimming area and bobbin case housing
- Idle the machine for 2–3 minutes after cleaning the hook with a brush
- Replace needles after repeated thread breaks on the same needle — Impressions Magazine notes commercial operators typically replace needles after every 8 hours of continuous use, not on a fixed 40-hour schedule
Match speed to the job. Running at maximum SPM on every garment is one of the most common errors in commercial embroidery shops. It increases needle wear, generates more thread breaks on challenging substrates, and introduces stitch irregularities that slow down the inspection process more than the speed ever saved.
Getting these fundamentals right is significantly easier when you have hands-on guidance from the start. For operators running machines like the Xtreme Tech Pro 1501 IPX or Happy Japan HCD3E-X1501, Dr. DTG provides on-site customer training with every machine purchase, covering real operation before your first production run. This is particularly valuable for shops transitioning from single-needle machines, where unfamiliarity with multi-needle workflows accounts for most early errors.
Conclusion
Operating a 15-needle embroidery machine well is a sequencing problem, not a technical mystery. Threading, tension calibration, stabilizer selection, design loading, and shutdown each serve a defined function — operators who treat that sequence as fixed produce consistent results. Operators who shortcut it spend their time troubleshooting instead of stitching.
Consistent operation habits pay off in measurable ways. Machines that are oiled on schedule, threaded correctly, and run within their rated parameters last longer, produce fewer errors, and lower your cost per garment over time. That holds whether you're running 20 pieces a day out of a home shop or 200 pieces across multiple shifts — the process doesn't change, only the volume does.
Frequently Asked Questions
What is the best 15-needle embroidery machine?
It depends on your production volume, application, and budget. Two strong commercial options are the Happy Japan HCD3E-X1501 (known for long-term reliability) and the Xtreme Tech Pro 1501 IPX (sold by Dr. DTG with a 7-year warranty, on-site training, and Independent Presser Foot Control). Pre-purchase demos are available so you can evaluate both before committing.
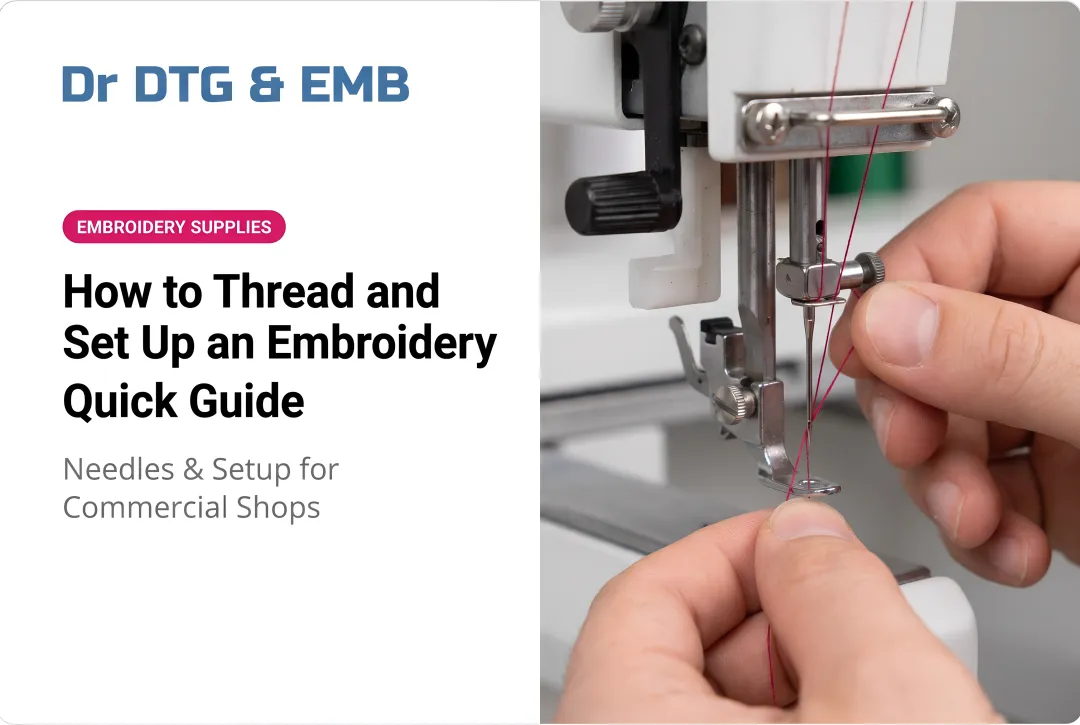
How do you thread a 15-needle embroidery machine?
Each needle is threaded individually through the full upper path — from the thread stand through the tension discs, take-up lever, lower guides, and needle eye. Thread must also wrap around the rotary thread-break wheel for the monitoring system to work. Follow the directional indicators printed on your machine.
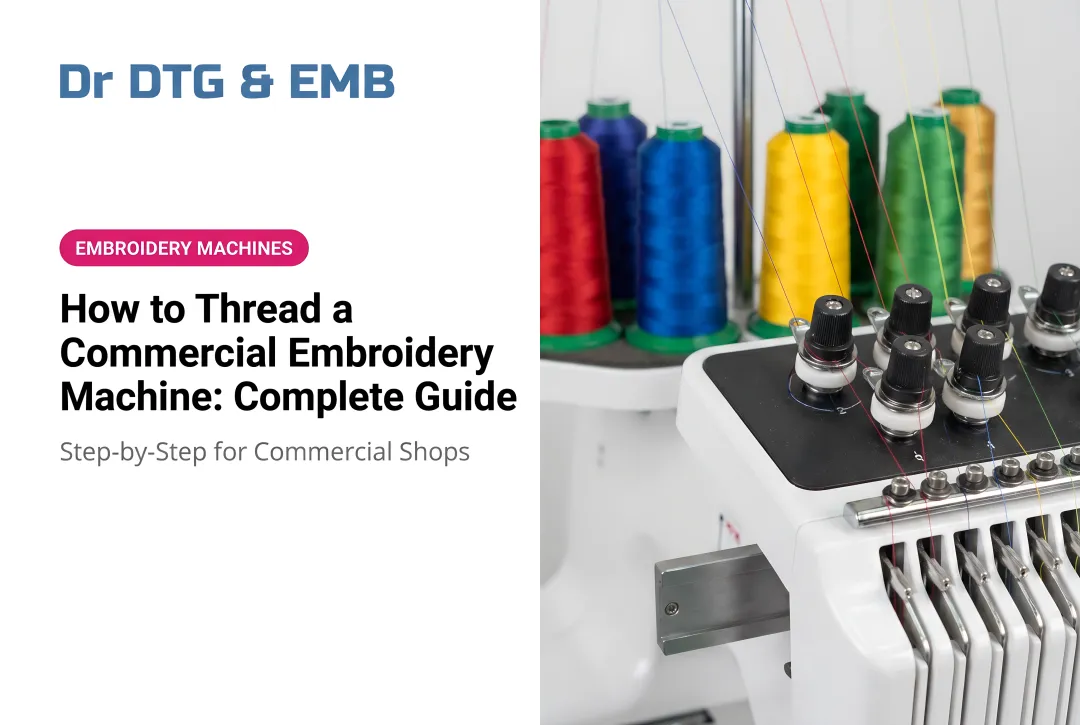
What type of thread should I use in a 15-needle embroidery machine?
40-weight polyester embroidery thread is the standard for commercial multi-needle machines — it handles high production speeds, washes reliably, and holds color. Thread consistency across all 15 spools matters at volume; inconsistent thread construction between positions causes uneven tension and more frequent breaks.
How fast does a 15-needle embroidery machine run?
Commercial 15-needle machines from Happy Japan and Tajima are rated at up to 1,200 SPM on flat goods and 1,000 SPM for cap embroidery. Actual operating speed should be reduced for dense designs, specialty fabrics, and metallic thread — running at maximum on every job increases wear and error frequency.
How often should I oil a 15-needle embroidery machine?
Oil the rotary hook raceway with one small drop of clear sewing-machine oil every 4–8 hours of active use. Additional oiling points (needle bar, head shaft, crank lever) follow the machine's stitch-count prompts. Skipping lubrication causes direct mechanical damage that requires costly repairs.
Can a beginner learn to operate a 15-needle embroidery machine?
Yes. The learning curve is steeper than a single-needle machine, but with structured on-site training, consistent practice on test fabric, and access to knowledgeable support, most new operators reach operational proficiency quickly. Dr. DTG includes hands-on training with every machine purchase, and customer feedback consistently confirms that new operators leave trained well enough to complete their first garment the same day.