The frustrating part? Most of these issues are fixable — but only if you identify the actual cause before touching anything. This guide covers the five most common commercial embroidery machine problems, their root causes, a step-by-step repair process, and a clear framework for deciding when to fix versus when to replace.
Key Takeaways
- Most problems fall into four categories: threading/tension, mechanical parts, software/settings, and stabilizer/hooping errors
- Re-threading and replacing the needle resolves most issues before any mechanical fault needs investigating
- Skipping root cause diagnosis is the leading reason problems keep coming back
- Use the 50% rule as a starting benchmark: if repair costs approach half the machine's replacement value, upgrading makes financial sense
Common Embroidery Machine Problems and Their Root Causes
Most failures follow recognizable patterns. Matching the symptom to the cause is the fastest path to a fix.
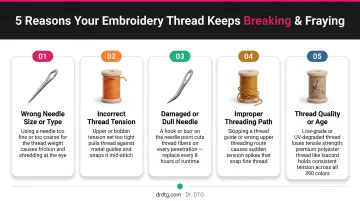
Thread Breaking or Fraying
Thread snaps mid-stitch or frays near the needle and rotary hook. Common causes include:
- Burrs, nicks, or rough spots on the rotary hook assembly
- Incorrect needle size for the thread being used
- Poor-quality or old thread (causes lint buildup and tension inconsistency)
- Thread path errors — missed guide, tension disc, or take-up lever
- Upper tension set too tight
According to Barudan's technical documentation, poor-quality thread is a direct cause of thread breaks and tension problems. Impressions Magazine also reports that low-grade thread generates lint buildup that compounds tension trouble over time.
Skipped or Uneven Stitches
Gaps in the design, irregular stitch formation, or loops on the fabric underside all point to the same group of culprits. Check these first:
- Dull or bent needle
- Incorrect needle size for the thread
- Needle-to-hook timing off (hook point misses the thread loop)
- Fabric not stabilized properly, allowing movement under the needle
- Bobbin tension imbalance
Melco's technical documentation identifies incorrect hook timing, excessive hook gap, and a dull hook point as primary mechanical causes of skipped stitches.
Bird's Nesting (Thread Bunching Under Fabric)
A large tangle of thread on the fabric underside — often followed by a machine jam — is almost always a threading or tension problem. The most common causes:
- Upper thread not routed through all guides (threading with presser foot lowered)
- Bobbin incorrectly inserted or wound
- Unbalanced upper-to-bobbin tension
- Flagging (fabric bouncing up with the needle due to incorrect presser foot height)
Barudan identifies three root causes: unbalanced tension, flagging, and a hook assembly problem. Start with tension — it's the most common offender — then check for flagging, and inspect the hook assembly last.
Design Sewing Out of Registration
Design elements that misalign, shift, or overlap incorrectly usually trace back to fabric movement or digitizing gaps. Likely causes:
- Fabric moving during stitching (loose hoop, wrong stabilizer)
- Pull and push distortion — Impressions Magazine reports pull distortion of 0.17–0.25 mm and push distortion of 0.13–0.20 mm for 40 wt thread columns
- Design tested on different fabric from what's used in production
- Inadequate compensation built into the digitized file
Machine Displaying Error Codes or Stopping Mid-Run
Unexpected halts, error messages, or a stuck wiper and trimmer mechanism point to mechanical obstruction or a software issue. Common causes:
- Thread jammed in the wiper or trimmer mechanism
- Software or firmware glitch
- Sensor obstruction (lint, thread debris)
- Design file format incompatible with the machine
Clear the trimmer area first — thread jams are the most frequent trigger for mid-run stops and are the easiest to resolve without tools.
How to Fix Your Embroidery Machine: Step-by-Step
Attempting a fix without identifying the root cause wastes time, risks further damage, and usually causes the problem to return. Work through these steps in order.
Step 1: Identify the Exact Problem
Before touching anything, document the symptom precisely:
- When does it occur — startup, mid-run, at a color change?
- What is the machine doing versus what it should be doing?
- Are there error codes on the display?
Visually inspect the fabric underside, needle area, and bobbin zone. What you see there tells you which system to investigate first.
Step 2: Confirm the Root Cause Category
Determine whether the issue is:
- Mechanical — rotary hook, picker, trimmer, presser foot
- Threading or tension — upper thread path, bobbin insertion, tension balance
- Software or settings — design file, stitch density, firmware
- Fabric and hooping — stabilizer type, hoop tension, fabric movement
Start with the simplest causes. Re-thread the machine completely with the presser foot raised, replace the needle, and re-insert the bobbin correctly before assuming anything mechanical has failed.
Step 3: Apply the Correct Fix
If Mechanical (Rotary Hook, Picker, Trimmer, Presser Foot)
Check the rotary hook for burrs by running a finger slowly around the entire hook assembly. Barudan's technical manual instructs users to feel for any burrs, nicks, or rough spots — if found, polish with very fine emery cloth followed by crocus cloth (an ultra-fine abrasive polishing cloth).
For skipped stitches caused by timing issues, Barudan's hook timing procedure calls for:
- Rotating the main drive pulley to 25° (bridge machines) or 23° (arm/single-head machines)
- Positioning the hook point directly behind the needle scarf and above the needle eye
- Maintaining hook-to-needle clearance of approximately one half to one thread width
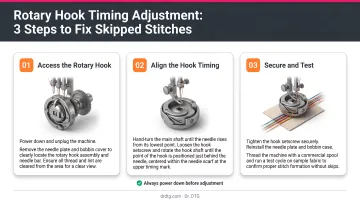
After tightening the screws, run an "HOX" test pattern to confirm the correction. If you're unfamiliar with your machine's internal mechanisms, leave this step to a qualified technician. Melco notes that accurate hook timing on some models requires a dial indicator and adaptor.
Threading or Tension Problems
Re-thread the entire upper thread path completely. Thread must pass through every guide, tension disc, and the take-up lever, with the presser foot raised during threading. Re-insert the bobbin in the correct direction and confirm it clicks into the tension slot.
For upper tension, Barudan recommends tightening (clockwise) when top stitching appears loopy and loosening (counterclockwise) when thread is puckering. Balanced underside stitching typically shows approximately 2/3 top thread and 1/3 bobbin thread.
For bobbin tension, Melco's drop-test method: the bobbin case should drop approximately 1–2 inches when bounced by the thread. Madeira USA's technical documentation recommends adjusting the bobbin tension screw in very small increments — a quarter turn or less — to avoid overcorrecting.
If Software, Settings, or Design File Issue
- Confirm the design file format is compatible with the machine
- Reload the design and verify stitch density and underlay settings match the fabric
- Reset to factory defaults if settings have been altered unknowingly
- If registration is off, review the digitized file for pull/push compensation — this is often a digitizing correction, not a machine adjustment
If Fabric, Hooping, or Stabilizer Issue
- Use cutaway stabilizer for knits, tearaway for woven fabrics
- Re-hoop firmly — no play or movement should be detectable
- Always test on the same fabric type as the final production garment before running a full job
Step 4: Test and Validate
Run the machine on scrap fabric at normal operating speed. Inspect both sides of the stitching for balance, evenness, and registration accuracy. A fix that looks correct at slow speed may reveal a secondary issue only visible under normal stitching conditions.
When to Fix vs. Replace Your Embroidery Machine
The decision comes down to three factors: the machine's condition, the cost and availability of parts, and whether it still meets your production needs.
| Scenario | Recommendation |
|---|---|
| Minor issue on a machine in good condition | Fix — re-thread, replace needle, clean bobbin area, adjust tension |
| Significant mechanical failure on an older machine | Fix if parts are available and repair cost is well under half the machine's replacement value |
| Repair cost approaches 50% of replacement value | Replace — cross-industry equipment guidance commonly cites the 50% threshold |
| Machine no longer meets production volume or design complexity | Replace — an upgrade pays for itself faster than repeated repairs |
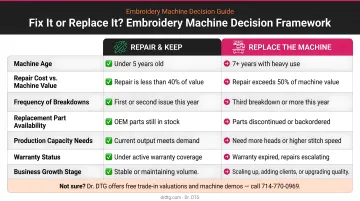
For newer machines, warranty coverage changes this calculus considerably. Dr. DTG's Xtreme Tech XTPro line comes with a 7-year warranty option, backed by an in-house technician team and OEM parts inventory in California — cutting the financial risk of major mechanical failures for recently purchased machines.
Happy Japan machines sold through Dr. DTG are similarly supported with parts and service.
Beyond repair coverage, if your machine can no longer handle current volume, multi-head requirements, or complex designs, upgrading to a 2-head or 4-head configuration is often the more cost-effective long-term decision. Dr. DTG's lineup — including the XTPro 1502 IPX (2-head) and 1504 IPX (4-head) — can handle 2–4x the output of a single-head machine, a practical step up when demand has outgrown your current setup.
Common Mistakes to Avoid When Troubleshooting
Most troubleshooting goes sideways for the same predictable reasons. Avoid these three:
- Chase the root cause, not the symptom. Replacing thread without checking the rotary hook for burrs — or adjusting tension before verifying the thread path — leads to repeat failures and wasted time.
- Run a test stitch after every adjustment. Stitch on scrap fabric before resuming production. A fix that looks good cold may reveal a secondary issue only under real stitching conditions.
- Confirm part compatibility before installing anything. Needles, bobbins, and bobbin cases that don't match your machine's specs create new problems even after the original issue is resolved. Always cross-check against your machine's manual.
Preventive Maintenance Tips to Keep Your Machine Running
Clean after every major job. Remove lint and thread debris from the bobbin area, rotary hook, and needle plate. Barudan recommends oiling the hook raceway every 4–8 hours of use — lack of lubrication increases friction and contributes directly to thread breaks.
Replace needles on a schedule. Melco recommends changing needles after every 4–8 hours of solid sewing, and also when the needle is broken, bent, burred, or when fabric or thread conditions change. A needle that looks fine may already be dull enough to cause skipped stitches and stitching quality issues before any part failure becomes obvious.
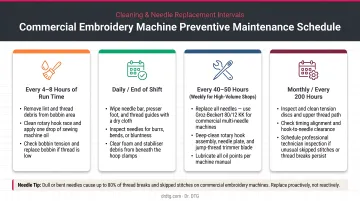
Use high-quality thread consistently. Low-grade or old thread generates excessive lint, creates tension inconsistency, and breaks more frequently. Isacord — 40-weight, 100% polyester thread engineered for high-speed commercial sewing — runs consistently without looping, puckering, or excess lint. Dr. DTG stocks the full 390-color Isacord catalog in 1000m and 5000m spools as the US Master Distributor, so sourcing a reliable supply is straightforward.
Frequently Asked Questions
Why is my embroidery machine not working?
The most common causes are incorrect threading, a dull or bent needle, bobbin insertion errors, or tension imbalance. Re-threading the machine completely with the presser foot raised and replacing the needle resolves most issues before any mechanical fault comes into play.
How much does it cost to fix an embroidery machine?
Minor DIY fixes — needle replacement, re-threading, cleaning — cost little to nothing. Professional servicing varies widely depending on the machine model and the specific failure, so contact a qualified technician for an accurate quote.
Why does my embroidery machine keep breaking thread?
The top causes are burrs on the rotary hook, incorrect upper tension, wrong needle type or size, low-quality thread, or a threading error. Check the hook assembly for burrs and rough spots first — polish with fine emery cloth if you feel any snag points.
Can I fix my embroidery machine myself or do I need a technician?
Threading, tension, needle replacement, and cleaning are all user-fixable with your machine's manual. Mechanical problems involving hook timing, motor components, or internal sensors require a qualified technician — attempting those without proper tools risks further damage.
What causes skipped stitches in machine embroidery?
The main causes are a dull needle, incorrect needle size for the thread, needle-to-hook timing being off, fabric not properly stabilized, or upper tension too tight. Replacing the needle is always the first step — it resolves a large portion of skipped stitch complaints before anything else needs adjustment.
How often should I clean and maintain my embroidery machine?
Clean the bobbin area and hook race after every major job or design run. Oil the hook raceway every 4–8 hours of use per your machine manufacturer's guidance. Schedule a full inspection and service at the intervals your machine manufacturer recommends — consistent maintenance prevents the majority of common failures before they interrupt production.