Introduction
Multi-needle embroidery machines are built for speed and color complexity, and none of that matters if needles aren't correctly positioned before the first stitch drops. The machine handles color changes automatically. Everything before that is on the operator.
Needle positioning is where most production errors originate. Loading cones in the wrong order, missing a step in the thread path, skipping the trace function — these aren't machine malfunctions. They're setup failures, and they're entirely preventable.
This guide walks through the exact steps to position needles correctly on a multi-needle machine: loading thread in color order, threading each needle's full path, assigning colors in the machine interface, and verifying alignment with the trace function. Get these steps right and you eliminate the most common source of wasted runs before production ever starts.
Key Takeaways
- Load thread cones in the same numbered order as the design's color stop sequence
- Thread each needle through the full path: pretensioners, detector wheel, take-up lever, then the needle eye
- Assign needle numbers to design colors in the machine's interface before stitching
- Always run the trace function to confirm hoop clearance and center alignment
- Most positioning failures trace back to skipped steps, not machine malfunction
How to Position Needles on a Multi-Needle Embroidery Machine
Step 1: Load Thread Cones in Color Order
Open the design file or check the machine's color stop display. Most machines show a numbered list matching each needle position to a design color segment. That sequence is your loading guide.
Place each cone on the thread rack post that corresponds to its color stop number. Cone 1 goes to needle post 1, cone 2 to needle post 2, and so on. AMANN's embroidery documentation notes that multi-head machines commonly use 1–18 needles per head, with needle count determining the maximum colors you can thread before needing an intermediate changeover.
Keep threads running in clean, non-crossing vertical lanes from the rack through the guide tubes. Thread path condition matters — sharp edges on guide elements and crossed thread paths cause tension inconsistency and thread breaks.
What can go wrong here: Cones loaded by color preference rather than sequence number cause the machine to stitch correct paths in wrong colors — an error that's invisible until the design is already partially stitched.
Step 2: Thread Each Needle Through the Full Path
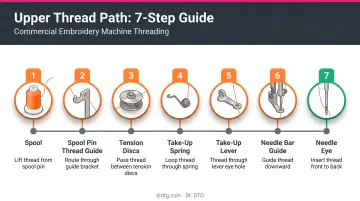
Each needle on a multi-needle machine has a dedicated thread path. According to the Barudan BEXS Instruction Manual, the upper thread follows this sequence:
- Spool pin
- Pretensioners
- Thread-break detector wheel
- Top thread tensioners
- Take-up spring
- Take-up lever eyelet
- Needle eye (front to back)
Every stage must be completed correctly. The two most failure-prone points:
- Thread-break detector wheel: Thread must wrap around the wheel with enough contact to cause it to rotate when thread moves. If the wheel doesn't spin, the machine reads it as a thread break — even with thread present.
- Take-up lever: Missing this eyelet means the machine runs without proper thread control. Improper threading at this stage is a documented cause of bird-nesting and looping under the fabric.
After threading each needle, perform a manual pull test. Pull the thread gently by hand — it should move with smooth but firm resistance. SWF's D-Series manual sets an upper-thread pull target of around 100–120g. Thread that moves freely with no resistance isn't seated properly.
Step 3: Assign Needle Numbers to Design Colors in the Machine Interface
Threading alone doesn't tell the machine which needle to activate at each color change. That's handled through the control panel.
Open the needle bar selection or color assignment screen — available on Happy Japan, Barudan, SWF, and most other commercial machines. For each needle:
- Select the needle number
- Confirm its color stop assignment
- Lock the assignment before moving to the next
Happy Japan's HCS3 manual describes this as the Needle Bar Selection menu, where assignments are programmed before sewing and the machine automatically switches to the correct needle at each color change. SWF's D-Series documents needle bar selection up to the 99th bar.
That covers the standard setup. If your design has more color stops than needles, you'll need to plan before stitching begins:
When the design has more colors than available needles:
- Identify which color stops can be consolidated (similar shades, small fill areas)
- Plan which needles will be swapped mid-job at a designated color stop
- Program those stops as pause points before stitching begins
Don't start stitching and improvise — mid-run decisions under production pressure cause assignment errors.
Step 4: Verify Needle Position Using the Trace Function
After loading and assigning every needle, run the trace function before touching the start button.
Trace moves the embroidery frame through the design's outline without stitching a single thread. It serves two purposes:
- Hoop clearance check — confirms the needle path stays within the hoop boundary at all points
- Placement verification — confirms the needle's starting position aligns with the center mark on the fabric
The Barudan BEXS manual documents two trace modes: perimeter trace (shows the bordered sewable area) and outline trace (follows the design outline to verify position and size). Happy Japan's documentation also supports two-point alignment, where defining two reference points lets the machine set angle and embroidery position automatically.
If the trace reveals a problem:
- Design approaching the hoop edge → use the machine's positioning keys to shift the design (ZSK documents pantograph positioning in 1mm or 1/10mm increments)
- Needle misaligned from the fabric center mark → adjust using positioning keys, then re-run trace
- Do not re-hoop unless the fabric itself has shifted — positioning adjustments handle most offset issues without disturbing the hoop
What You Need Before Positioning Needles
Preparation determines how smoothly the steps above go. A clean, organized setup prevents most threading errors before they happen.
Equipment and Machine Readiness
Check these before threading a single needle:
- Tension disks and guide tubes — clean, free of lint and buildup (buildup causes phantom tension issues and false break alerts)
- Thread-break sensors — functioning and clear of debris
- Needles — correct type for the fabric, not bent or burred; replace any needle showing visible wear before loading
Dr. DTG carries Groz-Beckert 80/12 KK needles for commercial multi-needle machines — a reliable choice for standard embroidery on woven and knitted fabrics. AMANN confirms the DB x K5 is the established worldwide needle system for machine embroidery, with sizes ranging from Nm 55 to Nm 120 depending on application.
Thread Quality and Design File Requirements
Both of these need to be confirmed before your run starts — not after the first thread break:
- Design file: The color stop sequence must be fully defined before needle assignment can begin. A file with missing or merged color stops makes correct needle-to-color matching impossible — this is a digitizing issue, not a machine issue.
- Thread quality: AMANN documents that Isacord polyester embroidery thread maintains consistent coefficients of sliding friction across all colors — so tension stays stable when switching between needles without manual readjustment. Dr. DTG is the USA Master Distributor of Isacord, carrying the full 390-color catalog in 1000m and 5000m spools. The 5000m spools are the practical choice for high-volume runs where multiple needles burn through thread fast.
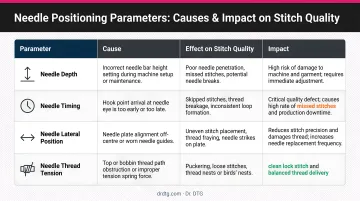
Key Parameters That Affect Needle Positioning Results
Four variables account for most needle positioning failures — and all of them are within your control. Getting these right determines whether your machine runs cleanly or produces skipped stitches, off-color segments, and registration errors.
| Parameter | Why It Matters | Impact When Wrong |
|---|---|---|
| Thread tension per needle | Each needle's tension operates independently | Uneven tension causes loop formation, bobbin thread showing on top, or puckering |
| Color sequence in design file | Determines which needle activates at each stage | One transposed color stop stitches an entire segment in the wrong color |
| Needle bar alignment and height | Active bar must align with the rotary hook below | Skipped stitches on one specific needle — a mechanical sign, not a threading issue |
| Design centering on fabric | Machine doesn't auto-detect hoop type or size | Off-center start causes designs to clip edges or miss placement marks entirely |
Amann — the German manufacturer behind Isacord thread — sets a clear tension benchmark: bobbin thread should form 1/3 of the backside stitch surface. If bobbin thread is pulling through to the top, upper tension is too tight. If top thread is loose underneath, upper tension is too low.
Common Mistakes When Positioning Needles
- Skip the trace step and you lose the only check that confirms needle clearance and fabric alignment before thread is wasted.
- Loading cones by convenience rather than by the color stop list causes wrong-color stitching that won't surface until the job is already running.
- Thread riding on top of tension disks instead of seated between them produces zero effective tension — the symptom looks like a needle or design problem, but it's a threading error.
- Overriding thread-break alerts without confirming the detector wheel rotates risks mid-run failures at that needle position every time.
Troubleshooting Needle Positioning Issues
Most needle positioning problems on multi-needle machines trace back to a handful of identifiable causes. Start with the thread path, then check tension, then move to mechanical alignment — in that order.
Wrong color stitching in the wrong area
- Cause: Needle-to-color assignment doesn't match the loaded thread order, or the design file has a color stop numbering error
- Fix: Open the color assignment screen and compare each needle number against the design color list; re-assign and re-thread if the sequence is reversed or shifted
Immediate thread break on one specific needle after positioning
- Cause: Thread not seated in tension disks, take-up lever missed, or burred needle
- Fix: Replace the needle first (quickest, lowest-cost step), then re-thread the full path for that needle only — run the pull-resistance test before restarting
Design stitching outside the intended placement area
- Cause: Needle starting position not aligned to the fabric's center mark, or the trace step was skipped
- Fix: Return the needle to home position, re-run the trace, and use positioning keys to shift until the needle aligns with the center mark; confirm clearance at all design edges
Thread-break sensor triggering false alerts after re-threading
- Cause: Thread is passing over the detection wheel without engaging it — the wheel isn't rotating, so the machine reads thread absence
- Fix: Re-route the thread around the inspection wheel with enough wraps to create friction — the wheel must spin freely during a manual pull test before you restart
- Barudan's VT error documentation specifically identifies wheel engagement as the first check for false thread-break errors
Conclusion
Correct needle positioning is a four-part process: load cones in color sequence, thread each needle's complete path, assign needle numbers to design colors in the interface, and verify alignment with the trace function. Skip any step and you've introduced a failure point the machine can't catch on its own.
Most errors — wrong color sequences, thread breaks, misaligned designs — come from rushed setup, not from equipment failure. A consistent pre-run checklist eliminates the vast majority of preventable stops. If you're running Xtreme Tech XTPro or Happy Japan machines and want hands-on guidance specific to those interfaces, Dr. DTG provides on-site customer training with every machine purchase and keeps a full OEM parts inventory for both lines at their Brea, California shop.
Once your setup routine is consistent, the machine stops being a source of troubleshooting headaches and starts being the production tool you invested in.
Frequently Asked Questions
How do I assign colors to specific needles on a multi-needle embroidery machine?
Open the needle bar selection or color assignment screen on the control panel. Select each needle number, match it to the corresponding design color stop, and confirm each entry individually — most machines require this before saving the full sequence.
What is the correct order to position needles for a multi-color embroidery design?
Needle order should follow the design file's color stop sequence exactly — cone 1 matches color stop 1, and so on for each subsequent needle. Any deviation causes correct paths to stitch in the wrong colors, often undetected until the job is running.
Can I change needle positions or reassign colors mid-design on a multi-needle machine?
Yes. Most commercial multi-needle machines support planned color stops — the machine pauses, the operator swaps thread and reassigns a needle. For designs with more color stops than available needles, map out which stops require a swap before stitching begins.
Why does needle positioning affect thread tension and stitch quality?
Each needle has an independent thread path and tension system. If thread isn't properly seated in the tension disks or misses a guide point on one needle's path, that needle will produce looping, skipped stitches, or visible color inconsistencies — while every other needle performs normally.
How do I verify needle alignment over the fabric before stitching begins?
Run the trace function after setup — the machine moves the frame through the design outline without stitching, confirming the needle clears the hoop boundary and centers over the fabric. Use the positioning keys to adjust as needed, then re-run trace to confirm.
How many needles should I pre-load for a typical embroidery job?
Pre-load one needle per distinct color stop in the design. Loading all colors upfront eliminates mid-run stops and keeps production moving. When the design's color count exceeds the machine's needle capacity, plan which stops will require a mid-job thread swap before stitching starts.