Introduction
Multi-needle embroidery machines have become the standard for custom apparel businesses, professional embroiderers, and serious hobbyists who need speed, color flexibility, and consistent output. Unlike single-needle machines that require manual rethreading between every color change, multi-needle machines switch colors automatically — saving hours across a production run.
That said, the setup process feels intimidating at first. The machine looks complex, threading paths are unfamiliar, and the sequence of steps isn't always obvious. The good news: most of that complexity is front-loaded. Once you've run your first complete setup correctly, the process becomes routine.
This guide walks you through how to use a multi-needle embroidery machine from power-on to finished stitch-out — covering threading, hooping, design loading, tension settings, and troubleshooting real-world conditions, not just ideal ones.
Key Takeaways
- Multi-needle machines automatically shift between pre-threaded needles, eliminating manual color changes mid-design
- Before stitching, load the correct file format, thread each needle, insert the bobbin correctly, and hoop with the right stabilizer
- Threading guides must be followed in order — skipping even one step causes thread breaks and poor stitch quality
- Run a test stitch-out on scrap fabric before touching your final garment
- Consistent results depend on disciplined hooping, stabilizer selection, and thread tension as much as the machine itself
What Makes a Multi-Needle Embroidery Machine Different
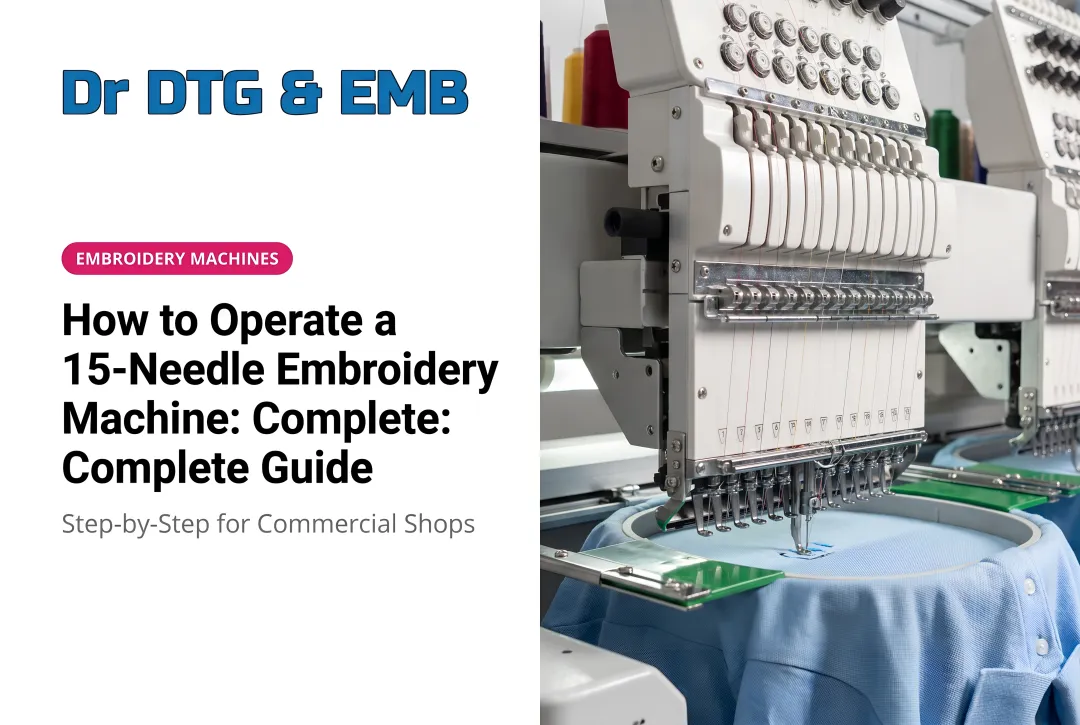
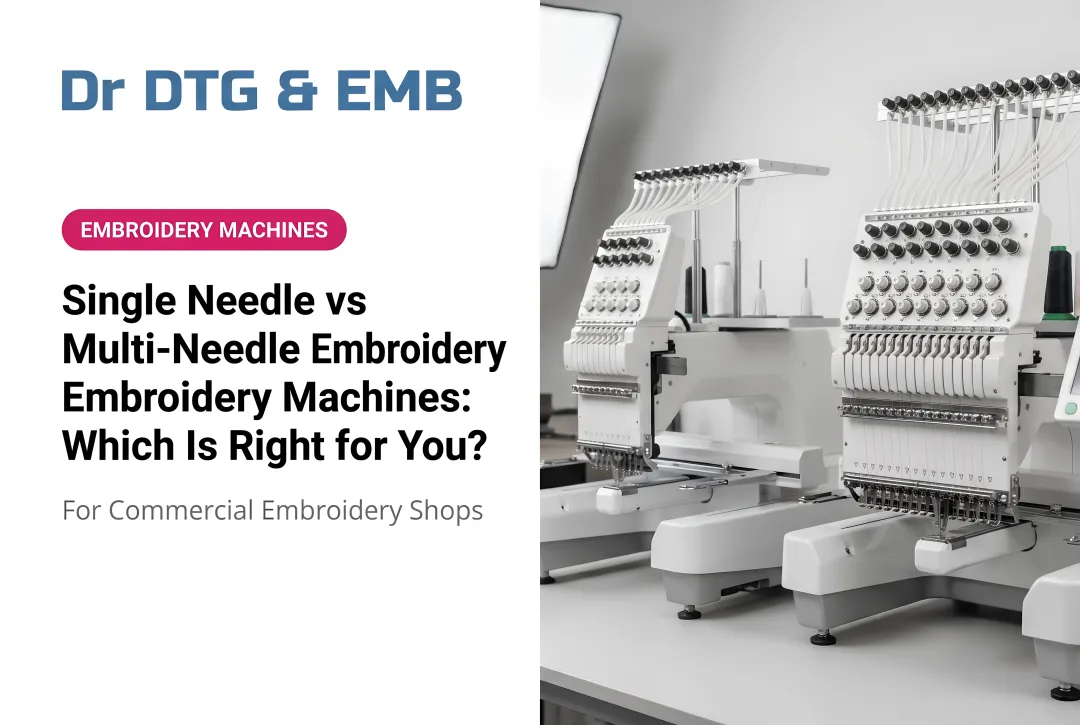
Multi-needle machines hold multiple needles — commonly 10, 12, or 15 — each pre-threaded with a different color. As the design progresses, the machine head shifts automatically to whichever needle the next color requires. That means no stopping mid-run to rethread or swap colors.
The structural feature that matters most for beginners is the tubular free-arm design. Rather than a flat bed, these machines have a cylinder arm that lets you slide hats, sleeves, bags, and other tubular items directly onto the arm for embroidery. Machines like the Happy Japan HCD3E-X1501 (15 needles) and the Xtreme Tech XTPro 1501 IPX (also 15 needles) are built around this architecture, making it straightforward to embroider caps and sleeves without adapters or workarounds.
Is a Multi-Needle Machine Right for You?
Multi-needle makes sense when you:
- Produce 5+ embroidered items per week
- Work with designs using 3 or more colors
- Embroider hats, sleeves, or other tubular items
- Are building or scaling a custom apparel business
A single-needle still works if you:
- Embroider occasionally as a hobbyist
- Work almost exclusively with 1–2 color designs
- Have a very limited startup budget
If budget is a deciding factor, Impressions Magazine reports that multi-needle machines typically range from $7,000–$19,000, with 4–15 needles and faster color changes driving the primary business case.
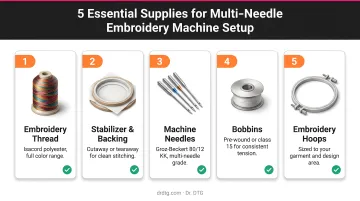
What You Need Before You Start
Gather these before powering on the machine:
- Correct design file format — DST is widely accepted across commercial machines; PES is standard for Brother; JEF for Janome. Your machine's manual specifies what it reads. Artwork files like PNG or SVG must be converted through digitizing software first.
- Embroidery-specific thread for every needle — Quality polyester thread like Isacord is built for high-speed commercial machines and runs consistently without looping, puckering, or breaks. Regular sewing thread shreds at embroidery speeds — don't substitute it.
- The right stabilizer for your fabric — Tear-away for stable woven fabrics, cut-away for stretchy knits, water-soluble for delicate materials. Choosing wrong here causes puckering and misregistration, so match the stabilizer to the fabric before you hoop.
- Prewound bobbins matched to your machine — Prewound bobbins (Style L and M are common commercial formats) are the practical standard for production work because they load instantly and run consistently.
- USB drive or cable to transfer your design file, plus the machine's manual.
Dr. DTG carries all of these supplies — bobbins, backing, needles, hoops, and the full 390-color Isacord thread catalog — so you can source everything from one place before your first run.
How to Use a Multi-Needle Embroidery Machine (Step-by-Step)
Embroidering on a multi-needle machine follows a defined sequence. Rushing any step — especially threading or hooping — leads predictably to thread breaks, registration errors, or wasted garments.
Setup and Preparation
1. Power on and inspect needles. Check each needle for bending or dullness before threading. A compromised needle causes skipped stitches and fabric snags. Replace any suspect needles — Dr. DTG stocks Groz-Beckert 80/12 KK needles, which are suited for knitted, woven, and microfiber fabrics. Madeira's needle guide puts average needle life at around 8 hours of running time; Melco recommends chrome needle changes every 4–8 sewing hours.
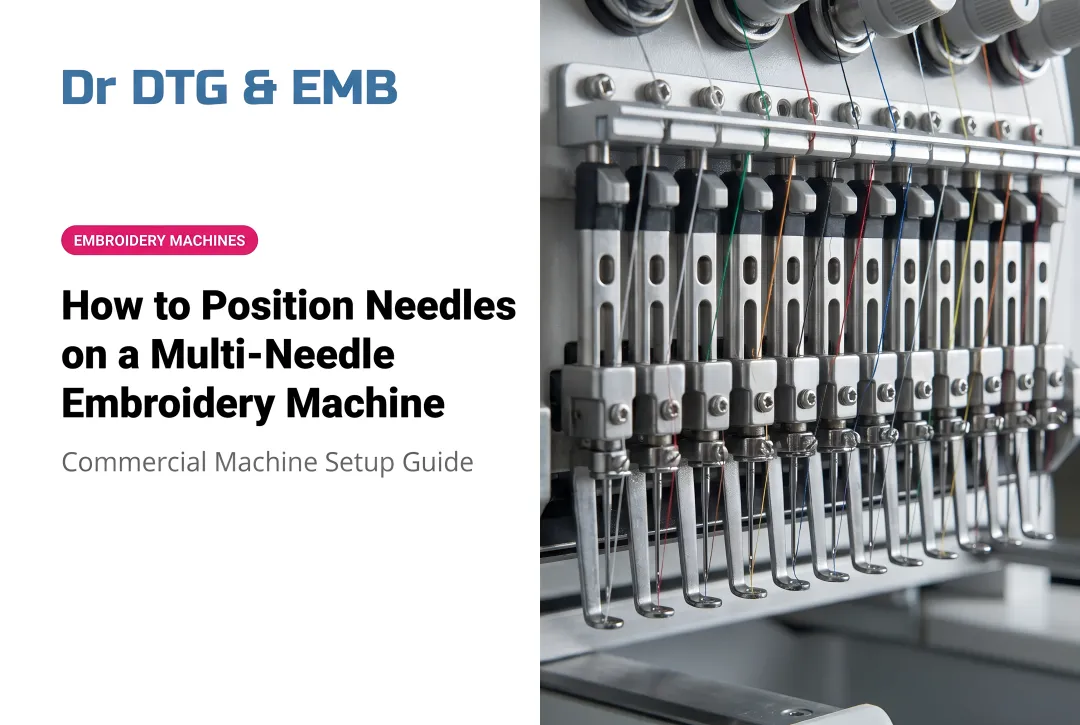
2. Thread each needle individually. Most machines have numbered thread guides printed on the machine body. Follow them in sequence — every single one. Route thread through each guide before passing through the needle eye. Threading one needle completely before moving to the next prevents confusion. If you're doing a color change on an already-threaded needle, tie the new thread onto the old one and pull it through rather than rethreading from scratch.
3. Insert the bobbin correctly. The bobbin must be oriented exactly as your manual shows — incorrect direction is one of the most common beginner errors and causes bobbin thread to appear on the top of the design. The Melco EMB 10/6T manual, for example, specifies the bobbin pigtail facing up. The bobbin case must seat fully and click into place. Never insert or remove the bobbin while the machine is running.
Loading Your Design and Assigning Colors
4. Transfer the design file. Load the file via USB or Bluetooth, locate it on the machine's touchscreen, and confirm the hoop size matches the design dimensions before proceeding.
5. Review and adjust the color sequence. The machine will auto-assign needle positions to design colors. Check this mapping carefully — if needle position 3 holds red thread but the design calls for navy in that slot, use the machine's color swap function to reassign.
Designs with more colors than available needles require one extra step: set the machine to pause at specific color stops so you can manually rethread before it continues.
Hooping Your Fabric
6. Hoop correctly — this matters more than most beginners expect. On a multi-needle machine, the inner hoop ring fits inside the outer ring — the reverse of most home machine hoops. Follow this sequence:
- Place stabilizer beneath the fabric
- Secure both in the hoop until the material is taut and flat
- Attach the hoop to the machine's driver via side brackets and support-arm pins
- Confirm the hoop size matches your machine's settings
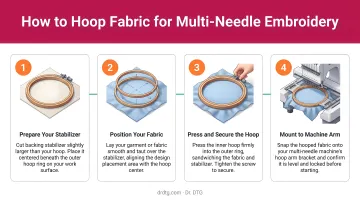
That dual-point attachment stabilizes the frame for heavy fabrics like denim and towels.
7. Use the Trace function before stitching. Run the machine's trace or positioning function to verify the design will land exactly where intended. Skipping this step is how off-center chest logos and crooked cap embroidery happen — 30 seconds now prevents a scrapped garment.
Starting and Running the Embroidery
8. Start at reduced speed for the first few stitches. Watch tension on the first color element. No looping on the underside, no bobbin thread pulling to the top — if it looks clean, let the machine run at full operating speed. Poor tension on the first stitches is your earliest warning of a threading or bobbin problem.
9. Manage thread tails between color changes. As each color segment finishes and the machine shifts to the next needle, the previous thread tail needs to be trimmed before the new segment starts. Most commercial machines handle this automatically with built-in cutters — confirm your machine's behavior on the first color change and trim manually where needed.
What to Watch For While the Machine Is Running
Commercial machines run at 800–1,200 stitches per minute (some commercial specs, like Barudan, reach 1,300 spm on flat goods). At that speed, small problems escalate fast.
Watch for these during every run:
- Fabric drift — On tubular items especially, excess sleeve or garment material can drift into the needle path. Stop the machine immediately if fabric bunches near the presser foot.
- Loops or bird's nesting under the fabric — upper thread is too loose or the bobbin isn't seated correctly. Re-tension the upper thread and confirm the bobbin case is fully clicked in.
- Repeated thread breaks on the same needle — usually a threading path error, a damaged needle, or tension set too tight. Rethread that needle from scratch before continuing.
- Hoop movement — If the hoop shifts during stitching, stop and reposition. A misaligned restart mid-design is one of the hardest problems to recover from, so catching hoop slip early saves the piece.
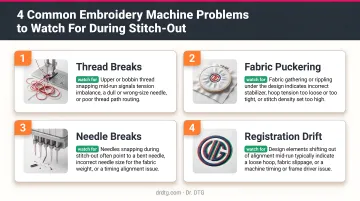
Stay with the machine for the full stitch-out. If something sounds or looks off — unusual noise, thread piling up, the hoop rocking — pause immediately and diagnose before restarting.
Best Practices for Getting Consistent Results
The embroiderers who get consistent results aren't necessarily the most experienced — they're the ones who follow the same checklist every time.
Adopt these habits early:
- Always run a test stitch-out first. Use a scrap piece of the same fabric and stabilizer combination before touching the final garment. This catches tension issues, density problems, and color sequence errors without wasting product.
- Use quality thread consistently. Low-grade thread shreds at commercial speeds. Isacord is 100% trilobal continuous-filament polyester with nearly 2x the tensile strength of rayon — a reliable choice for multi-needle setups running at production volumes.
- Keep a maintenance routine. Per manufacturer guidelines, change needles every 4–8 hours of sewing time and oil the rotary hook every 4–6 hours. Weekly lubrication of the drive shaft, hook shaft bushings, and needle bars keeps wear from compounding.
- Take advantage of dealer support. If your machine came with on-site training — as is standard with Xtreme Tech XTPro and Happy Japan purchases through Dr. DTG — use that time to lock in proper threading and hooping routines from day one.
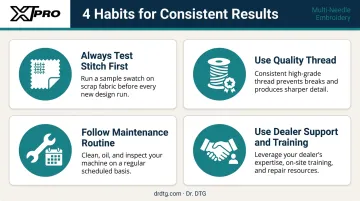
Discipline with these four habits will protect your output quality far more reliably than any advanced technique you pick up later.
Frequently Asked Questions
How do multi-needle embroidery machines work?
Multiple needles are pre-threaded with different colors, and the machine head automatically shifts to whichever needle the design calls for at each color change. This eliminates stopping and rethreading manually between colors — the core reason multi-needle machines run so much faster than single-needle alternatives.
Are multi-needle embroidery machines worth it?
For anyone producing more than a handful of embroidered items per week or working with multi-color designs regularly, yes. The time savings from automatic color changes, combined with tubular embroidery capability for hats and sleeves, make multi-needle machines a strong investment compared to single-needle alternatives.
How do I thread a multi-needle embroidery machine for the first time?
Each needle has its own dedicated threading path marked with numbered guides on the machine body. Follow those guides in order for each thread, use the machine's manual as a visual reference, and thread one needle completely before moving to the next to avoid confusion.
What stabilizer should I use with a multi-needle embroidery machine?
Stabilizer choice depends on fabric: tear-away for stable woven fabrics, cut-away for stretchy knits, and water-soluble for delicate materials. Always test on a scrap piece of the same fabric before stitching the final item.
How many needles do I need as a beginner?
A 10- or 15-needle machine covers most multi-color designs without mid-run color stops. The Happy HCH Plus (7-needle) suits startup operations where most logos use 4–7 colors, while 15-needle machines like the XTPro 1501 IPX (both available at Dr. DTG) handle virtually any design complexity.
What file format do multi-needle embroidery machines use?
Common formats include DST (widely accepted across brands), PES (Brother), and JEF (Janome). Artwork files like PNG or SVG must be converted through digitizing software first — confirm accepted formats in your machine's documentation.