Introduction
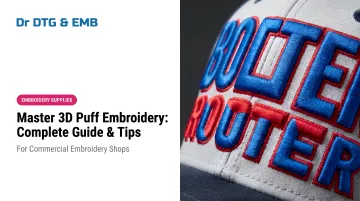
Walk into any sporting goods store, streetwear boutique, or team apparel shop and you'll notice it immediately — caps with logos that jump off the fabric, bold and tactile, demanding attention. That raised, dimensional look is 3D puff embroidery — distinctive enough that customers specifically request it by name, and shops that offer it can charge meaningfully more for the service.
Many embroiderers avoid the technique entirely, assuming foam, stop codes, and custom digitizing make it too complicated. That assumption is wrong. With the right materials and a clear process, 3D puff is approachable even for shops just getting started with cap decoration.
This guide covers what 3D puff actually is, how to digitize for it correctly, a full production workflow, and pro tips for avoiding the most common failures.
Key Takeaways:
- 3D puff embroidery uses foam beneath satin stitches to lift designs off the fabric
- Proper digitizing is the single most critical variable — more than the machine itself
- Use 3–4mm embroidery-specific foam and 100% polyester thread for best results
- Bold, simple designs with elements at least 3mm wide produce the cleanest results
- 3D puff caps command a significant price premium over standard embroidered caps
What Is 3D Puff Embroidery?
3D puff embroidery places a layer of foam — typically urethane — beneath satin stitches, lifting the design off the fabric surface to create a raised, three-dimensional effect. The satin stitches run over the foam, capping it from above while the edges of the stitching cut cleanly through the foam material. This produces a bold, tactile logo or lettering that stands visually above the garment.
Per Tajima's 2024 production guide, the foam is placed after an outline contour is stitched, running stitches hold it in position, and then the satin fill stitches cut the foam at the edges to create sharp, clean borders.
Flat Embroidery vs. 3D Puff Embroidery
| Flat Embroidery | 3D Puff Embroidery | |
|---|---|---|
| Stitch placement | Directly on fabric | Over foam layer |
| Result | Smooth, 2D finish | Raised, dimensional look |
| Digitizing | Standard settings | Must be re-digitized specifically |
| Best for | Detailed designs, fine text | Bold logos, block letters, chunky shapes |
| Primary applications | Apparel, bags, polos | Structured caps, headwear |
The two techniques cannot share the same stitch area. A design digitized for flat embroidery will not produce usable 3D puff results and must be re-digitized from scratch.
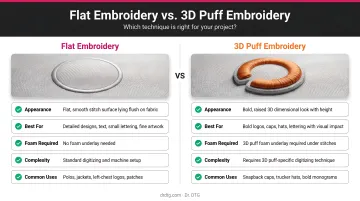
Best candidates for 3D puff: structured caps and hats (their firm surface supports the foam), block lettering, monograms, chunky brand logos. Thin scripts, fine serifs, and designs with narrow elements under 3mm are poor fits.
Materials You Need for 3D Puff Embroidery
Wrong materials are the most common reason 3D puff results disappoint. Get these right before running a single stitch.
Foam (Urethane/Puff Foam)
Embroidery-specific puff foam is required. Craft store foam isn't dense enough to support the stitches — Wilcom's 3D puff webinar resource explicitly flags craft foam as unsuitable. The commercial standard is 3mm or 4mm thickness:
- 3mm foam (Madeira E-Zee 3D Foam, AllStitch): medium grade, suitable for most applications
- 4mm foam (Gunold Puffy Foam Classic): the commercial standard for structured, raised results
- Above 4mm: not recommended — the extra height creates more problems than it solves
Match foam color to your thread color. Show-through on lighter thread colors is a real issue if the foam underneath is a contrasting shade.
Thread
100% polyester thread is the right choice for 3D puff. Ricoma specifically recommends polyester for cap puff work because it withstands the heat cleanup step — using a heat gun to remove foam remnants — better than rayon. Polyester is also stronger under the additional mechanical stress of stitching through foam.
Dr. DTG is the USA Master Distributor of Isacord Thread by Amann (Germany): a 40-weight, 100% trilobal polyester continuous filament thread in 390 colors. Individual spools run $5.29 (1000m) or $9.95 (5000m), with volume and wholesale pricing for commercial shops. Pre-curated 50-spool kits at $222.50 are a practical option for stocking a full production color range.
One caution from Tajima: when using heat to clean foam remnants, don't hold the heat gun too close. Polyester thread can melt if overheated.
Needles and Stabilizer
- Needle: 75/11 sharp point — Wilcom specifically recommends this for 3D cap embroidery. Sharp points penetrate foam cleanly without deflection. Dr. DTG also stocks Groz-Beckert 80/12 KK needles (large-eye, elevated shoulder design) which are purpose-built for foam embroidery and reduce foam compression at the stitch entry point.
- Stabilizer: Cut-away or non-woven backing secured with double-sided tape. Per Tajima's cap workflow, double-sided tape fixes the non-woven fabric to the cap frame, and clips secure the hat to prevent movement during stitching.
Dr. DTG stocks 3D puffy foam, Groz-Beckert needles, and Isacord thread at their Brea, California location, with nationwide shipping available.
How to Digitize for 3D Puff Embroidery
Digitizing determines whether your 3D puff comes out raised and bold or flat and compressed. A file built for standard flat embroidery won't cap foam correctly — you need a dedicated digitizing pass for every 3D puff project.
Core Digitizing Parameters
Follow these settings, supported by Wilcom and Tajima:
- Minimum satin width: 3mm (2mm can work in limited cases but may compress foam too much)
- Maximum satin width: 10–12mm, depending on your machine
- Stitch density: 0.18mm (Wilcom) or 0.2mm for satin stitches cutting through foam end faces (Tajima)
- Underlay: None. Skip zigzag underlay entirely — it pushes down the foam before the top stitches can cap it. Use only minimal support and travel stitches
- Compensation: Use push compensation (approximately 0.3–0.4mm on the sides), not pull compensation. Foam already pushes thread outward, so pull compensation works against you. End caps should extend roughly 0.5mm beyond the satin stitch edge for clean corners
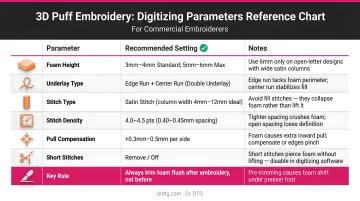
The Stop Code
This is the step most beginners miss. Your digitized file must include a color stop command after the outline is stitched. The machine pauses here so you can place the foam before the fill stitches begin. Without this stop code, you lose the window to position the foam. Per Tajima: "forgetting the stop code means the timing to place urethane will be missed."
Design Selection for Digitizing
Not every design translates to 3D puff. Any stroke narrower than 3mm doesn't belong in a 3D puff design — that's the baseline filter. Stick to:
- Block lettering and chunky sans-serif fonts
- Simple brand logos with solid fill areas
- Monograms where each stroke reads clearly at size
- Geometric shapes with clean, defined edges
Avoid fine scripts, small text under 3mm, tight internal void areas, and anything that relies on fine detail for its visual impact.
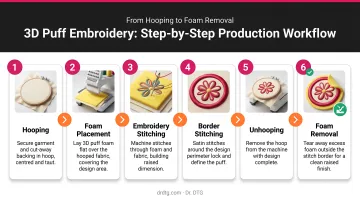
Step-by-Step: How to Do 3D Puff Embroidery on Caps
These six steps cover the full production sequence — from hooping the cap to cleaning up the finished design. Follow them in order for consistent results.
Step 1 — Prepare and Hoop the Cap
Fix non-woven backing to the cap frame using double-sided tape. Set the cap on the frame, pull the sweatband out so it doesn't get sewn in, and use clips to secure the cap firmly. Any movement during stitching will shift your registration.
Step 2 — Load the Design and Set Machine Mode
Upload your 3D puff digitized file via USB or Wi-Fi. Set the machine to semi-automatic or manual mode so it stops at each color step. Run the trace function first — confirm the needle path stays fully within the frame boundaries before starting production.
Step 3 — Stitch the Outline
Press start. The machine stitches the design outline and pauses at the stop code. This outline is your placement guide for the foam. If you're using two thread colors for visual contrast, the outline can be stitched in a different color from the fill.
Step 4 — Cut and Place the Foam
Cut puff foam to cover the entire design area, leaving at least 1 inch of excess on all sides. Secure the foam over the stitched outline with double-sided tape — this prevents shifting when the machine resumes. Make sure the foam color matches your thread color so any exposed edges blend in.
Step 5 — Stitch Over the Foam
Resume the machine at a reduced speed: 500–600 stitches per minute, per Ricoma's guidance for 3D cap puff work. The extra material increases the risk of needle and thread breaks, so drop your speed and don't rush it. Hold or tape the foam edges if needed until the first stitches anchor it.
Step 6 — Remove Excess Foam
Peel away excess foam around the design edges after embroidery completes. For remnants in tight areas, briefly apply heat from a heat gun or hair dryer to melt them away. Keep the heat source moving — don't hold it in one spot — and use polyester thread — it handles heat removal better than rayon.
Pro Tips to Avoid Common Mistakes
Thread and needle breaks are the most frequent complaint in 3D puff work. The causes are almost always:
- Running the machine too fast (stay at 500–600 SPM)
- Using rayon thread instead of polyester
- Using craft foam that's too soft
- Using foam thicker than 4mm
Design selection errors come in a close second. If a customer brings in a design with thin script lettering or fine details, don't try to force it into a 3D puff format. Simplify the design first or quote it as flat embroidery instead. The 3mm minimum stroke rule is a hard limit — below that threshold, foam cannot be held cleanly by the stitch.
Always run a test on scrap fabric or a spare cap before committing to production. Match the test material as closely as possible to the actual hat fabric, and hold onto flawed test caps — they serve as useful reference samples for future jobs.
Why 3D Puff Embroidery Is a Smart Business Add-On
The headwear market is large and growing. Grand View Research projects the global headwear market to reach $62.83 billion by 2033, registering a 6.9% CAGR from 2026 to 2033. In the U.S. promotional products industry specifically, caps and hats represented 9.0% of total sales-volume distribution in 2024 according to PPAI data — with demand increasing year over year.
3D puff caps command a meaningful price premium. Vendor benchmarks give a sense of the range:
- Broken Arrow: approximately $3.00 more per hat than standard embroidery
- Stitch America: $5.00 each for 12–23 pieces, dropping to $1.00 each at 48+ pieces
- Threadbird: a $1.75 per garment upcharge on embroidery orders
Who's Buying 3D Puff Caps
The customer segments with the strongest demand:
- Sports teams — high schools, recreational leagues, club sports ordering in volume
- Streetwear brands — where the raised, bold aesthetic is part of the visual identity
- Corporate merchandise — premium headwear for branded giveaways and uniforms
- Custom fashion labels — limited-run caps where premium finishing justifies the price point
Not every embroidery shop offers 3D puff. That gap is a real competitive advantage — but only if you have the right equipment to deliver consistent results at volume.
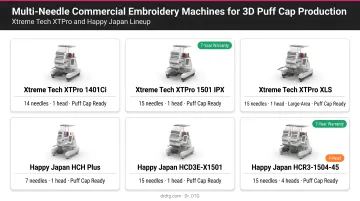
Equipment for Commercial 3D Puff Production
Commercial 3D puff production requires a multi-needle embroidery machine with cap frame capability, stop-code mode, adjustable speed control, and consistent tension management. These aren't optional features — they directly affect foam height uniformity and stitch quality across a run.
Dr. DTG carries machines built for exactly this work:
- HCH Plus (7-needle) — compact cap-capable machine for smaller shops
- HCD3E-X1501 (15-needle) — mid-range production with full cap frame support
- HCR3-1504-45 (4-head commercial) — high-volume runs with multi-head efficiency
- Xtreme Tech XTPro line — available with a 7-year warranty option
Every machine purchase includes a pre-purchase demo and on-site training. Dr. DTG also carries the full supply stack — Isacord thread, 3D puffy foam, Groz-Beckert needles, and backing — so shops can source equipment and consumables in one place. Reach the team at 714-770-0969 or stop by the Brea, CA showroom to talk through your setup.
Frequently Asked Questions
What is the difference between 3D puff embroidery and regular embroidery?
Regular flat embroidery stitches lie directly on the fabric, producing a smooth 2D result. 3D puff embroidery places a foam layer beneath the stitches, lifting the design off the fabric surface for a raised, dimensional look with more visual impact. The two techniques require different digitizing and cannot share the same stitch area.
How much does 3D puff embroidery cost?
Pricing varies by vendor, quantity, and design complexity. As a benchmark: Broken Arrow charges roughly $3.00 more per hat than standard embroidery, while Stitch America prices 3D puff at $5.00 per piece for small runs (12–23 units), dropping as quantity increases. Expect to pay a clear premium over standard embroidered headwear regardless of which shop you use.
What foam thickness is best for 3D puff embroidery?
3–4mm embroidery-specific puff foam is the standard for commercial work. Madeira publishes 3mm foam; Gunold publishes 4mm for commercial work. Foam above 4mm causes more problems than it solves, and craft store foam is too soft to support the stitches properly.
What designs work best for 3D puff embroidery?
Bold, simple designs where every element is at least 3mm wide — block letters, monograms, and chunky logos. Fine scripts, thin lines, and intricate detail work cannot hold the foam cleanly and will produce compressed, unclear results.
Can any embroidery machine do 3D puff embroidery?
Most commercial multi-needle machines with cap embroidery capability can handle 3D puff, provided they support semi-automatic or manual mode to pause at stop codes between color steps. Speed control and consistent tension matter too — running too fast is the primary cause of thread and needle breaks on foam.