](https://file-host.link/website/drdtg-x31ae1/assets/refined-images/1781620365072000_6ac4ac76348c4546ab93aeac7c5ff943/360.webp)
They don't.
Any embroidery machine — a home single-needle or a commercial multi-needle — can produce quality patches when paired with the right stabilizer, properly digitized files, and the correct stitch sequence. The global embroidered patches market was valued at nearly $100M in 2023 and is growing fast, which means the demand is there. The question is whether your process is ready to meet it.
This guide covers exactly what you need, the step-by-step method, and how to diagnose the most common failures before they waste your materials and machine time.
Key Takeaways
- Any embroidery machine makes patches when the stabilizer, fabric, and stitch sequence are correct
- Digitize your design file specifically for patches — standard embroidery files won't produce clean results
- 40-weight polyester thread is the standard for both fills and satin borders
- Border stitching always runs last, after the main design fill is complete
- A full-density satin border of at least 3mm lets you skip the Merrow machine entirely
What You Need Before Making Patches
Getting the materials right before you start is half the battle. The wrong stabilizer or a poorly structured design file will cause problems that technique alone can't fix.
Stabilizer Options
The stabilizer choice drives the entire patch construction method:
| Stabilizer Type | Best For | Removal Method |
|---|---|---|
| Fibrous water-soluble (e.g., Floriani Wet N Gone) | Dense fabric-base patches | Rinse with water |
| Heavy film water-soluble (e.g., Madeira Badgemaster, 80 micron) | Fabric patches, heirloom work | Rinse with water |
| Polyolefin/badge film (e.g., Madeira E-Zee Badge Film, 100 micron) | Thread-only patches, no fabric base | Heat removal at 248–284°F |
| Cut-away | When permanent backing is acceptable | Tear/trim, stays in place |
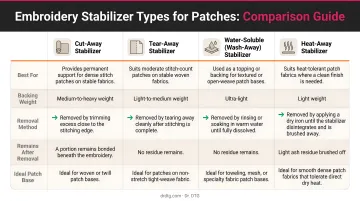
Fibrous water-soluble stabilizers handle high-stitch-density designs better than plastic film options — the fibrous structure doesn't perforate as aggressively under dense needle penetration.
Patch Base Fabrics
- Polyester twill — industry standard; dimensionally stable, low fray, fine texture for crisp results
- Felt — preferred for chenille-style patches; doesn't fray after cutting, nothing deflects the needle
- Canvas — adds structure but coarser weaves can deflect needles on denser designs
Thread, Needles, and Design File
Thread: 40-weight polyester is the standard for fills and borders. It handles high stitch density without excessive thread breaks, holds color through repeated washing, and produces consistent satin-border coverage. Dr. DTG stocks the full 390-color Isacord catalog — 100% polyester, made in Germany by Amann — in 1,000m spools from $5.29 and 5,000m spools from $9.95, with volume pricing for commercial shops.
Needles: A 75/11 round-point needle covers most twill and canvas patch work. Switch to a finer needle for felt to minimize visible puncture marks. Dr. DTG carries Groz-Beckert 75/11 RG needles in 100-count boxes at $28.00 — a reliable all-purpose choice for woven and knitted substrates.
Design file: A standard embroidery file won't produce clean patches. Your file must include:
- A placement stitch outline
- A tack-down pass
- Main fill elements stitched before the border
- A full-density satin or faux-merrow border as the final element
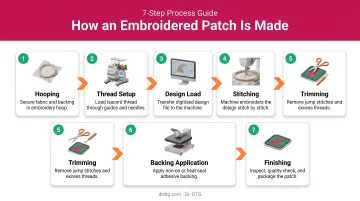
How to Make Patches with Any Embroidery Machine
This seven-step method works on any machine, whether home single-needle or commercial multi-needle. Patch materials are dimensionally stable, so this process is more forgiving than direct garment embroidery.
Step 1: Hoop the Stabilizer
Hoop your chosen stabilizer drum-tight — no slack, no give. A loose hoop causes fabric shift and edge misalignment that can't be corrected mid-run. Test tension by gently tapping the surface: it should produce a low, taut sound.
Step 2: Stitch the Placement Line
Run the placement stitch first. The machine outlines exactly where the patch fabric should sit, ensuring consistent positioning across every patch in the run.
Step 3: Position and Secure the Patch Fabric
Place pre-cut patch fabric over the placement outline. For materials that shift, apply a light mist of embroidery adhesive spray between the stabilizer and fabric — don't over-spray, as residue builds up on the needle.
For irregular shapes: Position uncut fabric over the area, stitch 1–3 straight passes to define the edge, then manually trim the excess before proceeding.
Step 4: Stitch the Tack-Down
Run the tack-down pass to lock the fabric before main design stitching begins:
- Pre-cut pieces → zigzag stitch tack-down
- Hand-cut in-hoop pieces → straight-stitch perimeter
Step 5: Embroider the Main Design
Stitch all central design elements — fills, lettering, decorative stitching — before the border. The border runs last, always. Running it early perforates the stabilizer edge and causes fabric shift during fill stitching.
Step 6: Stitch the Full-Density Border
Stitch the border using a full-density satin column of at least 3mm–4mm width. Wider is better for covering raw fabric edges and preventing fraying after cutting.
Brother's PE-DESIGN 11 Embroidered Patch Wizard documents a 3.0mm satin border at 4.5 lines/mm density as a working reference point. Specialty digitizing software can also replicate a faux-merrow effect (replicating the look of traditional Merrow edging) without any additional equipment.
Step 7: Remove Stabilizer and Finish
- Water-soluble: Rinse with water, allow to dry fully
- Polyolefin film: Apply heat at 248–284°F; excess film releases cleanly
- Trim remaining patch fabric close to the border with sharp scissors — cut outside the satin column, not through it
- Optional: press iron-on heat-seal adhesive backing for heat-applicable patches
Key Variables That Determine Patch Quality
Two identical machines produce very different patches depending on how well these four variables are controlled.
Hooping Tension
A loose hoop allows the stabilizer to flex during stitching, causing registration errors between the placement line, tack-down, and final border. Even a 1mm shift ruins edge alignment.
Check tension before every run: the stabilizer should produce a low, taut sound when tapped — this confirms drum-tight tension. The right technique: pull the material taut along the longer sides first, then press the corners in slightly — this prevents the fabric from loosening mid-run.
Stabilizer Type vs. Design Density
High-stitch-density designs perforate plastic film stabilizers more aggressively than fibrous water-soluble materials. A film stabilizer under a heavily filled design can cause the patch to float or pop out during the border run.
Match your stabilizer to your design:
- Dense, heavily filled designs → fibrous water-soluble stabilizer
- Light thread-only patches → plastic film, with stitch count managed through underlay digitizing
Border Width and Stitch Density
A border narrower than 3mm often fails to capture fabric fibers fully, leaving visible fraying after cutting. A 3.5mm–4mm satin column with an edge-walk underlay plus double zigzag underlay creates a border with more body and a wrapped appearance that holds through repeated washing.
Thread Weight
- 40-weight polyester: fills and borders for most patch types
- 60-weight: fine lettering under 4mm height, where thread density would otherwise cause bunching
- 30-weight: avoid for satin borders — it looks bulky and distorts the column shape
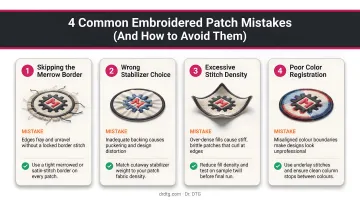
Common Mistakes When Making Patches
Most patch problems trace back to four repeatable errors. Catch these early and you'll sidestep the most common causes of misaligned borders, fraying edges, and stabilizer remnants.
- Skipping the placement stitch or tack-down pass. These two steps anchor the patch material — without them, fabric drifts and borders misalign. Each pass takes under a minute.
- Running the border before the main design fill. The dense border perforates the stabilizer edge. Fill stitching that follows causes the patch to shift inside a weakened frame.
- Using the wrong stabilizer. For clean-edge patches where the stabilizer must be fully removed, tear-away leaves remnants that prevent a finished look. Water-soluble, polyolefin, or badge-film stabilizers work best for freestanding or clean-edge patches.
- Cutting into the border. Trimming within the satin stitch column — rather than just outside it — severs the anchoring threads. The border unravels within a few washes. Always trim at or just beyond the outermost thread of the border column.
Troubleshooting Patch Problems
Patch failures almost always trace back to stabilizer failure, hooping error, or design sequencing errors. Here's how to diagnose the most common ones:
Patch fabric shifting mid-run
- Likely cause: insufficient adhesive spray, loose hoop, or missing tack-down
- Fix: re-hoop with drum-tight tension; apply adhesive spray between stabilizer and fabric; confirm the tack-down pass is set to zigzag for pre-cut pieces
Border threads fraying or unraveling after cutting
- Likely cause: border too narrow, density too low, or scissors cut through the satin column
- Fix: increase border width to at least 3.5mm; add edge-walk underlay; trim with sharp scissors just outside the satin column edge
Patch pops out of stabilizer during border stitching
- Likely cause: plastic film stabilizer under a high-density design; needle perforations along the border edge weaken the film before the border run finishes
- Fix: switch to fibrous water-soluble stabilizer for dense designs; reduce stitch density in the main fill if film must be used; reduce stitching speed slightly to lower mechanical impact on the stabilizer edge
Frequently Asked Questions
Can an embroidery machine sew on patches?
Yes. Any embroidery machine can both make patches and attach finished patches to garments. Making patches uses the stabilizer-base method covered in this guide. Attaching a finished patch requires hooping the garment and stitching around the patch perimeter or edge.
What stabilizer do I need to make patches with an embroidery machine?
Fibrous water-soluble stabilizer works best for dense fabric-base patches and rinses away cleanly. Polyolefin or plastic badge film suits thread-only patches where no fabric base is used. Using the wrong stabilizer for your design density can cause puckering or poor edge definition.
What fabric is best for making embroidered patches?
Polyester twill is the standard — stable, low-fray, and compatible with dense embroidery. Felt is the preferred alternative for chenille-style patches because it doesn't fray at all after cutting, so no border is needed to contain raw edges.
Do I need a special design file to embroider patches?
Yes. A standard embroidery file must be re-digitized for patches to include a placement stitch, tack-down pass, fill-before-border sequence, and full-density satin border. Running a non-patch file on patch materials won't produce clean results.
How do I get a clean patch edge without a Merrow machine?
A full-density satin stitch border of 3mm or wider, stitched as the final design element, creates a clean wrapped edge. Specialty digitizing software such as Brother's PE-DESIGN patch wizard can produce a faux-merrow effect that closely replicates the look of a traditional Merrow overlock edge.
Can I make iron-on patches with a home embroidery machine?
Yes. Complete the patch, press a heat-seal adhesive backing onto the finished piece before trimming, then apply heat per Madeira's specifications: 320–392°F, 15–30 seconds dwell time, and 40–60 psi pressure. Use a Teflon or silicone cover sheet to protect the embroidery surface during pressing.