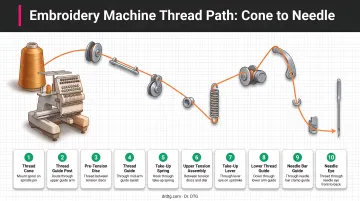
The path from cone to needle looks complex at first glance — but it's a single, logical sequence: cone → thread tree → guide tube → pre-tension → tension assembly → break sensor → take-up lever → needle. Every stop along that path serves a specific mechanical purpose. Skip one, and the machine tells you immediately.
This guide covers everything you need: what to prepare, the complete step-by-step threading process, the two methods professionals use for routine vs. from-scratch threading, the variables that affect stitch quality, common mistakes, and a troubleshooting map for the most frequent problems.
Key Takeaways
- Threading is a fixed, repeatable sequence — every stage controls a specific aspect of tension or thread delivery
- Always thread with the machine powered off or in E-Stop mode
- Tension assembly is the most critical section — correct disk seating and winding counts directly determine stitch quality
- Skip the take-up lever eye and you'll get instant bird nesting under the throat plate — always confirm this point before sewing
- Run the "dental floss" pull test after threading — smooth, consistent resistance confirms correct path before your first stitch
What You Need Before Threading a Commercial Embroidery Machine
Preparation eliminates the majority of threading errors before the process begins. A mis-threaded machine running at production speed amplifies every small setup mistake.
Equipment and Thread Readiness
Minimum tools before you start:
- Thread scissors or snips — sharp enough to cut cleanly without fraying
- Wire threading tool — for feeding thread through guide tubes; don't substitute a bent paperclip (static electricity and tube length make gravity-feeding unreliable)
- Tweezers — for clearing lint from tension disks and guide channels
- Adequate lighting — you need to clearly see the needle eye and tension disk seating
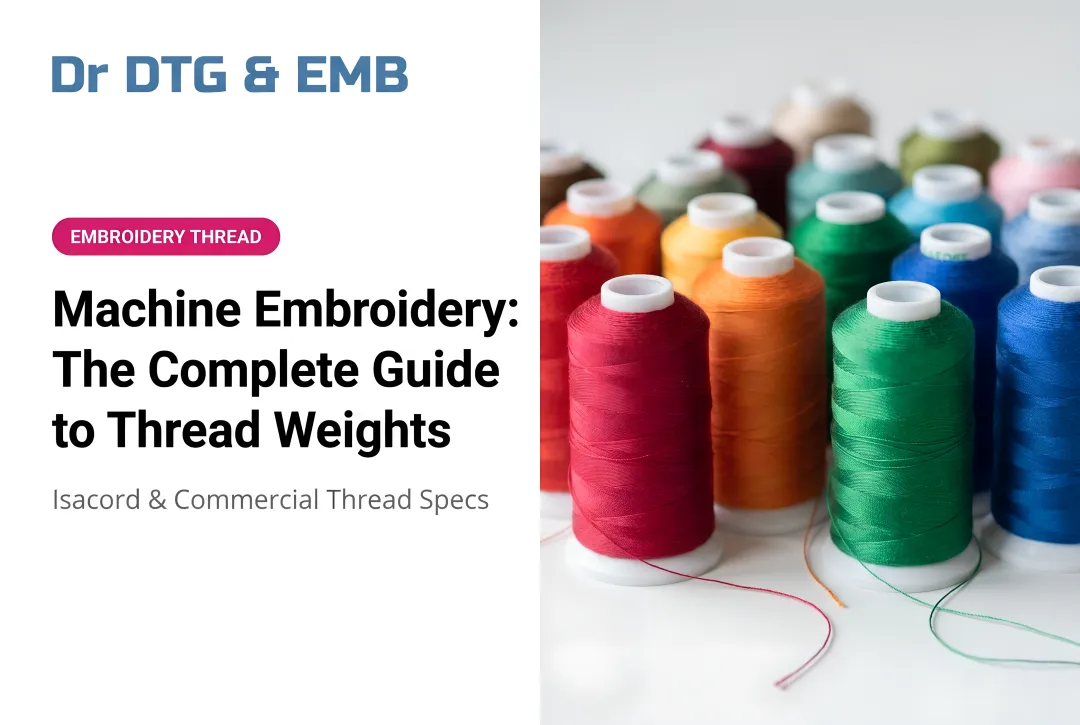
For thread, 40wt polyester is the commercial industry standard. The Happy HCD2-1501 training documentation lists 40wt polyester (or rayon) as the standard upper thread for commercial multi-needle operation. Polyester's tensile strength and consistent feed characteristics keep break rates low at high speeds.
Thread quality matters more than most operators realize. According to Barudan's FAQ, poor-quality thread directly causes thread breaks and tension problems. Impressions Magazine also links cheap thread to downtime from breaks, slow sew speeds, and lint buildup in tension assemblies.
Dr. DTG is the USA Master Distributor for Isacord 40wt polyester — the full 390-color catalog, available in 1000m and 5000m spools, formulated for consistent feed at commercial machine speeds.
Needle and Machine Condition Checks
Before threading, inspect the needle:
- Check for burrs — run a fingernail down the point; if it catches, replace it
- Check seating — the needle must be fully inserted with the scarf (the groove above the eye) facing toward the rotary hook and the long groove facing front
- Check age — the Madeira Needle Guide (2022) cites an average needle life of approximately 8 hours of running time; replace on a regular schedule rather than waiting for failures
Replacing a needle on schedule costs cents. Replacing a ruined garment — or losing a client order — costs far more.
How to Thread a Commercial Embroidery Machine: Step-by-Step
The following path applies to most commercial multi-needle machines, including 15-needle platforms like the Happy Japan series and the Xtreme Tech XTPro 1501. The XT Pro 1501/2001 Operation Manual identifies the path components as the thread pallet, conductor tray, lead tube, tension board, and mask. Barudan's 15-needle threading guide lists pre-tensioners, thread-break detector wheel, top tensioners, take-up spring, take-up lever, presser foot, and needle. Component names vary by brand — the mechanical sequence does not.
Always perform this process with the machine powered off or in E-Stop mode. The Barudan BEXS manual specifies stopping the machine and disconnecting power before working on threading or turning shafts.
Step 1: Cone Placement and Thread Tree Routing
Seat the cone fully and vertically on its numbered rack post — a wobbling cone creates jerky, inconsistent tension. Route the thread upward through the overhead rack guide hole that matches that needle's number position. Matching cone number to machine-marked position prevents diagonal drag between adjacent thread paths.
Pull enough thread down to work comfortably. Confirm the thread is not crossing over adjacent paths on the rack; crossed paths create friction that falsely tightens tension before the thread even reaches the head.
Step 2: Feeding Through the Guide Tube
Insert the wire threading tool from the bottom of the numbered guide tube upward, hook the thread into the tool's eyelet, then pull the tool back down. This draws the thread through cleanly. Static electricity and tube length make gravity-feeding unreliable in most shop environments, so use the wire tool every time.
Confirm the thread exits the tube cleanly without wrapping around adjacent tubes. Any crossing at this stage creates invisible tension inconsistencies downstream.
Step 3: Pre-Tension Routing
Route the thread under the pre-tension disk or knob at the top of the head, entering from the left side. The pre-tension stage stabilizes feed before the thread enters the main tension assembly, preventing the snap that breaks thread as the machine accelerates to speed.
Quick verification: gently pull the thread after this step. It should offer slight, smooth resistance rather than fall freely through.
Step 4: Tension Assembly — Winding Counts and Check Spring
Threading methodology varies by machine brand — get this step wrong and no other adjustment will fix it:
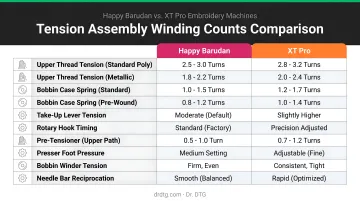
- Happy HCD2: 1/2 turn through the upper tensioner, then one full clockwise turn around the lower spoked wheel (which also serves as the break sensor)
- Barudan 15-needle: one clockwise wrap around the detector wheel, then 1.5 wraps between the nylon wheels and over the take-up spring
- XT Pro: one full circle on the tension board
Always follow your specific machine's manual for winding counts. The counts listed above are model-verified baselines for 40wt polyester. Metallic or thicker threads may require fewer wraps.
Winding direction matters just as much as count. Happy maintenance documentation confirms that upper thread must be Z-twisted and wound correctly to prevent loosening during rotary hook operation. Both Happy and Barudan specify clockwise wraps — follow this on every wrap without exception.
After the lower clamp, route the thread to catch the L-shaped check spring (take-up spring). Pull the thread gently and the spring should deflect downward and snap back. A static spring means it was missed. The symptom: looping on the embroidery surface.
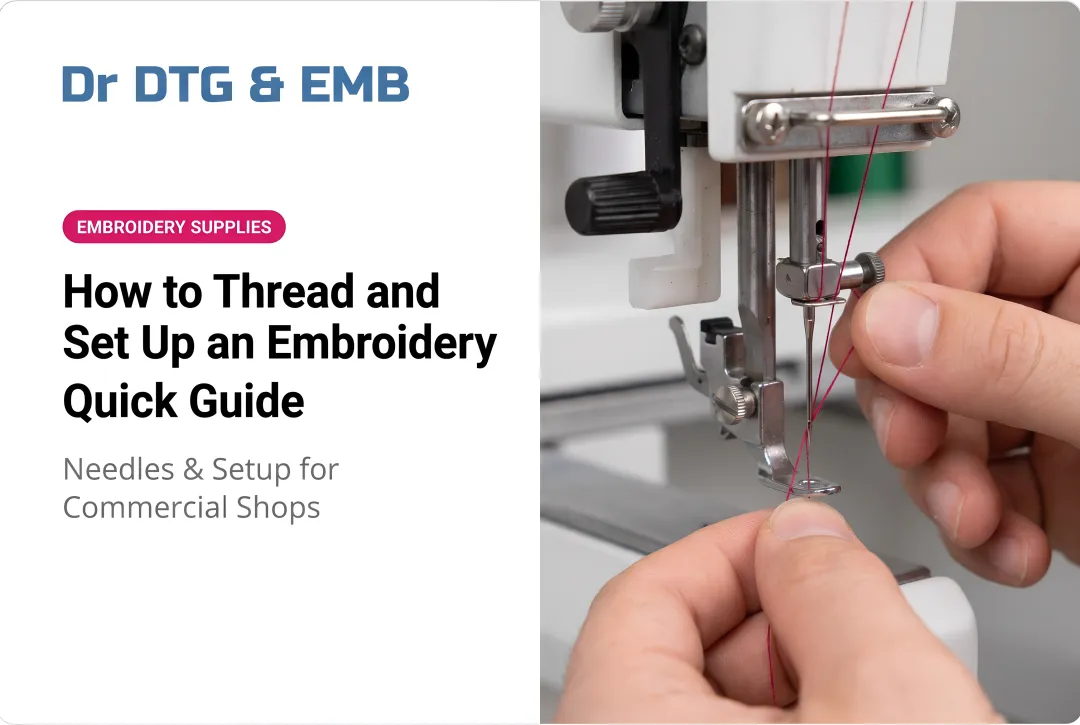
Step 5: Take-Up Lever
Route the thread upward and pass it through the eye of the take-up lever (not over it, not behind it). Thread draped over or behind the lever rather than positively through its eye will produce a massive bird nest under the throat plate within the first few stitches.
Verification: Manually rotate the handwheel (machine off) and watch the thread move up and down with the lever. If the thread doesn't travel with the lever, it has missed the eye. Re-thread this stage before continuing.
Step 6: Lower Guides, Needle, and Tail Securing
Route the thread straight down through the lower guide plate (through the hole specific to that needle number), then through the thread press set (the small guide clip directly above the needle clamp). Skipping this final guide causes the thread to enter the needle at a sharp angle, generating friction and heat that frays thread quickly.
Thread the needle eye front-to-back. Both Barudan's 15-needle guide and Gunold's commercial needle guidance confirm this orientation: long groove facing front, scarf facing back, eye threaded front to back.
Leave about 1 inch (2–3 cm) of thread tail and tuck it under the holding spring on the needle bar driver.
Final pull test: Pull 5–6 inches of thread from the needle end. Resistance should feel like pulling dental floss — firm and smooth. Free-falling means a tension stage was missed. Jerky or catching means the thread is snagged on a guide edge rather than seated inside it.
From-Scratch Threading vs. the Tie-On Method
Professional embroiderers use two distinct approaches. Choosing correctly saves real time on the floor.
From-scratch threading (the full path above) resets the entire thread path. Use it when:
- Setting up a new machine or new needle position
- After a bird nest or a thread break that rebounded into the machine
- Troubleshooting any tension or stitch quality issue
The Tie-On Method (For Color Changes)
The tie-on method is the speed solution for routine color changes when the existing thread path is confirmed good.
Based on Happy HCH-701 training documentation:
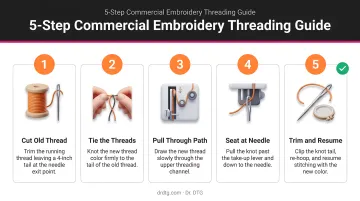
- Place the new cone on the rack
- Tie the new thread to the old thread using a square knot with trimmed tails (3–5 mm). Note: Tajima's TAJIMAG guide recommends the Weaver's Knot as an alternative
- Pull the old thread from the needle end to drag the new thread through the entire path
- Cut the knot just above the needle eye (knots cannot pass through)
- Thread the needle front-to-back as normal
When NOT to use the tie-on: If the machine has been producing false thread-break errors, shredding thread, or inconsistent stitches, do not inherit a faulty path. Full from-scratch re-threading resets every control point.
Key Variables That Affect Threading Quality
Threading correctly is necessary but not sufficient. How each component is engaged determines whether the machine produces consistent, sellable stitches or constant stops.
Thread Tension and Disk Seating
Tension is created by path friction across multiple control points, not a single dial. If thread rides on top of the tension disks rather than seated between them, effective tension is zero regardless of knob settings. The bobbin thread will pull the top thread to the underside on every stitch.
Disk seating check: Hold the thread above and below the tension assembly and pull firmly. You should feel a subtle resistance as the thread seats deep between the disks. No resistance means the thread is riding on top.
Madeira's thread tension guide specifies that a correctly stitched satin column should show approximately one-third bobbin thread running down the center on the back of the embroidery.
Use the back of your embroidery as a quick diagnostic: all top thread visible on the back means top tension is too loose; all bobbin thread visible means top tension is too tight or there's a snag in the path.
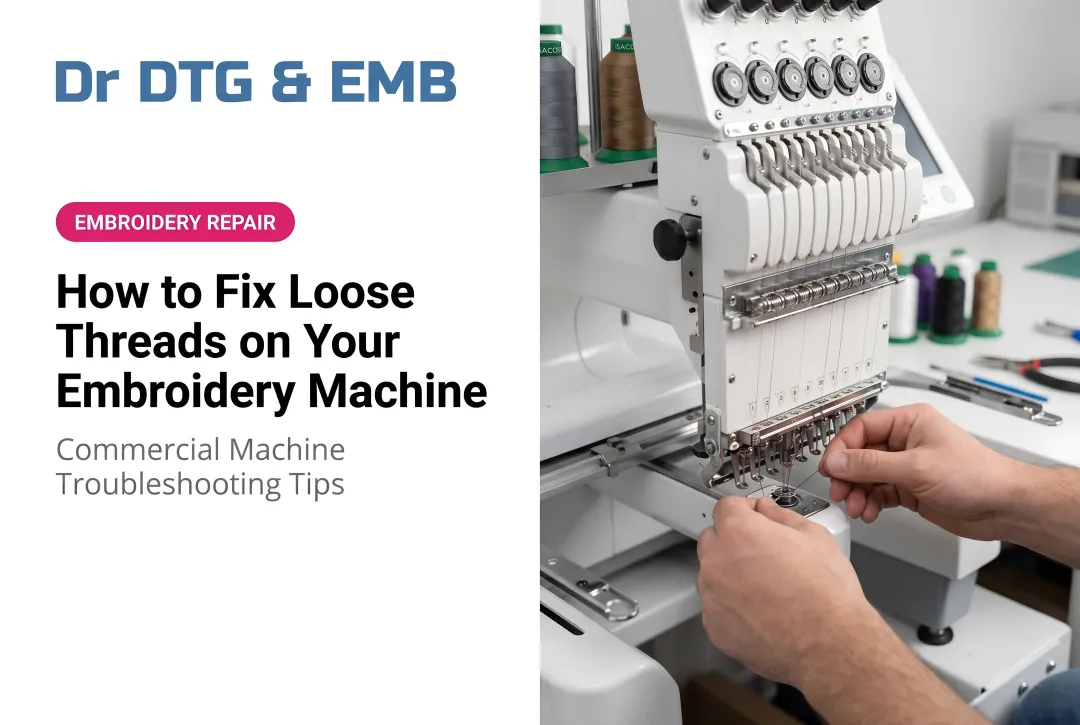
Break Sensor Wheel Engagement
The break sensor wheel must physically spin as thread feeds through it. Insufficient winding allows thread to slide over the wheel without turning it, triggering false "thread break" errors that halt production. Rotary wheels must spin during sewing — slack in the thread path can let it jump off the wheel entirely.
Engagement check: Pull thread by hand before restarting and watch the wheel rotate. If it stays still, re-thread that section with more tension on the feed path.
Needle Size Matching
Even a perfectly threaded head produces poor results with a wrong-sized needle. General sizing guidance based on Madeira and Happy documentation:
| Needle Size | Application |
|---|---|
| 65/9 | Fine or lightweight fabrics |
| 75/11 | Standard wovens, polos (Happy HCD2 baseline) |
| 80/12 | Caps, heavy canvas (per Happy HCD2) |
| 90/14 | Heavier threads; larger thread weights |
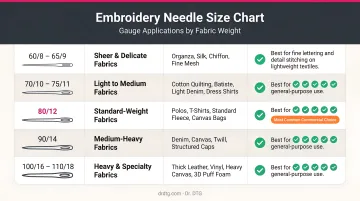
A needle too large for the fabric causes puckering regardless of tension settings.
Common Threading Mistakes to Avoid
Most threading problems come down to the same handful of errors. Watch for these before you run a stitch:
- Power off or engage E-Stop before touching the needle area — never thread with the machine active
- Skipping the take-up lever eye causes immediate bird nesting; rotate the handwheel and watch the thread travel to confirm
- Missing the check spring leaves loops on the embroidery surface; the spring should visibly deflect when you pull the thread
- Counter-clockwise bobbin winding fights the thread's Z-twist structure, leading to fraying at speed
- Under-winding the break sensor lets the thread slide over the wheel instead of spinning it, triggering false break errors
- Re-thread completely from scratch when stitch quality has been inconsistent — using the tie-on shortcut locks in the existing problem
Troubleshooting Common Threading Problems
Most threading problems fall into four symptom patterns, each pointing to a specific missed step. Identify your symptom below, then follow the targeted fix before re-threading from scratch.
Immediate Bird Nesting (Looping Under the Throat Plate)
- Cause: Take-up lever eye was missed, or thread is not seated between the main tension disks
- Fix: Re-thread the take-up lever. Then perform the disk-seating pull test to confirm thread is seated between the disks, not riding on top
Continuous False Thread-Break Errors (Machine Stops, Thread Is Intact)
- Cause: Break sensor wheel is not spinning — thread was wound fewer than the required turns or is riding on the wheel's edge
- Fix: Re-route around the sensor wheel with the correct winding count per your machine's manual. Pull thread by hand and confirm the wheel rotates before restarting
Thread Shredding or Fraying at or Near the Needle
- Cause: Burr on the needle eye, skipped thread press set guide above the needle, incorrect needle size, or counter-clockwise winding unraveling thread fiber
- Fix:
- Change the needle first — quickest diagnostic step (needles cost under a dollar each)
- Confirm thread passes through the press set guide
- Verify all winding is clockwise
- If the problem persists, pull a thread tail slowly through the entire path by hand and feel for any catch point
Loose Stitches or Bobbin Thread Visible on Top of the Design
- Cause: Top tension too low — insufficient winding around tension clamps or thread seated on top of rather than between the tension disks
- Fix: Perform the disk-seating pull test. If seating is correct but tension remains loose, add a half-turn clockwise to the upper tension. Recheck winding counts at both upper and lower clamps
Frequently Asked Questions
What is the correct thread path for a commercial embroidery machine?
The universal sequence runs from the cone through the rack guide, guide tube, pre-tension, tension assembly (upper clamp, sensor wheel, lower clamp, check spring), take-up lever, lower guides, and needle eye to the holding spring. The take-up lever is the most commonly missed point. Confirm it's threaded by rotating the handwheel and watching the thread move with the lever before stitching.
Why does my thread keep breaking on a commercial embroidery machine?
The three most common causes are a burr or wrong-sized needle, incorrect winding direction (counter-clockwise works against the thread's fiber structure), or a snag somewhere in the thread path. Start by changing the needle: it's the cheapest and fastest fix. Then trace the full path with the dental-floss pull test before adjusting any tension knobs.
How do I know if my thread tension is set correctly?
Use two methods: the dental-floss pull test (firm, smooth resistance from the needle end — no free-falling or jerking) and a back-of-embroidery inspection. A correctly balanced satin column shows approximately one-third bobbin thread down the center on the back, per Madeira's tension guide.
What is bird nesting and how do I prevent it?
Bird nesting is a tangle of looped thread under the throat plate caused by slack in the top thread, most often from missing the take-up lever eye or zero top tension (thread not seated between the disks). Prevent it by confirming both points before stitching: rotate the handwheel to verify the take-up lever, then perform the disk-seating pull test.
When should I do a full re-thread vs. using the tie-on shortcut?
Use the tie-on only when the machine was stitching correctly immediately before the color change. If the machine has been producing shredding, false break errors, or poor stitch quality, perform a full from-scratch re-thread to reset every control point. Inheriting a compromised path with the tie-on locks in the problem.
What thread weight and type works best for commercial embroidery machines?
40wt polyester is the commercial standard for its tensile strength, colorfastness, and consistent feed through tension assemblies. It feeds predictably through sensors and tension disks, reducing stops and improving output consistency. Dr. DTG stocks the full 390-color Isacord 40wt polyester catalog in 1000m and 5000m spools, with volume pricing available for commercial shops.