This guide serves as a centralized reference hub covering everything from model identification and manual sourcing to first-time setup, error code diagnosis, and maintenance scheduling. Jump directly to the section you need, or read through for a complete operational foundation.
Key Takeaways
- Happy Japan produces multiple series (HCU, HCS3, HCR3, HCD, Journey) — always match the manual to your exact model number before starting
- Free PDF operator manuals are available at happyemb.com and through authorized distributors
- E-050, E-018, and E-193 are the most common error codes; most clear with manual guidance before a technician is needed
- Lubrication intervals are hour-based, not calendar-based: one drop at the rotary hook every 8 operating hours, needle bars every 40 hours
- Complex mechanical failures and repairs under active warranty require a certified technician to protect your coverage
Happy Embroidery Machine Model Overview: Know Your Machine Before You Begin
Happy Japan Co., Ltd. manufactures a range of commercial embroidery machines in Japan, from compact single-head studio units to large multi-head production systems. Each model has its own operator manual, parts list, and support documentation — using the wrong manual creates setup errors and potential warranty issues.
Key Series at a Glance
| Series | Configuration | Primary Use Case |
|---|---|---|
| HCU / HCU2 | 15-needle, 1-head, up to 1,500 rpm | Heavy-duty commercial production; shops running high stitch counts daily |
| HCS3 (Voyager) | 12-needle, 1-head, compact | Startups and studio operators who need a compact footprint without sacrificing build quality |
| HCR3 | 15-needle per head, 2–12 heads | High-volume contract embroidery; embroiders multiple garments simultaneously |
| HCD / HCD3 | 15-needle, 1-head | Commercial single-head workhorse; well-established parts availability |
| Journey (HCH) | 7-needle, 1-head | Entry-level commercial; ideal for home-based businesses and side operations |
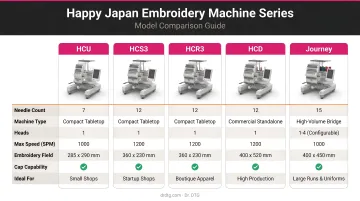
Of these series, three models are currently available through Dr. DTG: the HCH Plus (7-needle), HCD3E-X1501 (15-needle single-head), and HCR3-1504-45 (4-head, 15-needle per head) — each matched to a different production scale, from startup embroidery to high-volume contract shops.
Before downloading any manual or contacting support, locate your machine's model and serial number. This label is typically found on the machine head or rear of the machine frame. That combination of numbers determines which documentation applies to your equipment.
Where to Find Your Happy Embroidery Machine Manual
The official source for all Happy Japan operator manuals, parts lists, and technical documentation is happyemb.com. Always use model-specific documentation — a manual written for the HCU will not accurately cover the HCS3's calibration or threading path.
Official Sources for HCU, HCS3, and HCR3 Manuals
Direct PDF downloads are available at no cost:
- HCU / HCU2-1501 — HCU support page includes the operator manual and parts list with setup diagrams and threading instructions
- HCS3-1201 (Voyager) — Voyager support page covers the compact single-head Voyager series
- HCD series — HCD support page includes the HCD2-1501 and HCD3 documentation
- HCR3 multi-head — HCR3 learning resources covers the multi-head series
For older or legacy models, check the Happy legacy support page first. If documentation isn't available there, contact your authorized dealer with your serial number ready.
Secondary sources for manuals and parts lists:
- Texmac Direct — the only nationwide Happy distributor covering all 50 US states and Canada; machine support hotline at 866-838-2424
- Happy Japan USA — US-based, factory-direct access to training, parts, and tech support; contact via happyjapanusa.com
- Dr. DTG (Brea, CA) — we're an authorized Happy Japan dealer with OEM parts inventory and in-house technicians; call us at 714-770-0969 or submit a support ticket
Video Resources and Supplemental Documentation
The official Happy education portal offers video tutorials covering initial setup, threading, and maintenance. Assembly and setup videos are available for the HCU-1501 and the Journey/Voyager.
Happy Link and Happy LAN are separate software platforms for design management and machine connectivity — covering USB/LAN transfers, pattern library management, and network operation. Each has its own dedicated manual:
Setting Up Your Happy Embroidery Machine: Step-by-Step Guide
Correct initial setup prevents the majority of early errors, thread breaks, and calibration failures that new operators encounter. These steps apply across Happy machine series, but always confirm specifics in your model's operator manual.
Power, Calibration, and Safety Protocols
Most Happy machines operate on single-phase 100–115V or 200–230V — confirm your model's exact specification in the operator manual before connecting power. Check your facility's outlet type before installation.
First-boot calibration sequence:
- Release the emergency stop before powering on
- Power on the machine — the head moves through a calibration cycle
- Do not attach any hoop during calibration — this is a common mistake that causes early error codes
- Watch for mechanical confirmation that calibration completed (head returns to home position)
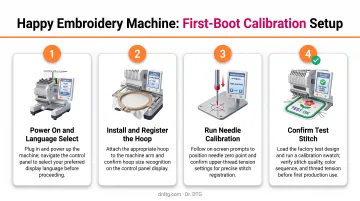
Incomplete calibration is one of the most frequent sources of early error codes on new machines. If the machine displays an error immediately after first boot, verify the hoop was removed and power-cycle the machine.
Threading, Needle, and Bobbin Setup
Threading path (follow this sequence exactly): thread stand → tension discs → take-up lever → thread guides → needle eye. The needle's flat side (scarf) must face backward toward the hook.
Needle selection:
- Happy machines use DBxK5 industrial needles — no substitutes
- Size 75/11 for general fabrics (cotton, polyester knits)
- Size 80/12 for denser materials (twill, nylon webbing, ballcap crowns)
- No tension adjustment compensates for the wrong needle size — missed stitches and thread breaks follow
Bobbin loading and tension:
- Bobbin turns clockwise in the case
- Thread through the tension slit and metal tension flap
- Perform the drop test: hold the bobbin case by the thread, dip your hand sharply downward — correct tension means the case unspools slightly, then stops
- Target tension: 23–27 grams, adjustable via the tension flap screw
Frame and Hoop Installation
With threading complete, the final step is mounting your frame. Installation steps vary by frame type:
Tubular frames:
- Secure brackets to the arm per your model's specifications
- Set guide pillars and confirm the frame seats flush before tensioning
Cap frames:
- Remove the red shipping collars from the guide bar before mounting
- Attach the frame using M4 screws at the specified torque
- Plug in the cap frame cable and confirm detection on the control panel
First-time buyers who purchase Happy Japan machines through Dr. DTG receive hands-on setup training before leaving the facility. One customer put it simply: "I took my embroidery machine home that day [and] embroidered my first hat at home. The Happy machine is so user friendly [and] the training you get before purchase makes it even better."
Troubleshooting Common Happy Embroidery Machine Errors and Issues
A useful diagnostic starting point: errors affecting all needles typically indicate a mechanical or assembly issue. Errors isolated to one needle point to a thread path or tension problem at that specific needle position.
Use this framework as your first filter when reading the error codes below — it will narrow your diagnosis before you touch anything.
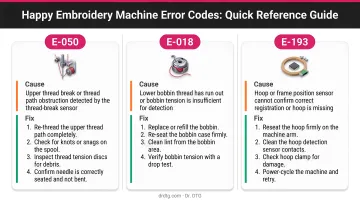
Decoding Critical Error Codes
| Error Code | Cause | Fix |
|---|---|---|
| E-050 | Main shaft not at rest position (C-Point should be at 270°) | Disable the brake in maintenance mode, remove the rear rubber caps, and rotate the main shaft with a 3mm hex wrench until the C-point aligns with the pointer |
| E-018 | Main shaft will not turn; often caused by thread buildup/birdnesting at the rotary hook | Clear thread buildup from the needle plate and rotary hook area, re-thread correctly, then recalibrate |
| E-193 | Thread catcher/catch hook not in stop position; limit switch issue | Check the catcher mechanism's stop position; if the issue persists after mechanical inspection, the detection circuit board may need evaluation by a technician |
| E-021 | Needle bar selection motor stopped midway | Return the needle-selection cam to its regular position; check the needle-selection mechanism |
| E-022 | Take-up lever or position detection problem | Inspect the take-up lever for mechanical obstruction; check the position-detecting circuit board |
| E-024 | Needle center error — needle bar stop position is off | Check the needle-selection vicinity; re-center needle bar per maintenance manual |
| E-190 | Cut blade not at stop position | Inspect the moving knife for obstructions, check the trim sensor for debris, and return the knife to stop position |
Fixing Thread Breaks and Missed Stitches
Thread path inspection checklist:
- Verify threading at tension discs, take-up lever, and needle eye
- Inspect for burrs or debris along the thread path
- Replace aged or damaged spools — old thread loses tensile strength
- Use 40-weight polyester embroidery thread for best results
Isacord 40-weight polyester — available through Dr. DTG as the USA Master Distributor — is called out by name in Happy's HCD training materials. At high operating speeds, its consistent tensile strength keeps breakage low and production running.
Rotary hook timing for missed stitches: Set the timing dial to 25 degrees, align the hook point with the needle scarf, and confirm a gap of 0.1–0.15mm between needle and hook. Over- or under-timing causes looping, missed stitches, or repeated thread breaks.
Thread Trimmer Not Cutting
Diagnostic split: If trimming fails across all needles, the problem is the cutter assembly (moving and fixed knife under the needle plate). If it fails on only one needle, investigate that needle's thread path.
To test the knife system, follow these steps:
- Remove the needle plate and access the moving knife
- Cycle through a cut test per your model's maintenance manual
- In the closed position, the moving knife should slide cleanly under the fixed knife with no visible gap
- If a gap exists, clean the knife interface thoroughly and dry completely
- Apply a thin film of white sewing machine oil — adjust the fixed knife angle only if the gap persists after cleaning
Happy Embroidery Machine Preventive Maintenance Schedule
Commercial machines running at high stitch counts accumulate lint, lose lubrication, and drift from calibration faster than home-use machines. A structured maintenance routine protects stitch quality and prevents the majority of production-disrupting breakdowns.
Weekly, Monthly, and Quarterly Checklist
| Frequency | Tasks |
|---|---|
| Weekly | Clean the rotary hook area (lint and thread debris); inspect needles and replace bent or dull ones; check thread tension balance across all needle positions |
| Monthly | Tighten loose screws; inspect belts and cables for wear; verify software/firmware is current |
| Quarterly | Deep clean internal components; verify shaft calibration; confirm all sensors are reading correctly |
For commercial operations, hour-based lubrication intervals take priority over the calendar schedule above:
- Every 8 operating hours — one drop of white sewing machine oil at the rotary hook race
- Every 40 operating hours — one drop per needle bar lubrication point and upper shaft tube
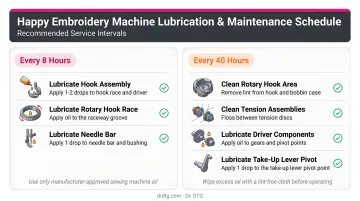
Use only white sewing machine oil at all lubrication points. Too much oil creates a lint-attracting sludge that accelerates fouling. High-volume shops should oil at the start and end of each shift.
Beyond lubrication, placement and environment matter. Keep the machine on a stable, level surface away from direct sunlight and humidity swings, and cover it when idle. A clean work area cuts lint accumulation in the hook race and tension assemblies.
When to Call a Professional: Repair Services and Expert Support
Some issues fall outside the scope of operator-level troubleshooting. Hand off to a certified technician when you encounter:
- Persistent error codes that return after manual resets
- Mechanical binding that doesn't resolve after cleaning and lubrication
- Anything involving timing belt replacement or circuit board diagnosis
- Any repair that could affect warranty compliance
The HCD2 Maintenance Manual explicitly states that adjustment, repair, or handling of electrical components requires prior technical training — treat that as a hard requirement, not a formality.
Finding certified support:
- Dr. DTG (Brea, CA) — authorized Happy Japan dealer with 20+ years of experience; on-site repair in Southern California, return-to-depot service nationwide; call 714-770-0969 or submit a ticket at drdtg.com/submit-ticket
- Texmac Direct — national Happy distributor; machine support team at 866-838-2424
- Happy Japan USA — factory-direct support via happyjapanusa.com
Have your model number, serial number, and a brief error code description ready before you call — it cuts diagnostic time significantly.
When Dr. DTG's owner John Echlin was called in after two or three other technicians failed to fix a customer's machine, the customer reported: "John did a great job and knew exactly what was wrong and fixed it quickly. He was very fair and efficient." Brand-specific experience makes the difference between a fast fix and a frustrating diagnosis.
Frequently Asked Questions
Are Happy embroidery machines good?
Happy Japan machines are reliable commercial embroidery equipment with production speeds up to 1,500 stitches per minute and service lives that regularly exceed 20 years. Models like the HCU2 and HCS3 Voyager are a common choice for professional shops that want strong performance without a steep learning curve.
Who makes Happy embroidery machines?
Happy embroidery machines are manufactured by Happy Japan Co., Ltd., a Japanese company producing commercial embroidery equipment at a factory in northern Japan. In the US, machines are distributed through Texmac Direct (nationwide), Happy Japan USA, and authorized dealers like Dr. DTG.
Where can I download my Happy embroidery machine manual?
Start at happyemb.com — navigate to the Support section and select your machine series. Have your model number and serial number ready before searching, as documentation is organized by specific model variant. Your authorized dealer is a reliable secondary source if the portal doesn't have your specific document.
What are the most common Happy embroidery machine error codes?
The most frequently encountered codes are E-050 (main shaft position error), E-018 (main shaft won't turn, often caused by thread buildup), and E-193 (thread catcher mechanism issue). Most resolve by following the step-by-step procedures in your operator manual or the troubleshooting table in this guide.
How often should I service my Happy embroidery machine?
Operator-level cleaning and lubrication follows an hour-based schedule: every 8 hours for the hook and every 40 hours for needle bars. For professional inspections, the right frequency depends on your stitch volume, so check with your authorized dealer based on your production level.
What thread should I use in a Happy embroidery machine?
40-weight polyester is the standard for Happy commercial machines. Isacord 40-weight polyester is specifically referenced in Happy's HCD training materials and is widely used in high-speed commercial production for its tensile strength and low breakage rate. Dr. DTG, the US Master Distributor of Isacord, stocks all 390 colors in 1000m and 5000m spools.