What makes threading tricky isn't complexity — it's the small errors that compound. A skipped guide here, the presser foot left down there, a bobbin inserted backward — any one of these produces problems that look like mechanical failures but trace back to a 30-second oversight. Even experienced operators miss steps when rushing.
This guide covers exactly what to prepare before you start, the step-by-step threading sequence, key variables that affect results after threading, common mistakes, and how to fix the most frequent issues that come up.
Key Takeaways
- Always start with the presser foot raised and the machine powered off before touching any thread
- Thread the upper path through every numbered guide in sequence; skipping the take-up lever causes immediate bird nesting
- Bobbin direction matters as much as upper thread path — verify orientation against your machine diagram
- Thread quality affects tension consistency — use 40-weight polyester like Isacord for reliable feeding
- A test stitch on scrap fabric catches threading errors before they ruin your finished work
What You Need Before Threading Your Embroidery Machine
Skipping the pre-threading setup stage is the root cause of most problems before the machine even starts. Two minutes here prevents far more lost time once stitching starts.
Machine and Workspace Readiness
Before touching any thread:
- Power off the machine — threading with the machine on creates safety risks and can trigger false thread-break errors
- Raise the presser foot lever fully — this is mechanically necessary for proper thread seating in the tension discs
- Rotate the handwheel to bring the needle to its highest position
- Inspect the needle — dull, bent, or wrong-size needles cause thread shredding and skipped stitches; for most commercial multi-needle machines with 40-weight thread, a size 75/11 needle is the standard starting point (Madeira's needle specifications confirm #65/9 to #75/11 covers the majority of 40-weight work — always verify against your machine manual for specialty fabrics or threads)
With your machine ready, gather your thread and bobbins before starting.
Thread and Bobbin Materials
- Use 40-weight polyester embroidery thread as the standard for machine embroidery
- Thread consistency directly affects tension behavior — Impressions Magazine's 2025 thread overview notes that poor-quality thread causes downtime through breaks, lint buildup, and tension fluctuations
- Isacord Thread (available through Dr. DTG, the US Master Distributor) is a 40-weight German-made polyester thread widely used in commercial embroidery shops for its consistent tension behavior at production speeds
For bobbins:
- Confirm your bobbin class matches the machine — L, M, and A classes are not interchangeable
- Bobbin compatibility varies by model — verify against your machine manual or contact the manufacturer
- Pre-wound bobbins work well for production settings; self-wound bobbins allow custom color matching on the backing side
How to Thread Your Embroidery Machine Step by Step
Thread paths vary by machine brand and model. The sequence below reflects the universal structure followed by most single- and multi-needle commercial machines. Cross-reference your machine manual for numbered guide locations specific to your model.
Step 1: Prepare the Machine
- Power off the machine completely
- Raise the presser foot lever fully (the single most commonly skipped step), which affects how thread seats in the tension assembly
- Rotate the handwheel toward you to bring the needle to its highest position
- Confirm the take-up lever is also at its highest point before beginning the thread path
Step 2: Set Up the Thread Spool
- Place the spool on the spool pin in the orientation shown in your machine diagram — most machines unwind thread counterclockwise
- Use the correct spool cap size to prevent thread from tangling at the pin base
- For large production cones, use an external thread stand positioned above machine height for a smooth, consistent feed
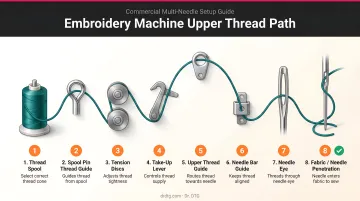
Step 3: Thread the Upper Path
This is where most errors happen. Follow the numbered guides in exact order — no shortcuts.
The typical sequence runs: spool holder → first guide → pre-tension hook → tension disc assembly → take-up lever → lower thread guides → needle.
Critical points:
- Every guide must be physically engaged — thread passing beside a guide instead of through it causes immediate tension inconsistency
- The take-up lever controls thread flow during stitch formation; skipping it feeds excess thread into the bobbin area and is a leading cause of bird nesting
- Thread the needle front to back (or per your machine's specification)
- If using an auto-threader, follow the lever mechanism precisely; use tweezers for needle-threading precision
After threading, gently tug the thread — you should feel light, consistent resistance. No resistance means a guide has been missed.
Step 4: Thread and Install the Bobbin
- Insert the bobbin in the orientation shown in your machine diagram (Barudan: bobbin rotates clockwise when pulled; Melco: thread comes over the top-right, then routes through the slot and under the tension spring)
- Pull the thread through the tension slot and under the spring clip until it seats firmly
- Lower and raise the needle once to catch the bobbin thread through the needle plate
- Draw both threads toward the back of the machine before hooping fabric
- Run a test stitch on scrap fabric with the same stabilizer you'll use for the actual project
Key Variables That Affect Threading Quality
Threading gets the thread into your machine — these variables determine whether it stays there and runs cleanly through every stitch.
Thread Tension Setting
| Symptom | Likely Cause |
|---|---|
| Bobbin thread visible on top of fabric | Upper tension too tight |
| Upper thread loops visible under fabric | Upper tension too loose |
| Balanced thread on both sides | Correct calibration |
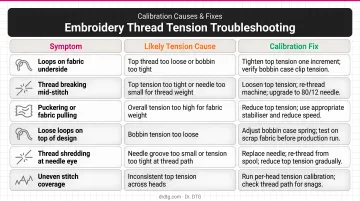
Tension must be calibrated to thread weight and fabric type after every thread change. Always test on scrap fabric with matching stabilizer — never on the final project.
Needle Type and Condition
A mismatched or worn needle shreds thread, skips stitches, and damages fabric — producing symptoms that mimic tension problems.
- Replace needles approximately every 8 hours of continuous stitching — this is trade guidance from Impressions Magazine (2024), not a universal OEM rule; Barudan notes that replacement intervals vary by application
- Replace immediately if the needle strikes the hoop, needle plate, or any hard surface — even minor bending causes skipped stitches
- If you experience three thread breaks in quick succession, replace the needle before diagnosing anything else
Dr. DTG stocks Groz-Beckert 80/12 KK needles (standard point for single and multi-head embroidery) in boxes of 100, suitable for standard 40-weight embroidery thread on most fabric types.
Thread Path Engagement and Spool Orientation
- If thread feels loose with no resistance after threading, at least one guide has been missed — rethread from the spool
- Thread unwinding in the wrong direction creates friction no tension dial can fully correct
- Always verify spool cap direction and bobbin thread pull direction against the machine diagram before starting any project
Common Threading Mistakes to Avoid
| Mistake | What Goes Wrong |
|---|---|
| Presser foot left down during threading | Thread appears loaded but may not be properly seated — leads to immediate tangles |
| Threading out of sequence | Jumping between guides or skipping the take-up lever causes bird nesting |
| Wrong bobbin class or overfilled bobbin | Persistent tension imbalance frequently misdiagnosed as an upper thread problem |
| No test stitch before production | Undetected threading errors destroy finished goods |
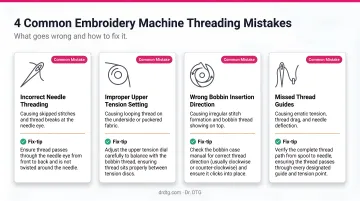
Of these, the one that wastes the most time is rushing a color change — skipping two guides and then spending 20 minutes chasing what looks like a mechanical fault. Threading every needle in sequence, every single time, is the only habit that prevents it.
Troubleshooting Common Threading Problems
Even careful threading produces issues when switching thread types, after a needle change, or after extended use. Work through each issue systematically: most have a straightforward cause.
Thread Breaking Repeatedly
Steps:
- Rethread the entire upper path from scratch with presser foot raised
- Replace the needle — especially if you've had multiple breaks in quick succession
- Inspect thread guides for rough spots, burrs, or lint buildup
- Check thread quality — inconsistent weight or twist in lower-grade threads contributes directly to breaks
Bird Nesting Under the Fabric
Bird nesting occurs when the upper thread fails to engage the bobbin thread, allowing excess thread to feed into the bobbin area.
Steps:
- Remove fabric and stabilizer, then fully rethread the upper path — confirm the take-up lever is engaged
- Re-insert the bobbin with correct orientation
- Run a test on scrap material before rehooping
Skipped Stitches
Steps:
- Replace the needle — a bent or dull needle is the leading cause
- Confirm the needle is pushed all the way up into the clamp before tightening
- Verify the flat side of the needle shank faces the correct direction per your machine manual
Machine Stops with Thread Error Despite Correct Threading
Steps:
- Trace the thread path and confirm it passes through all sensor loops or slots — most commercial machine manuals flag the thread-break detector wheel as a common miss
- Clean sensors with a dry lint-free swab; lint and oil residue cause false positives
- For ongoing sensor or mechanical issues on commercial machines, contact Dr. DTG's support team at 714-770-0969 or submit a ticket at drdtg.com/submit-ticket
Frequently Asked Questions
How do I know if my embroidery machine is threaded correctly?
After threading, gently tug the thread. Correct threading produces light, consistent resistance, confirming the tension discs are engaged. Run a test stitch on scrap fabric with matching stabilizer; balanced thread on both sides with no loops or breaks confirms you're good to go.
Why does my thread keep breaking even after re-threading?
The most common causes are a dull or wrong-size needle, a burr or rough spot in a thread guide, incorrect tension setting for the thread weight, or inconsistent lower-grade thread. Replace the needle first, then inspect each guide point for damage or lint buildup.
Do I need to re-thread my machine when changing colors or designs?
Yes. Color changes require rethreading the full upper path with the presser foot raised. Don't stop at the needle; go back to the spool to ensure every guide is correctly engaged for the new thread. Also check the bobbin for remaining thread supply.
What is the correct way to insert and orient a bobbin?
Insert the bobbin so the thread unwinds in the direction shown in your machine diagram. Barudan specifies clockwise rotation when thread is pulled; Melco specifies thread coming over the top and to the right. Pull the thread firmly through the tension slot and under the spring clip until it seats.
Does thread brand or quality affect how my machine runs?
Thread quality directly affects machine performance. Isacord is engineered with consistent twist and weight to feed smoothly through guides at high speed, drastically reducing loops, puckering, and breaks. Inconsistent lower-grade threads cause tension fluctuations, breakage, and color fading over time.
How often should I replace the needle on my embroidery machine?
Replace needles approximately every 8 hours of continuous stitching, or at the start of each new project. Replace immediately if the needle strikes the hoop, needle plate, or any hard surface — even slight bending causes skipped stitches that are difficult to diagnose without swapping the needle first.